In This Chapter
Understanding the difference between Sub procedures and Function procedures Executing Sub procedures (many ways) Executing Function procedures (two ways)
Several times in preceding chapters I mention Sub procedures and allude to the fact that Function procedures also play a role in VBA. In this chapter, I clear up confusion about these concepts.
Subs Versus Functions
The VBA code that you write in the Visual Basic Editor is known as a procedure. The two most common types of procedures are Sub and Function.
A Sub procedure is a group of VBA statements that performs an action (or actions) with Excel.
A Function procedure is a group of VBA statements that performs a calculation and returns a single value.
Most of the macros you write in VBA are Sub procedures. You can think of a Sub as being like a command: Execute the Sub procedure and something happens. (Of course, exactly what happens depends on the Sub procedure’s VBA code.)
A Function is also a procedure, but it’s quite different from a Sub. You’re already familiar with the concept of a function. Excel includes many worksheet functions that you use every day (well, at least every weekday). Examples include SUM, PMT, and VLOOKUP. You use these worksheet functions in formulas. Each function takes one or more arguments (although a few functions don’t use any arguments). The function does some behind-the-scenes calculations and returns a single value. The same goes for Function procedures that you develop with VBA.
Looking at Sub procedures
Every Sub procedure starts with the keyword Sub and ends with an End Sub statement. Here’s an example:

This example shows a procedure named ShowMessage. A set of parentheses follows the procedure’s name. In most cases, these parentheses are empty. However, you may pass arguments to Sub procedures from other procedures. If your Sub uses arguments, list them between the parentheses.
When you record a macro with the Excel macro recorder, the result is always a Sub procedure.
As you see later in this chapter, Excel provides quite a few ways to execute a VBA Sub procedure.
Looking at Function procedures
Every Function procedure starts with the keyword Function and ends with an End Function statement. Here’s a simple example:

This function, named CubeRoot, takes one argument (named number), which is enclosed in parentheses. Functions can have any number of arguments or none at all. When you execute the function, it returns a single value — the cube root of the argument passed to the function.
VBA allows you to specify what type of information is returned by a Function procedure. Chapter 7 contains more information on specifying data types.
You can execute a Function procedure in only two ways. You can execute it from another procedure (a Sub or another Function procedure) or use it in a worksheet formula.
You can’t use the Excel macro recorder to record a Function procedure. You must manually enter every Function procedure that you create.
Naming Subs and Functions
Like humans, pets, and hurricanes, every Sub and Function procedure must have a name. Although it is perfectly acceptable to name your dog Hairball Harris, it’s usually not a good idea to use such a freewheeling attitude when naming procedures. When naming procedures, you must follow a few rules:
You can use letters, numbers, and some punctuation characters, but the first character must be a letter.
You can’t use any spaces or periods in the name.
VBA does not distinguish between uppercase and lowercase letters.
You can’t embed any of the following characters in a name: #, $, %, &, A, *, or !.
If you write a Function procedure for use in a formula, make sure the name does not look like a cell address (for example, AC12).
Names can be no longer than 255 characters. (Of course, you would never make a procedure name this long.)
Ideally, a procedure’s name should describe the routine’s purpose. A good practice is to create a name by combining a verb and a noun — for example, Process Data, Print Report, Sort_Array, or Check Filename.
Some programmers prefer using sentence like names that provide a complete description of the procedure. Some examples include Write Report To Text File and Get_Print_Options_and_Print_Report. The use of such lengthy names has its pros and cons. On the one hand, such names are descriptive and unambiguous. On the other hand, they take longer to type. Everyone develops a naming style, but the main objectives should be to make the names descriptive and to avoid meaningless names such as DoIt, Update, and Fix.
Executing Sub Procedures
Although you may not know much about developing Sub procedures at this point, I’m going to jump ahead a bit and discuss how to execute these procedures. This is important because a Sub procedure is worthless unless you know how to execute it.
By the way, executing a Sub procedure means the same thing as running or calling a Sub procedure. You can use whatever terminology you like.
You can execute a VBA Sub in many ways — that’s one reason you can do so many useful things with Sub procedures. Here’s an exhaustive list of the ways (well, at least all the ways I could think of) to execute a Sub procedure:
With the Run Run Sub/User Form command (in the VBE). Excel executes the Sub procedure at the cursor position. This menu command has two alternatives: The F5 key, and the Run Sub/User Form button on the Standard toolbar in the VBE. These methods don’t work if the procedure requires one or more arguments.
From Excel’s Macro dialog box (which you open by choosing Tools Macro Macros). Or you can press the Alt+F8 shortcut key. When the Macro dialog box appears, select the Sub procedure you want and click Run. This dialog box lists only the procedures that don’t require an argument.
Using the Ctrl+key shortcut assigned to the Sub procedure (assuming you assigned one).
Clicking a button or a shape on a worksheet. The button or shape must have a Sub procedure assigned to it.
From another Sub procedure that you write.
From a Toolbar button. (See Chapter 19.)
From a custom menu you develop. (See Chapter 20.)
Automatically, when you open or close a workbook. (See Chapter 11.)
When an event occurs. As I explain in Chapter 11, these events include saving the workbook, making a change to a cell, activating a sheet, and other things.
From the Immediate window in the VBE. Just type the name of the Sub procedure and press Enter.
I demonstrate some of these techniques in the following sections. Before I can do that, you need to enter a Sub procedure into a VBA module.
1. Start with a new workbook.
2. Press Alt+F11 to activate the VBE.
3. Select the workbook in the Project window.
4. Choose Insert Module to insert a new module.
5. Enter the following into the module:

This simple procedure asks the user for a number and then displays that number’s cube root in a message box. Figures 5-1 and 5-2 show what happens when you execute this procedure.
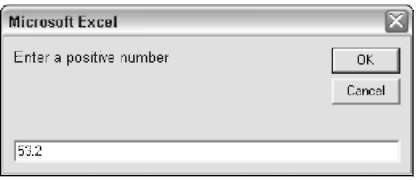
Figure 5-1:
Using the built-in VBA Input Box function to get a number.
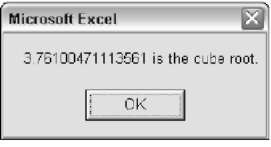
Figure 5-2:
Displaying the cube root of a number via the MsgBox function.
By the way, CubeRoot is not an example of a good macro. It doesn’t check for errors, so it fails easily. To see what I mean, try clicking the Cancel button in the input box or entering a negative number.
Executing the Sub procedure directly
The quickest way to execute this procedure is by doing so directly from the VBA module in which you defined it. Follow these steps:
1. Activate the VBE and select the VBA module that contains the procedure.
2. Move the cursor anywhere in the procedure’s code
3. Press F5 (or choose Run Run Sub/User Form).
4. Respond to the input box and click OK.
The procedure displays the cube root of the number you entered.
You can’t use the Run Run Sub/User Form command to execute a Sub procedure that uses arguments because you have no way to pass the arguments to the procedure. If the procedure contains one or more arguments, the only way to execute it is to call it from another procedure — which must supply the argument(s).
Executing the procedure from the Macro dialog box
Most of the time, you execute Sub procedures from Excel, not from the VBE. The steps below describe how to execute a macro using Excel’s Macro dialog box.
1. Activate Excel.
Alt+F11 is the express route.
2. Choose Tools Macro Macros (or press Alt+F8). Excel displays the dialog box shown in Figure 5-3.
3. Select the macro.
4. Click Run (or double-click the macro’s name in the list box).
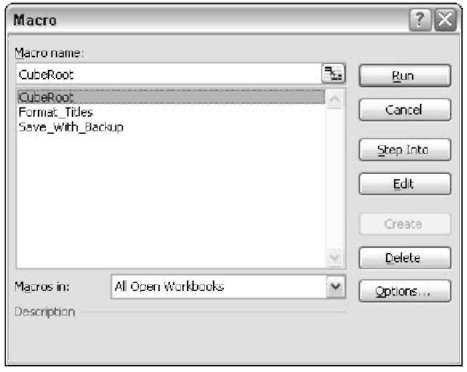
Figure 5-3:
The Macro dialog box lists all available Sub procedures.
Executing a macro using a shortcut key
Another way to execute a macro is to press its shortcut key. But before you can use this method, you have to set things up. Specifically, you must assign a shortcut key to the macro.
You have the opportunity to assign a shortcut key in the Record Macro dialog box when you begin recording a macro. If you create the procedure without using the macro recorder, you can assign a shortcut key (or change an existing shortcut key) using the following procedure:
1. Choose Tools Macro Macros.
2. Select the Sub procedure name from the list box.
In this example, the procedure is named CubeRoot.
3. Click the Options button.
Excel displays the dialog box shown in Figure 5-4.
4. Click the Shortcut Key option and enter a letter in the box labeled Ctrl.
The letter you enter corresponds to the key combination you want to use for executing the macro. For example, if you enter the letter c, you can then execute the macro by pressing Ctrl+C. If you enter an uppercase letter, you need to add the Shift key to the key combination. For example, if you enter C, you can execute the macro by pressing
Ctrl+Shift+C.
5. Click OK or Cancel to close the Macro Options dialog box.
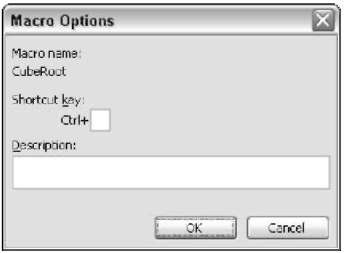
Figure 5-4:
The Macro Options dialog box lets you set options for your macros.
After you’ve assigned a shortcut key, you can press that key combination to execute the macro.
The shortcut keys you assign to macros override Excel’s built-in shortcut keys. For example, if you assign Ctrl+C to a macro, you can’t use this shortcut key to copy data in your workbook. This is usually not a big deal because Excel always provides other ways to execute commands.
Executing the procedure from a button or shape
You can create still another means for executing the macro by assigning the macro to a button (or any other shape) on a worksheet. To assign the macro to a button, follow these steps:
1. Activate a worksheet.
2. Add a button from the Forms toolbar.
To display the Forms toolbar, right-click any toolbar and choose Forms from the shortcut menu.
3. Click the Button tool on the Forms toolbar.
4. Drag in the worksheet to create the button.
After you add the button to your worksheet, Excel jumps right in and displays the Assign Macro dialog box shown in Figure 5-5.
5. Select the macro you want to assign to the button.
6. Click OK.
Clicking the button will execute the macro.
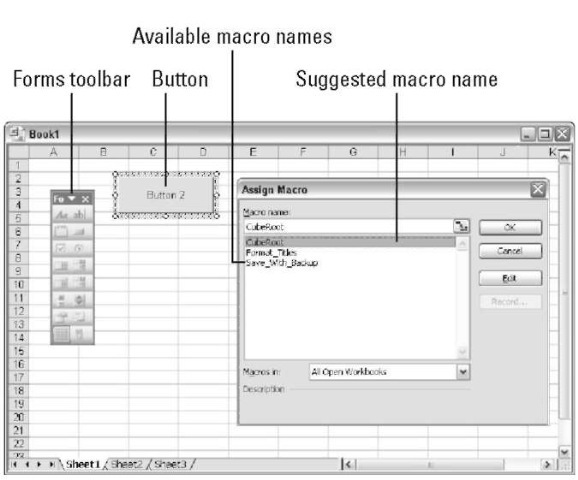
Figure 5-5:
When you add a button to a worksheet, Excel automatically displays the Assign Macro dialog box.
You can also assign a macro to any other shape or object. For example, assume you’d like to execute a macro when the user clicks a Rectangle object.
1. Add the Rectangle to the worksheet.
Use the Rectangle button on the Drawing toolbar.
2. Right-click the rectangle.
3. Choose Assign Macro from its shortcut menu.
4. Select the macro from the Assign Macro dialog box.
5. Click OK.
After performing these steps, clicking the rectangle will execute the macro.
Executing the procedure from another procedure
You can also execute a procedure from another procedure. Follow these steps if you want to give this a try:
1. Activate the VBA module that holds the CubeRoot routine.
2. Enter this new procedure (either above or below CubeRoot code — it makes no difference):

3. Execute the NewSub macro.
The easiest way to do this is to move the cursor anywhere within the NewSub code and press F5. Notice that this NewSub procedure simply executes the CubeRoot procedure.
By the way, the keyword Call is optional. The statement can consist of only the Sub procedure’s name. I find, however, that using the Call keyword makes it perfectly clear that a procedure is being called.
Executing Function Procedures
Functions, unlike Sub procedures, can be executed in only two ways:
By calling the function from another Sub procedure or Function procedure
By using the function in a worksheet formula
Try this simple function. Enter it into a VBA module:

This function is pretty wimpy — it merely calculates the cube root of the number passed to it as its argument. It does, however, provide a starting point for understanding functions. It also illustrates an important concept about functions: how to return the value that makes functions so important. (You remember that functions return values, right?)
Notice that the single line of code that makes up this Function procedure is a formula. The result of the math (number to the power of 1/3) is assigned to the variable CubeRoot. Notice that Squared CubeRoot is the function name, as well. To tell the function what value to return, you assign that value to the name of the function.
Calling the function from a Sub procedure
Because you can’t execute this function directly, you must call it from another procedure. Enter the following simple procedure in the same VBA module that contains the CubeRoot function:

When you execute the CallerSub procedure (using any of the methods describes earlier in this chapter), Excel displays a message box that contains the value of the Ans variable, which is 5.
Here’s what’s going on: The CubeRoot function is executed using an argument of 125. The function returns a value. That value is assigned to the Ans variable. The MsgBox function then displays the value in the Ans variable. Try
changing the argument that’s passed to the CubeRoot function and run the CallerSub macro again. It works just like it should.
By the way, the CallerSub procedure could be simplified a bit. The Ans variable is not really required. You could use this single statement to obtain the same result:
![]()
Calling a function from a worksheet formula
Now it’s time to call this VBA Function procedure from a worksheet formula. Activate a worksheet in the same workbook that holds the CubeRoot function definition. Then enter the following formula into any cell:
![]()
The cell displays 12, which is indeed the cube root of 1728.
As you might expect, you can use a cell reference as the argument for the CubeRoot function. For example, if cell A1 contains a value, you can enter =CubeRoot(A1). In this case, the function returns the number obtained by calculating the cube root of the value in A1.
You can use this function any number of times in the worksheet. As with Excel’s built-in functions, your custom functions also appear in the Insert Function dialog box. Click the Insert Function toolbar button and choose the User Defined category. As shown in Figure 5-6, the Insert Function dialog box lists your very own function.
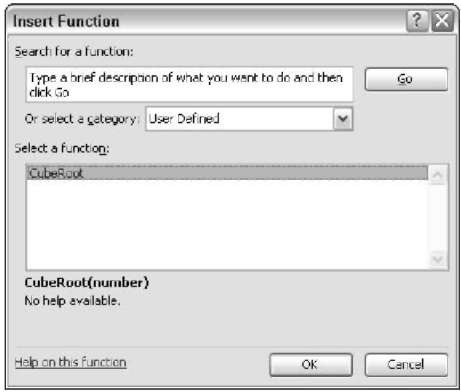
Figure 5-6:
The CubeRoot function appears in the User Defined category of the Insert Function dialog box.
If you want the Insert Function dialog box to display a description of the function, follow these steps:
1. Choose Tools Macro Macros.
Excel displays the Macro dialog box, but CubeRoot doesn’t appear in the list. (CubeRoot is a Function procedure, and this list shows only Sub procedures.) Don’t fret.
2. Type the word CubeRoot in the Macro Name box.
3. Click the Options button.
4. Enter a description of the function in the Description box.
5. Close the Macro Options dialog box.
6. Close the Macro dialog box by clicking the Cancel button.
This descriptive text now appears in the Insert Function dialog box.
By now, things may be starting to come together for you. (I wish I had had this topic when I was starting out.) You’ve found out lots about Sub and Function procedures. You start creating macros in Chapter 6, which discusses the ins and outs of developing macros using the Excel macro recorder.
