In This Chapter
Displaying the Insert Function dialog box
Finding the function you need
Using functions that don’t take arguments
Getting help with functions
Using the Function Arguments dialog box
Excel has so many functions that it’s both a blessing and a curse. You can do many things with Excel functions — if you can remember them all! Even if you remember many function names, memorizing all the arguments the functions can use is a challenge.
Don’t forget — arguments are pieces of information that functions use to calculate and return a value.
Never fear: Microsoft hasn’t left you in the dark with figuring out which arguments to use. Excel has a great utility to help insert functions, and their arguments, into your worksheet. This makes it a snap to find and use the functions you need. You’ll save both time and headaches, and make fewer errors to boot — so read on!
Getting Familiar with the Insert Function Dialog Box
The Insert Function dialog box (shown in Figure 2-1) is designed to simplify the task of using functions in your worksheet. The dialog box not only helps you locate the proper function for the task at hand, but also provides information about the arguments that the function takes. If you use the Insert Function dialog box, you don’t have to type functions directly into worksheets cells. Instead the dialog box guides you through a (mostly) point-and-click procedure — a good thing, because if you’re anything like us, you need all the help you can get!
In the Insert Function dialog box, you can browse functions by category, or scroll the complete alphabetical list. A search feature — where you type a phrase in the Search for a Function box, click the Go button, and see what comes up — is helpful. When you highlight a function in the Select a Function box, a brief description of what the function does is displayed under the list (ABS is selected in Figure 2-1). You can also click the Help on This Function link at the bottom of the dialog box to view more detailed information about the function.
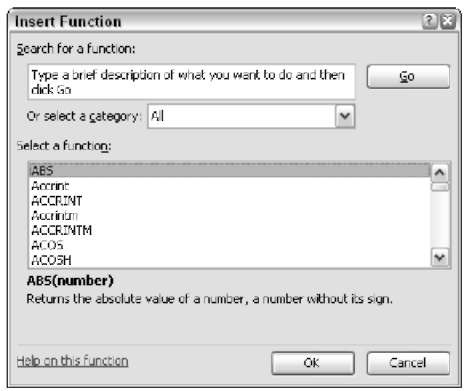
Figure 2-1:
Use the Insert Function dialog box to easily enter functions in a worksheet.
You can display the Insert Function dialog box in three ways:

Choose Insert Function.
On the Formula Bar, click the Insert Function button (which looks like f).
On the Standard toolbar, click the AutoSum arrow-down next to the button and select More Functions (see Figure 2-2). The AutoSum button has a list of commonly used functions that you can insert with a click. If you select More Functions, the Insert Function dialog box opens.
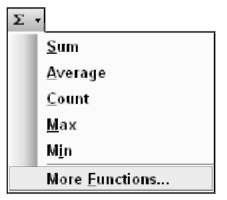
Figure 2-2:
The AutoSum button offers quick access to basic functions and the Insert Function dialog box.
Finding the Correct Function
The first step to using a function is finding the one you need! Even when you do know the one you need you may not remember all the arguments it takes. You can find a function in the Insert Function dialog box in two ways:
Search: Type one or more keywords or a phrase into the Search for a Function box. Then click the Go button. If Excel is able to find any matches on your entry, the Select a Function list in the dialog box will be filled with the matched functions, and the Or Select a Category dropdown list will display Recommended, and the Select a Function box will display a list of the functions that match your search. If no match is made, the Or Select a Category drop-down list will display Most Recently Used functions, and the most recently used functions will appear in the Select a Function dialog box.
Browse: Click the Or Select a Category down-arrow and from the dropdown list, select All or select an actual function category. When an actual category is selected, the Select a Function box will update to just the relevant functions. You can look through the list to find the function you want.
Table 2-1 lists the categories in the Or Select a Category drop-down list. Finding the function you need is different from knowing which function you need. Excel is great at giving you the functions, but you do need to know what to ask for.
| Table 2-1 Function Categories in the Insert Function Dialog Box | |
| Category | Type of Functions |
| Most Recently Used | The last several functions you used |
| All | The entire function list, sorted alphabetically |
| Financial | Functions for managing loans, analyzing investments, and |
| so forth | |
| Date & Time | Functions for calculating days of the week, elapsed time, |
| and so forth | |
| Math & Trig | A considerable number of mathematical functions |
| Statistical | Functions for using descriptive and inferential statistics |
| Lookup & Reference | Functions for obtaining facts about and data on |
| worksheets | |
| Database | Functions for selecting data in structured rows and |
| columns | |
| Text | Functions for manipulating and searching text values |
| Logical | Boolean functions (AND, OR, and so forth) |
| Information | Functions for getting facts about worksheet cells and the |
| data therein | |
| User Defined | Any available custom functions created in VBA code or |
| from add-ins {Note: This category may not be listed.) | |
| Engineering | Functions provided by the optional Analysis ToolPak |
| {Note: This category may not be listed.) | |
Entering Functions Using the Insert Function Dialog Box
Now that you’ve seen how to search for or select a function, it’s time to use the Insert Function dialog box to actually insert a function. The Insert Function dialog box makes it easy to both enter functions that take no arguments and functions that do take arguments. Either way the dialog box guides you through the process of entering the function.
Sometimes function arguments are not values but instead are references to cells or ranges. That this is also handled in the Insert Function dialog box makes it use so beneficial.
Selecting a function that takes no arguments
Some functions return a value, period. No arguments are needed for these ones. This means you don’t have to have some arguments ready to go. What could be easier? Here’s how to enter a function that does not take any arguments. For this example we are using the TODAY function:
1. Position the cursor in the cell where you want the results to appear.
2. Choose Insert O Function to open the Insert Function dialog box.
3. Select All in the Or Select a Category drop-down list.
4. Scroll through the Select a Function list until you see the TODAY function and click it once.
We’ve been walking through these steps too and Figure 2-3 shows what our screen looks like.
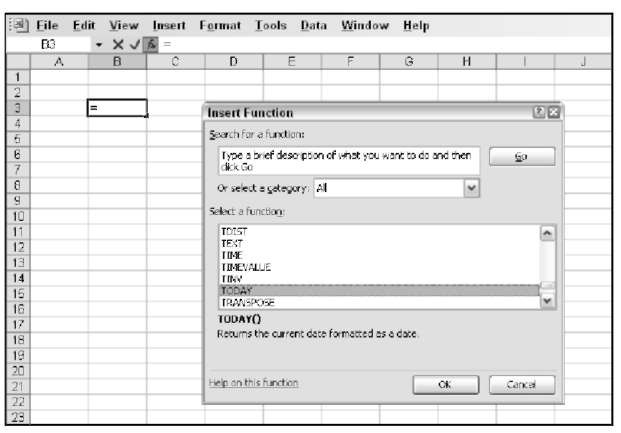
Figure 2-3:
Selecting a function.
5. Click the OK button.
The Insert Function dialog box closes and the Function Arguments dialog box opens. The dialog box tells you that function does not take any arguments. Figure 2-4 shows how the screen now looks.
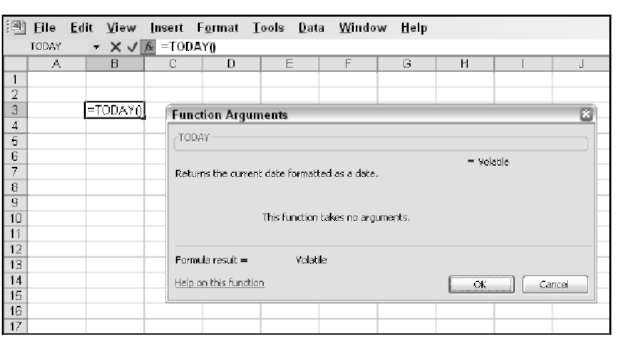
Figure 2-4:
Confirming no arguments exist with the Function Arguments dialog box.
6. Click the OK button.
This closes the Function Arguments dialog box and the function entry is complete.
You may have noticed that the Function Arguments dialog box says the Formula result will equal “Volatile.” This is nothing to be alarmed about! This just means the answer can be different each time you use the function.
Figure 2-5 shows how the result of the function has been returned to the worksheet. Cell B3 displays the date at the time we wrote this example. The date you see will be the current date.
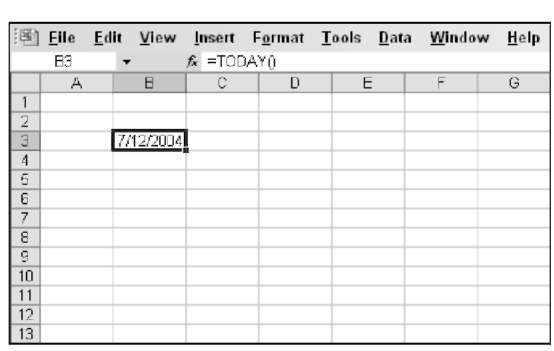
Figure 2-5:
Populating a worksheet cell with today’s date.
Most functions do take arguments. The few that do not take arguments are able to return a result without needing any information to do so. For example the TODAY function just returns the current date. It doesn’t need any information to figure this out.
Selecting a function that takes arguments
Most functions take arguments to provide the information the function needs to perform its calculation. Some functions take a single argument, others take many. Taking an argument means the function uses the argument. Taking arguments or using arguments means the same thing.
Most functions take arguments, but the number of arguments depends on the actual function. Some take a single argument and some can take up to 30.
In the following example, we show how to use the Insert Function dialog box to enter a function that does use arguments. The example uses the PRODUCT function. Here’s how to enter the function and its arguments:
1. Position the cursor in the cell where you want the results to appear.
2. Choose Insert O Function to open the Insert Function dialog box.
3. Select Math & Trig in the Or Select a Category drop-down list.
4. Scroll through the Select a Function list until you see the PRODUCT function and then click on it once.
We’ve been taking these steps too and Figure 2-6 shows what our screen now looks like.
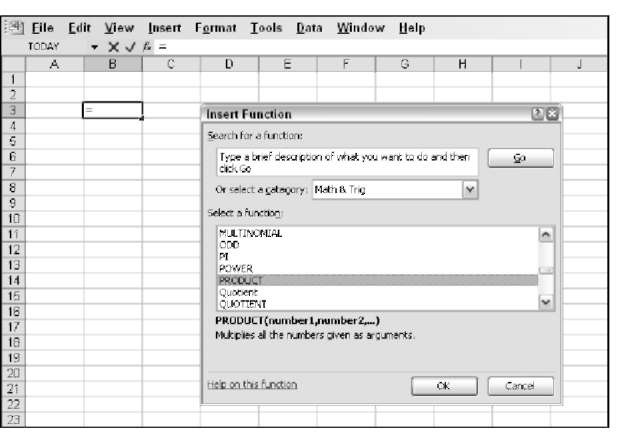
Figure 2-6:
Preparing to multiply some numbers with the PRODUCT function.
5. Click the OK button.
The Insert Function dialog box closes and the Function Arguments dialog box opens. Figure 2-7 shows what our screen looks like. The dialog box tells you that this function can take up to 30 arguments, yet there appears to be room for only 2. As you enter arguments the dialog box will expand to make room for more.
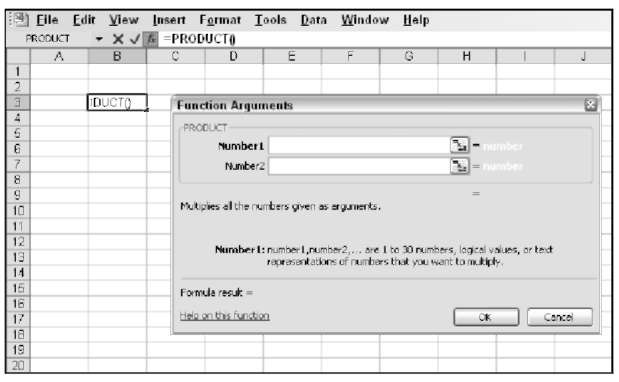
Figure 2-7:
Ready to input function arguments.
6. In the Function Arguments dialog box, enter a number in the Number 1 box and enter another number in the Number 2 box.
These are actual arguments you are entering. As you enter numbers the dialog box expands to allow additional arguments to be entered. Enter as many as you like, up to 30. Figure 2-8 shows how we entered 4 arguments. Also look at the bottom left of the dialog box. As you enter functions the Formula result is instantly calculated. Wouldn’t it be nice to be that smart!
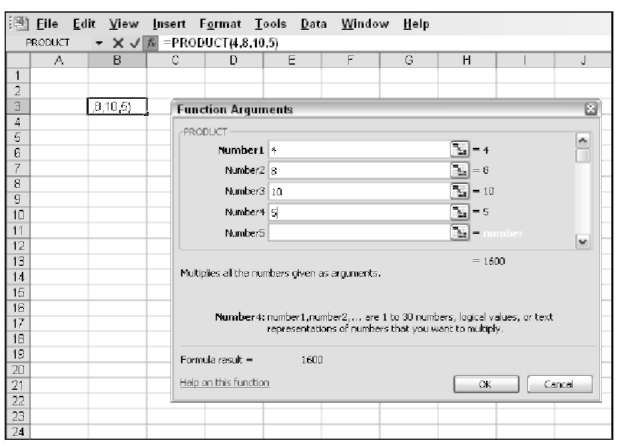
Figure 2-8:
Getting instant results in the Function Arguments dialog box.
7. Click OK to complete the function entry.
Figure 2-9 shows our worksheet with the returned result.
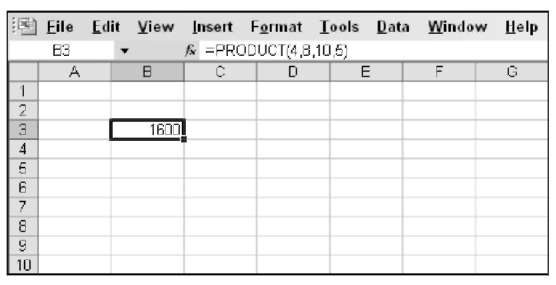
Figure 2-9:
Getting the final answer from the function.
Entering cell and range references as function arguments
Excel is so cool. Not only can you provide single cell references as arguments, but in many cases you can enter an entire range reference into a single argument! And what’s more, you can enter these arguments using either the keyboard or the mouse.
This example demonstrates using both single cell references and a range reference as arguments. For this example we use the SUM function. Here is how to use the Insert Function dialog box to enter the function and its arguments:
1. Enter some values in a worksheet, at least ten values in a column.
2. Select the cell where you want the result to go.
3. Choose Insert O Function to open the Insert Function dialog box.
4. In the dialog box, select the SUM function.
You may have to first select All or Math & Trig from the Or Select a Category drop-down list.
5. Click OK.
The Function Arguments dialog box opens. To the right of each Number box is a small fancy button — a special Excel control sometimes called the RefEdit. It allows you to leave the dialog box, select a cell or range on the worksheet, and then go back into the dialog box. Whatever cell or range you click or drag over on the worksheet is brought into the entry box as a reference.
You can type cell and range references directly into the Number boxes as well. The RefEdit controls are there for you to use if you want.
6. Click directly on the first RefEdit.
The dialog box shrinks so that the only thing visible is the field where you enter data.
7. Click a cell on the worksheet that has a number you entered previously.
8. Press the Enter key.
Your screen should look similar to the one shown in Figure 2-10. The area where you entered numbers and the cell you clicked on are likely to be different, but you should see that the Function Arguments dialog box now has its first argument — as a cell reference.
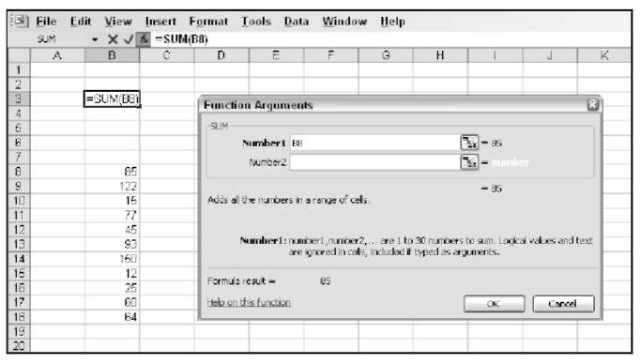
Figure 2-10:
Entering a single cell reference as a function argument.
9. Use the RefEdit control of the second Number box to click another cell that has a number.
10. Press the Enter key.
The Function Arguments dialog box opens again. Your screen should now look similar to that in Figure 2-11.
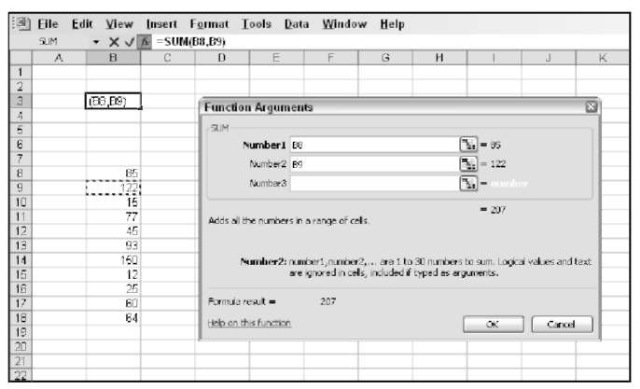
Figure 2-11:
Entering more function arguments.
11. Click the third RefEdit control.
12. To input a range as a function argument, click on a cell and hold down the mouse button; drag over several cells that are filled with numbers.
13. Press the Enter key.
Your screen should look similar to that in Figure 2-12. The Function Arguments dialog box should show two individual cell references and one range reference.
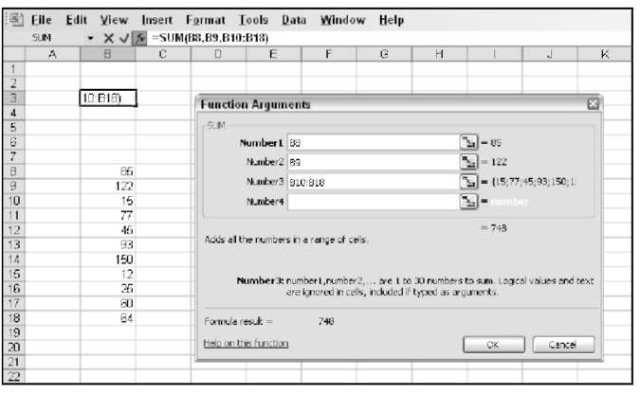
Figure 2-12:
Calculating a sum based on cell and range references.
14. Click the OK button in the Function Arguments dialog box to close it and populate the active cell with the result.
Congratulations! You did it. You successfully inserted a function that took both cell and range references. You’re harnessing the power of Excel. Look at the result — the sum of the numbers in all the cells, both the individual cells and those in the range. Just imagine how much summing you can do. You can have up to 30 inputs, with each one being a range of cells.
You can use the Insert Function dialog box at any time during the entry of a formula. This is helpful for when the formula uses some values and references in addition to a function. Just open the Insert Function dialog box when the formula entry is at the point where the function goes.
Getting Help while Using the Insert Function Dialog Box
The number of functions and their exhaustive capabilities gives you the power to do great things in Excel. However, from time to time, you may need guidance on how to get functions to work. Lucky for you, help is just a click away.
Both the Insert Function and Function Arguments dialog boxes have a link to the Help system. At any time, you can click the Help on This Function link in the lower-left corner of the dialog box and get help on the function you’re using. The Help system has many examples; often, reviewing how a function works leads you to other similar functions that may be better suited to your situation.
Using the Function Arguments Dialog Box to Edit Functions
Excel makes entering functions with the Insert Function dialog box easy. But what about when you need to change a function that has already been entered into a cell? Maybe you have to add more arguments or take some away. Well, there is an easy way to do this!
Position the cursor in the cell with the existing function before going to display the Insert Function dialog box. The Function Argument dialog box appears. This dialog box is already set to work with your function. In fact, the arguments that have already been entered into the function are displayed in the dialog box as well! You can add, edit, and delete arguments. Click OK when you’re finished, and the function will be updated with your changes.
