In This Chapter
Developing a useful VBA macro: A hands-on, step-by-step example Recording your actions using the Excel macro recorder Examining and testing recorded code Changing recorded macro.
I’m not much of a swimmer, but I have learned that the best way to get into a <C cold body of water is to jump right in — no sense prolonging the agony. By wading through this chapter, you can get your feet wet immediately but avoid getting in over your head. By the time you reach the end of this chapter, you just might start feeling better about this whole programming business. This chapter provides a step-by-step demonstration of how to develop a simple but useful VBA macro.
What You’ll Be Doing
In this example, you create an Excel macro that converts selected formulas to their current values. Sure, you can do this without a macro, but it’s a multi-step procedure.
To convert a range of formulas to values, you normally complete the following steps:
1. Select the range that contains the formulas to be converted.
2. Copy the range to the Clipboard.
3. Choose Edit Paste Special.
4. Click the Values option button in the Paste Special dialog box, which is shown in Figure 2-1.
5. Click OK.
6. Press Esc.
This clears the cut-copy mode indicator (the moving border) in the worksheet.
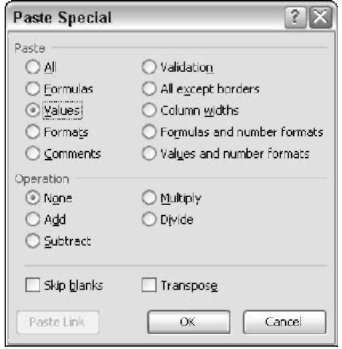
Figure 2-1:
Use the Values option in the Paste Special dialog box to copy formulas as values.
The macro you create in this chapter accomplishes all these steps in a single action. As I describe in the following sections, you start by recording your actions as you go through these steps. Then you test the macro to see whether it works. Finally, you edit the macro to add some finishing touches. Ready?
Taking the First Steps
This section describes the preparations you take prior to recording the macro. In other words, you need to take the following steps before the fun begins:
1. Start Excel if it’s not already running.
2. Open a new workbook.
3. Enter some values and formulas into the worksheet.
It doesn’t matter what you enter. This step simply provides something to work with.
Figure 2-2 shows how my workbook looks at this point. I created this data by using the RAND function, which generates random numbers. Specifically, the cells in the range A3: D10 contain this formula:
![]()
So, cell A1 contains a value and the other cells contain a formula.
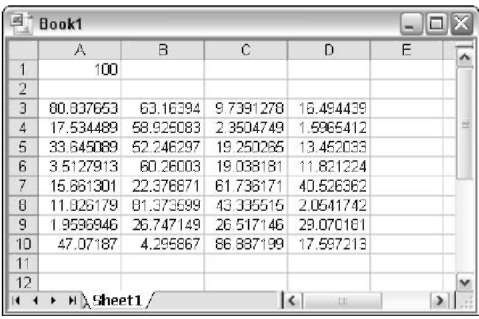
Figure 2-2:
My worksheet’s sample values and formulas.
Recording the Macro
Here comes the hands-on part. Follow these instructions carefully:
1. Select the range of cells that contains your formulas.
The selection can include both values and formulas. In my case, I chose the range A1:D10.
2. Choose Tools Macro Record New Macro.
The Record Macro dialog box appears, as shown in Figure 2-3.
3. Enter a name for the macro.
Excel provides a default name, but it’s better to use a more descriptive name. Convert Formulas is a good name for this one.
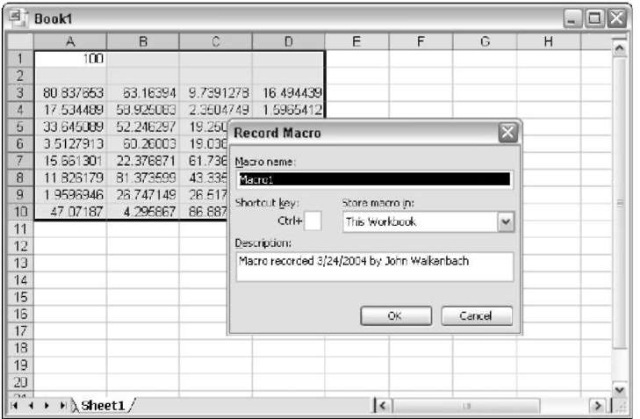
Figure 2-3:
The Record Macro dialog box appears when you’re about to record a macro.
4. Enter Shift+C (for an uppercase C) as the shortcut key combo.
Click in the Shortcut Key box to enter a shortcut key. Specifying one lets you execute the macro by pressing a key combination — in this case, Ctrl+Shift+C.
5. Click OK.
The dialog box closes and Excel’s macro recorder is turned on. From this point, Excel monitors everything you do and converts it to VBA code. Notice that a two-button toolbar appears and the status bar displays Recording.
6. Choose Edit Copy (or press Ctrl+C).
This copies the selected range of cells to the Clipboard.
7. Choose Edit Paste Special.
Excel displays the Paste Special dialog box.
8. Click the Values option.
9. Click OK to close the dialog box.
10. Press Esc to cancel the Excel cut-copy mode indicator.
The moving border (which is Excel’s way of telling you that data is ready to be copied) is removed from the selection.
11. Choose Tools Macro Stop Recording, or click the Stop Recording button on the mini-toolbar that’s floating on your screen.
The macro recorder is turned off.
Congratulations! You just created your first Excel VBA macro. You might want to phone your mother and tell her the good news.
Testing the Macro
Now you can try out this macro and see whether it works properly. To test your macro, add some more formulas to the worksheet. (You wiped out the original formulas while recording the macro.)
1. Enter some new formulas in the worksheet.
Again, any formulas will do.
2. Select the range that contains the formulas.
3. Press Ctrl+Shift+C.
In a flash, Excel executes the macro. The macro converts all the formulas in the selected range to their current values.
Another way to execute the macro is to choose the Tools Macro Macros command (or press Alt+F8) to display the Macros dialog box. Select the macro from the list (in this case, Convert Formulas) and click Run. Make sure you select the range to be converted before executing the macro.
Examining the Macro
So far, you’ve recorded a macro and tested it. And if you’re a curious type, you’re probably wondering what this macro looks like.
Excel stores the recorded macro in the workbook, but you can’t actually view the macro in Excel. To view or modify a macro, you must activate the Visual Basic Editor (VBE, for short).
Follow these steps to see the macro:
1. Choose Tools Macro Visual Basic Editor (or press Alt+F11).
The Visual Basic Editor program window appears, as shown in Figure 2-4. This window is highly customizable, so your VBE window may look different. The VBE program window contains several other windows and is probably very intimidating. Don’t fret; you’ll get used to it.
2. In the VBE window, locate the window called Project.
The Project window (also known as the Project Explorer window) contains a list of all workbooks that are currently open. Each project is arranged as a tree and can be expanded (to show more information) or contracted (to show less information).
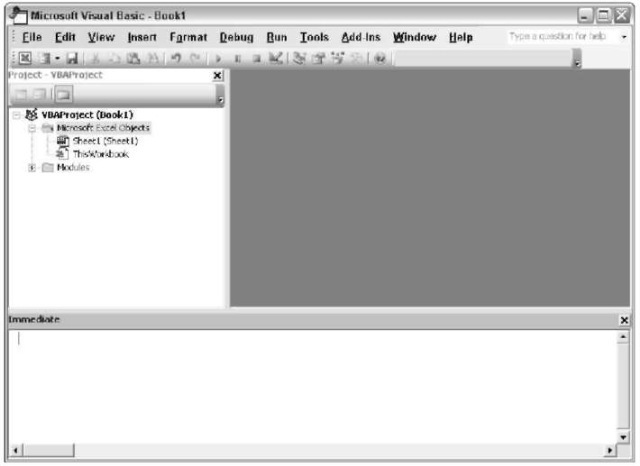
Figure 2-4:
The Visual Basic Editor is where you view and edit VBA code.
The VBE uses quite a few different windows, any of which can be either open or closed. If a window isn’t immediately visible in the VBE, you can choose an option from the View menu to display the window. For instance, if the Project window is not visible, you can choose View Project Explorer (or press Ctrl+R) to display it. You can display any other VBE window in a similar manner.
3. Select the project that corresponds to the workbook in which you recorded the macro.
If you haven’t saved the workbook, the project is probably called
VBA Project (Topic1).
4. Click the plus sign (+) to the left of the folder named Modules.
The tree expands to show Module1, which is the only module in the project.
5. Double-click Module1.
The VBA code in that module is displayed in a Code window. Figure 2-5 shows how it looks on my screen. Because the VBE program window is highly customizable, your screen may not look exactly the same.
The code in Module1 should look like this:
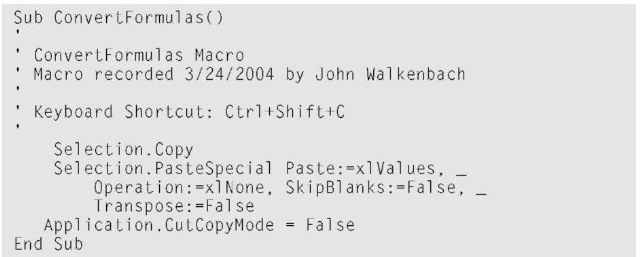
Notice that this listing looks just a bit different than what you see on your screen and from what is shown in Figure 2-5. (Take a look at the lines beginning with Selection.Paste Special.) The lines have simply been reformatted to fit on the printed page. The only difference is where each line of the macro is divided.
At this point, the macro probably looks like Greek to you. Don’t worry. Travel a few chapters down the road and all will be as clear as the view from Olympus.
The Convert Formulas macro (also known as a Sub procedure) consists of several statements. Excel executes the statements one by one, from top to bottom. A statement preceded by an apostrophe (‘) is a comment.
Comments are included only for your information and are essentially ignored. In other words, Excel doesn’t execute comments.
The first actual VBA statement (which begins with the word Sub) identifies the macro as a Sub procedure and gives its name — you provided this name before you started recording the macro. The next statement tells Excel to copy the cells in the selection. The next statement corresponds to the options you selected in the Paste Special dialog box. (This statement occupies two lines, using VBA’s line continuation character — a space followed by an underscore.) The next statement cancels the Excel cut-copy mode indicator. The last statement simply signals the end of the macro subroutine.
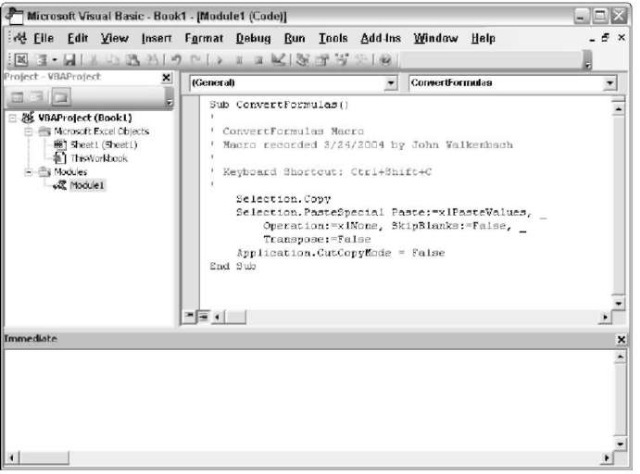
Figure 2-5:
The VBE displays the VBA code in Module1 of Topic.
Hey, I didn’t record that!
I’ve noted that the macro recorder is like recording sound on a tape recorder. When you play back an audio tape and listen to you own voice, you invariably say “I don’t sound like that.” And when you look at your recorded macro, you may see some actions that you didn’t think you recorded.
When you recorded the Convert Formulas example, you didn’t change the Operation, Skip Blanks, or Transpose options in the Paste Special dialog box, yet the recorder still recorded them. Don’t worry, it happens all the time. When you record an action that includes a dialog box, Excel records all of the options in the dialog box, not just the ones that you change. In later chapters, you’ll learn how to remove the extra stuff from a recorded macro.
Modifying the Macro
The macro you’ve created is fairly useful, saving you a few seconds every time you need to convert formulas to values — but it’s also dangerous. After you execute this macro, you may notice that you can’t choose the Edit Undo command. In other words, if you execute this macro accidentally, you have no way to convert the values back to the original formulas. (Actually, you can develop macros that can be undone with the Edit Undo command. That, however, is a bit beyond the scope of this topic.)
In this section, you make a minor addition to the macro to prompt users to verify their intentions before the formula-to-value conversion takes place. Issuing such a warning isn’t completely foolproof, but it’s better than nothing.
You need to provide a pop-up message asking the user to confirm the macro by clicking Yes or No. Fortunately, a VBA statement exists that lets you do this quite easily.
Working in a VBA module is much like working in a word-processing document (except there’s no word wrap). You can press Enter to start a new line and the familiar editing keys work as expected.
Here’s how you modify the macro to include the warning:
1. In the VBE, activate Module1.
2. Place the cursor at the beginning of the Selection.Copy statement.
3. Press Enter to insert a new line and then type the following VBA statements:

To make the new statements line up with the existing statements, press Tab before typing the new statements. Indenting text is optional but it makes your macros easier to read. Your macro should now look like the example in Figure 2-6.
These new statements cause Excel to display a message box with two buttons: Yes and No. The user’s button click is stored in a variable named Answer. If the Answer is not equal to Yes, Excel exits the subroutine with no further action (<> represents not equal to). Figure 2-7 shows this message box in action.
Activate a worksheet and try out the revised macro to see how it works. To test your macro, you may need to add some more formulas to your worksheet.
Just as you can press Alt+F11 to display the VBE, you can again press Alt+F11 to switch back to Excel.
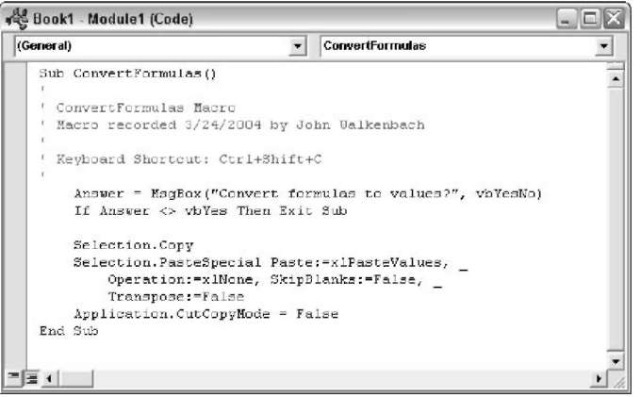
Figure 2-6:
The Convert-Formulas macro looks like this after you add to the statements.
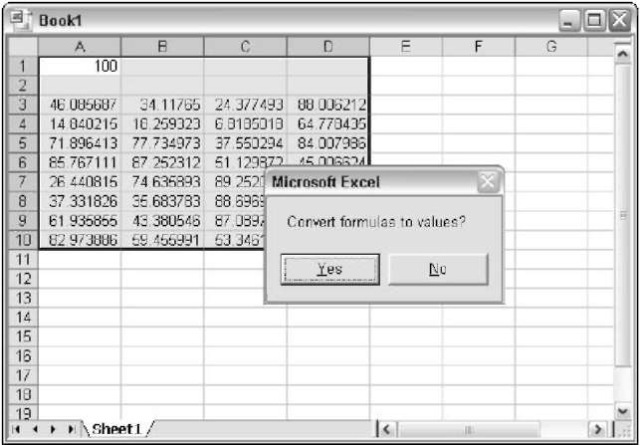
Figure 2-7:
The macro displays this message box.
You’ll find that clicking the No button cancels the macro, and that the formulas in the selection remain intact. When you click the No button, Excel executes the Exit Sub part of the statement. If you click Yes, the macro continues its normal course of action.
If you find this macro useful, save the workbook file.
More about the Convert Formulas Macro
By the time you finish this topic, you’ll completely understand how the Convert Formulas macro works — and you’ll be able to develop more-sophisticated macros. For now, I wrap up the example with a few additional points about the macro:
For this macro to work, its workbook must be open. If you close the workbook, the macro doesn’t work (and the Ctrl+Shift+C shortcut has no effect).
As long as the workbook containing the macro is open, you can run the macro while any workbook is active. In other words, the macro’s own workbook doesn’t have to be active.
The macro isn’t perfect. One of its flaws is that it generates an error if the selection isn’t a range. For instance, if you select a chart and then press Ctrl+Shift+C, the macro grinds to a halt and you see the error message shown in Figure 2-8. In Chapter 14, I show you how to correct this type of problem.
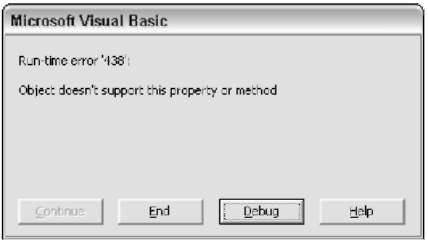
Figure 2-8:
The error message is VBA’s way of telling you something’s wrong.
Before you started recording the macro, you assigned it a new shortcut key. This is just one of several ways to execute the macro.
You could enter this macro manually rather than record it. To do so, you need a good understanding of VBA. (Be patient, you’ll get there.)
The two statements you added after the fact are examples of VBA statements that you cannot record.
You could store this macro in your Personal Macro Workbook. If you were to do so, the macro would be available automatically whenever you start Excel. See Chapter 6 for details about your Personal Macro Workbook.
You could also convert the workbook to an add-in file. (More about this in Chapter 22.)
You’ve been initiated into the world of Excel programming. (Sorry, there’s no secret handshake or decoder ring.) I hope this chapter helps you realize that Excel programming is something you can actually do — and even live to tell about it. Keep reading. Subsequent chapters almost certainly answer any questions you have, and you’ll soon understand exactly what you did in this hands-on session.
