Alternative Methods of Analysis
Sometimes when you’re conducting a postmortem computer forensic analysis (after you’ve acquired an image) you might need to perform analysis that is simply more cumbersome when you’re working with an image. For example, you might decide that you want to scan the system for malware, such as Trojans, backdoors, or spyware. When you’re working with an image of the system, you’ve got what amounts to a single file (or, as is often the case, multiple files that add up to the size of the original hard drive), and you need a way to scan the files within the image. So, rather than pulling all the files out of the image, there are some tools that you can use to convert the image into a format suitable for scanning.
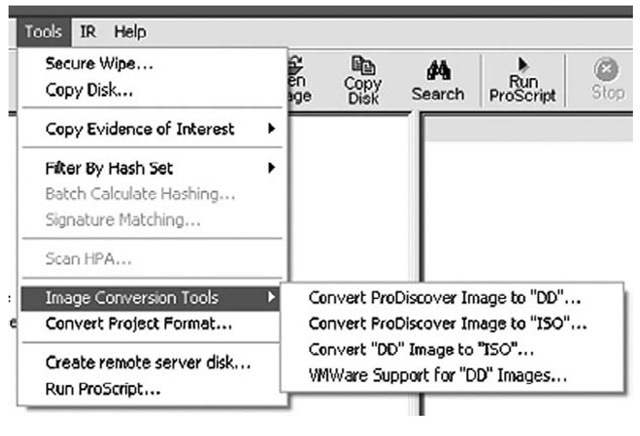
One such tool is available via ProDiscover. Beginning with Version 4.85 of ProDiscover, the tool has the ability to convert an image from either the native ProDiscover format or the dd format to an ISO format. ProDiscover also has the ability to create files needed to boot the image in VMware. Figure 5.14 illustrates these new options.
Figure 5.14 ProDiscover Menu Showing New Tools
As you can see in Figure 5.14, you can use ProDiscover to convert from the native ProDiscover .eve file format to dd format or from either a ProDiscover or dd image to an ISO 9660 Joliet specifications image. You can also use ProDiscover to create the necessary files required to boot the image in VMware, which is similar to what the VMware P2V (which stands for "physical to virtual") Assistant tool allows you to do. Using tools such as this, you can boot the system to perform additional analysis, such as antivirus and antispyware scanning, or to simply see what the system "looked like" when it was running. Sometimes this can be very useful when you’re investigating a case, because it is so difficult to determine the nature of a running system (given the interactions between various configuration settings, installed software, etc.) during a postmortem analysis.
A technical Webinar available at the Technology Pathways Resource Center Web site (www.techpathways.com/DesktopDefault.aspx?tabindex=8&tabid=14) walks you through the details of how to use the ProDiscover tools to ultimately boot an image in VMware. The Webinar requires the appropriate client software from WebEx.com.
Another tool that is free and extremely easy to use to boot an acquired image in VMware is Live View (http://liveview.sourceforge.net), which is available from CERT. Live View uses an easy-to-understand GUI (as illustrated in Figure 5.15) to walk you through many of the configuration options required to configure an image to be booted in VMware, and it automates the creation of the necessary files.
Figure 5.15 Live View GUI
Running Live View is a straightforward and intuitive process. Live View supports most versions of Windows and has limited support for Linux. I’ve used the tool successfully several times to boot and log in to acquired images.
Note
Once you get the image to boot, you can do a variety of things. If you’re using the VMware Workstation product and have it configured as a bridged network, you can enable the network interface for your newly booted image and scan it just as though you were doing a remote port scan and/or vulnerability scan. You might also want to log in to the running system, so unless the Administrator or user password is blank, you’re going to need to get the user’s or the organization’s information technology (IT) department’s cooperation to obtain the password or guess the password using brute force tools or passwords obtained from forensic examination of the system.
Booting an image via Live View is something that an analyst may include as part of her analysis to "see what the user saw." An alternative to using tools such as Live View is to mount the image as a read-only file system.
Mounting an Image
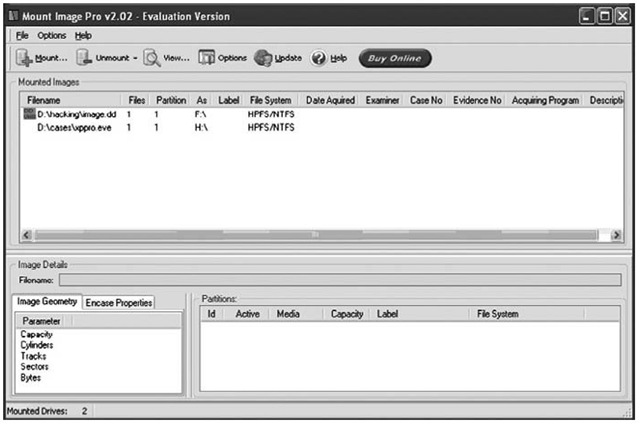
Another excellent (albeit not free) tool is Mount Image Pro (MIP, available from www.mount-image.com). MIP is a great tool that allows you to mount an image as a read-only drive on your current system. Figure 5.16 illustrates two images mounted as drives F:\ and H:\ via the 30-day evaluation version of Mount Image Pro.
Figure 5.16 Images Mounted As Drive Letters via Mount Image Pro v2.02
MIP does not boot the image and allow you to access the image as a running system; you will not be able to extract running processes for that system from physical memory. Rather, it mounts the image as a drive letter so that you can access the files within the image just as you would any other drive letter, and it does so in read-only mode so that no changes are made to the image. To verify this, I used md5deep.exe to compute a cryptographic hash for an image of an acquired system that was contained in a single file. I then used MIP to mount the image as a drive letter, and I accessed several files and copied several files from the mounted drive to another partition on my system. Once I had completed several actions, including running several Perl scripts against files in the mounted drive, I dismounted the drive letter and shut the MIP application down completely. I then reran md5deep.exe against the image file and the returned hash was identical to the first hash that I had calculated, verifying that the image is mounted read-only. Creating and verifying cryptographic hashes using a known and accepted algorithm should be part of your standard operating procedure if you’re using tools such as Mount Image Pro. (Several freely available tools such as MD5, SHA-1, and SHA-256 implement many of the accepted algorithms.)
Another very powerful tool to use to mount an acquired image as a read-only file system is Smart Mount from ASR Data (www.asrdata.com/SmartMount/). According to ASR Data’s Andy Rosen, the author of the tool, Smart Mount offers considerably more functionality (e.g., it runs on Windows and Linux, will mount password-protected .E01 files without the password, etc.) than MIP, and although it is also a commercial product that must be purchased, an evaluation version is also available.
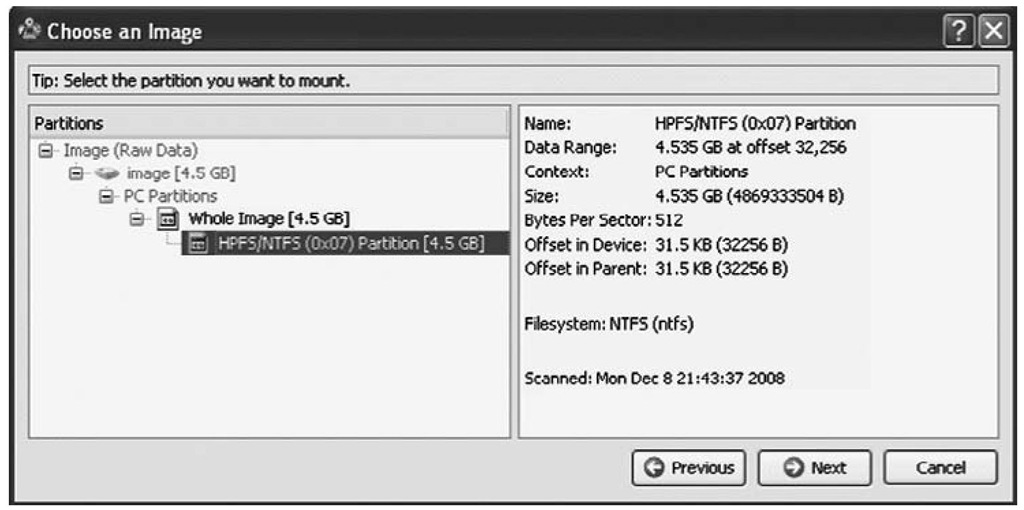
Smart Mount will mount a wide range of image files, including VMware .vmdk files and EnCase Expert Witness Format (EWF) files, as well as raw image files. Figure 5.17 illustrates part of the process of using Smart Mount to mount an acquired image file as a read-only file system (note that the acquired image is available from www.cfreds.nist.gov/Hacking_Case.html).
Figure 5.17 Smart Mount Mounting an Acquired Image File
You also can use freely available tools to mount acquired images as file systems, albeit with varying levels of ease of use and functionality. Two such tools are VDK (http://chitchat.at.infoseek.co.jp/vmware/vdk.html) and ImDisk (www.ltr-data.se/opencode.html). VDK installs as a CLI executable file (vdk.exe) and as a driver (vdk.sys). Typing the command vdk help at the command line will show you the various options available with VDK, or you can download and install the VDKWin GUI (http://petruska.stardock.net/Software/VMware.html), which is currently available as Version 1.1.1 and allows you to mount image files as virtual, read-only drives. VDK allows you to mount both VMware virtual disks (.vmdk files) as well as raw images as read-only file systems. You can also use vdk.exe to perform a variety of functions; for example, to get information about an acquired image file, such as the partitions within the image file, using the view command:
The output of this command looks like the following:
ImDisk installs as a console application and a Control Panel applet (as Figure 5.18 illustrates), and provides similar functionality as VDK.
Figure 5.18 ImDisk Control Panel Icon
Figure 5.19 illustrates the ImDisk dialog once the image file has been selected. The next step in the process will mount the selected image file as a read-only virtual disk with the drive letter H:\.
Figure 5.19 ImDisk Dialog
Mounting images as read-only drive letters has a lot of advantages, particularly in the areas of data reduction and analysis. For example, you can run any number of tools, such as antivirus and spyware detectors, file signature analysis, and tools for enumerating NTFS ADSes, against images in an automated fashion. Rather than enumerating through an image and then having to copy files of interest out of the image for more detailed analysis, you can automate many of these methodologies via Perl scripts.


![tmpDE201_thumb[2][2][2][2][2][2][2] tmpDE201_thumb[2][2][2][2][2][2][2]](http://what-when-how.com/wp-content/uploads/2011/09/tmpDE201_thumb2222222_thumb.jpg)


