Windows Phone which uses Silverlight as a development platform surely inherits the beauty of interacting with data using DataBinding. Binding data to Ul Control means that any alteration we do in Ul will cause a change in the data bound to it and vice versa. DataBinding makes it easier for us to display data by trimming down handling on code-behind, thus making the code much simpler.
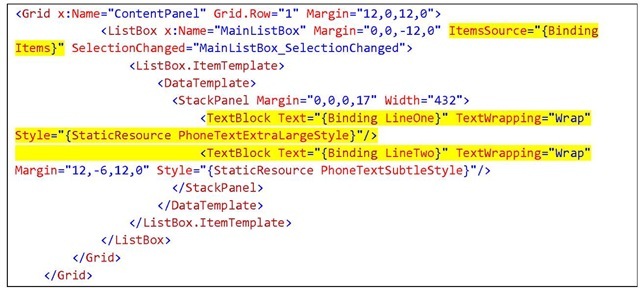
One scenario commonly used is working with a ListBox to show a number of data. The part highlighted in yellow in the box below shows XAML code that declares the binding of a ListBox to a collection named "items".
The part highlighted in green shows that the text value of TextBlock will refer to the property LineOne, regardless of its value, from the "Items" collection. To learn about it further, we will take a look at a standard template Windows Phone Tools has provided, Windows Phone Databound Application, which provides a comprehensible general illustration of databinding usage to display data collection.
1. Create a new Windows Phone Databound Application project. Right click on the solution on Solution Explorer window, select Add New Project and choose Windows Phone Databound Application.
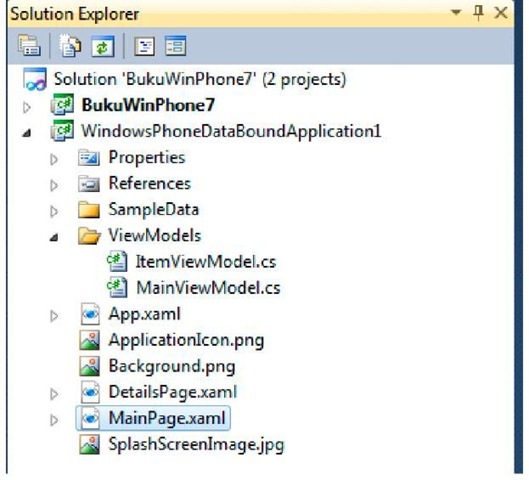
2. Several files will be automatically created, and we will review them one by one.
|
Item |
Description |
|
SampleData/MainViewModelSample |
This file consists of sample data which will be the input |
|
Data.xaml |
data during design process |
|
ItemViewModel.cs |
This file declares the view model for each item on the list |
|
MainViewModel.cs |
This file declares the main view for the application’s main page |
|
App.xaml |
The main file, consists of resources usable throughout the application and events to handle application states |
|
DetailsPage.xaml |
This file displays detailed data for every item on the list |
|
MainPage.xaml |
This file displays list from data collections using ListBox control |
3. Now take notice on the application design layout.
The main page already has a layout containing item design one, design two, and so on. The data is retrieved from SampleData and displayed on design time with data context declaration on the page.
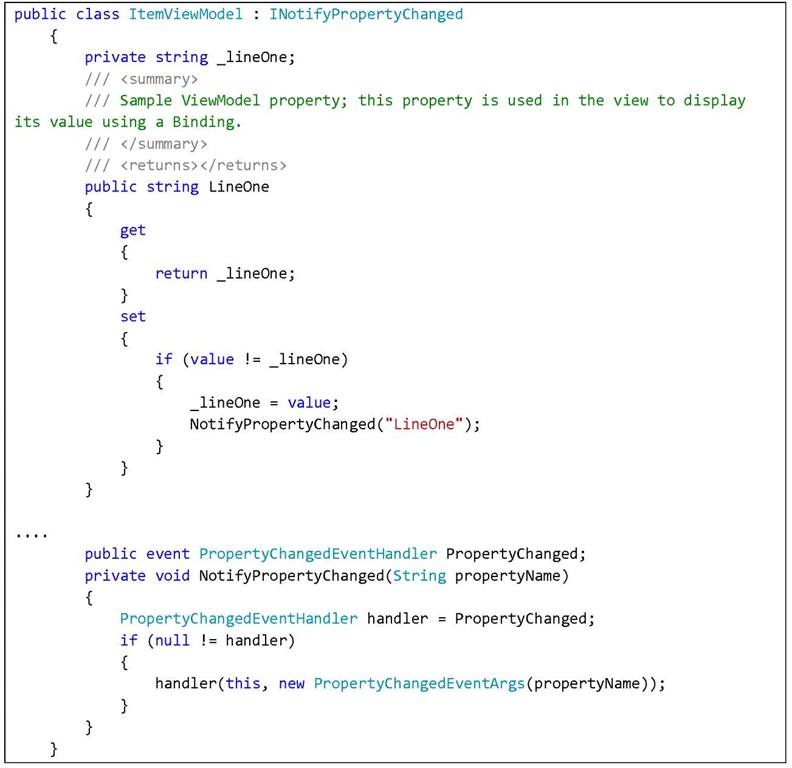
4. Open ItemViewModel.cs file and let’s observe it.
The class includes declarations for properties to be displayed, on the example above consists of 3 properties: a string, PropertyChanged property, and event handler. The last item is used to give notification when your data is changed.
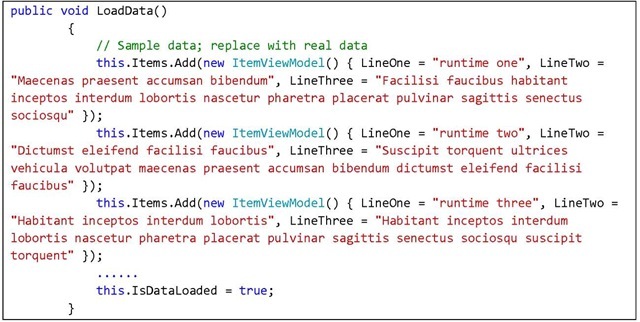
5. Now open MainViewModel.cs file and observe the contents
We can see a declaration of a collection called Items, which consists of ItemVIewModel. This collection will later be bound with ListBox Ul Control. Next we have Load data mechanism, in this part data is inserted into items. In reality, data source can be a service or a database.
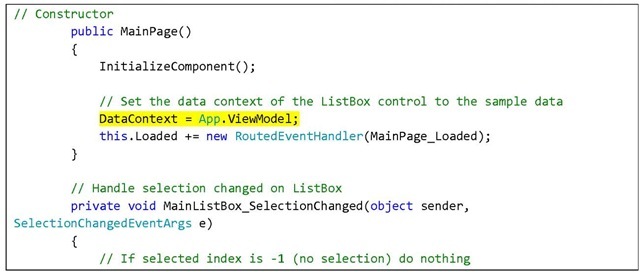
6. Now let’s open MainPage.xaml.cs file
The part highlighted in yellow is how you can set MainPage’s DataContext with App.ViewModel that refers to an instance of MainViewModel in App.xaml.cs file. With that declaration, MainViewModel automatically becomes the data source on MainPage.xaml page. There is also a navigation mechanism in Section Changed event handler from ListBox. It means that if one item in the ListBox is clicked, it will navigate to DetailPage and display details of the clicked item. This navigation has been discussed in Navigations on Windows Phone, along with passing parameters to target page. Now open MainPage.xaml file and observe the code in ListBox.
Notice that data source of ListBox, the ItemsSource property is Items, an ItemViewModel collection, and because data context is set to ViewModel then data will automatically be retrieved from ViewModel. Also notice that inside the ListBox, two TextBlocks are placed each of their values, in that order, bound to LineOne and LineTwo property of ItemViewModel in ViewModel collection. Therefore the values are automatically assigned to suitable data.
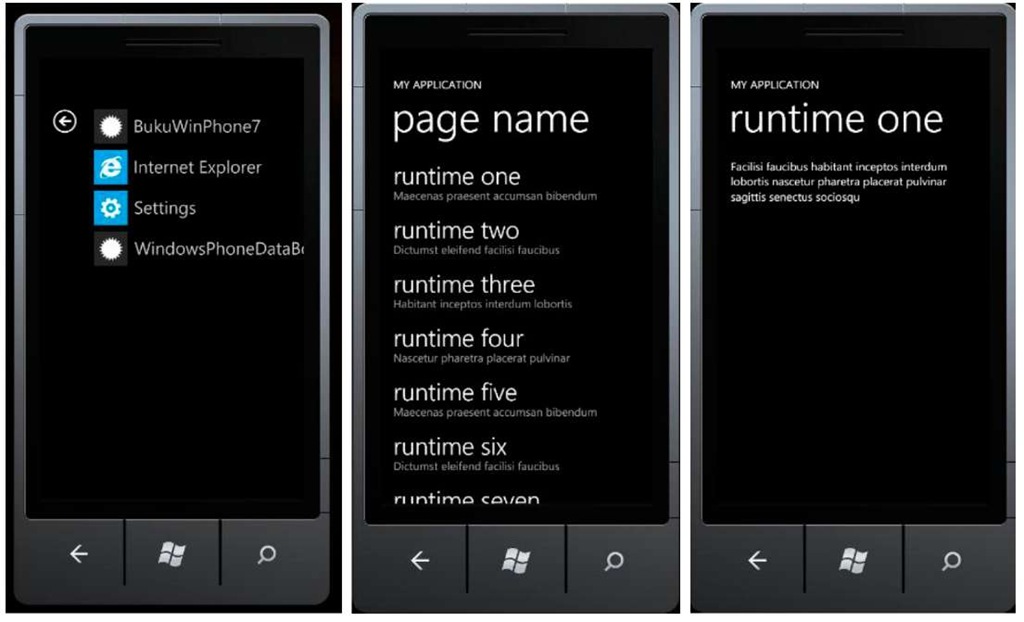
7. Now press F5 and see how the application works.
We can see that emulator displays several data runtime one, two, and so on. When we click an item we will be directed to the details of the data. This scenario is also known as Master/Detail scenario and can be applied further to make menu list, display dynamic data, et cetera. With databinding, working with data is made easier, and the code is cleaner. Furthermore Windows Phone Databound Application implements the use of MVVM (Model-View-ViewMode) Design Pattern which actuality derives from DataBinding practice. For applications related to data and MVVM view, maybe you should know that the concept will not be discussed further here. Search engines should be your good friend :)


