KEY CONCEPTS:
Upon completion of this topic, it is expected that the reader will understand these following concepts:
• The four components of each physical exam
• When a focused history and physical exam should be conducted on the scene or a rapid physical exam is appropriate
• Detailed physical examination and its appropriate use
• Matching the proper physical assessment with the patient’s presentation or chief complaint
• The ongoing assessment as a repeat of the initial assessment and used to detect trends
Case study:
Two new students were in the back of the room, bored. They asked each other, "Why do we bother doing a physical exam? The nurses don’t pay attention to us and the docs just repeat everything." The instructor for the class, a senior Paramedic, said," Come over here. I’ll bet that after a few minutes, you can figure out whether this ‘patient’ has pneumonia or congestive failure. You can also select the correct treatment as the wrong one can worsen your patient’s condition."
After practicing for a while, the students were convinced!
OVERVIEW
After performing the initial assessment and determining patient priority, the next step in patient assessment is to conduct the appropriate history and physical exam. This topic reviews the basic components of a focused assessment. It also provides techniques for gathering a patient’s vital signs. In this topic physical assessments are identified by mechanism of injury or the patient’s chief concern. The detailed physical examination is performed on a patient to determine additional information. However, it may not be appropriate for all patient encounters. The ongoing assessment is also a critical component that allows the Paramedic to alter the treatment plan if needed based on established trends. The ongoing assessment is a repeat of the initial assessment, which is performed continuously throughout the patient encounter.
Physical Examination
During a physical examination (also called exam), the Paramedic performs an assessment of the patient from head to toe in an effort to detect signs associated with a disease or condition. This may include signs that confirm that a disease or condition is present, thus helping the Paramedic decide which condition is most likely causing the patient’s chief concern during this encounter. One example is auscultation of the breath sounds to decide whether the patient’s shortness of breath is due to heart failure or asthma. The physical exam may also detect signs of a disease or condition that is present and not related to the patient’s chief concern, but which may need to be addressed by the Paramedic. For example, when evaluating a patient who complains of chest pain, the Paramedic may determine, by the patient’s history, that the condition is cardiac in nature. This could lead the Paramedic to decide that the patient has developed heart failure during this cardiac event after auscultating the breath sounds.
By developing excellent physical examination skills, the Paramedic can determine a treatment plan when the history does not clearly provide a guide. These skills are also important in situations where the history is not obtainable, as in the case of an unconscious patient. Excellent physical examination skills develop through practice, understanding the pathophysi-ology of disease, and understanding how diseases commonly present themselves.1 Whether performing clinical rotations or being a practicing Paramedic, it is helpful to ask the ED practitioners to point out interesting examination findings. This helps Paramedics recognize them on future patients.
Physical Examination Techniques
There are four components to every physical exam: (1) inspection, (2) auscultation, (3) palpation, and (4) percussion. These four components are the essential "hands on" techniques used to assess the patient. In addition to these four techniques, the Paramedic routinely measures the patient’s vital signs to complete the physical examination. The Paramedic then combines these physical examination findings, the vital signs, and the history and formulates a treatment plan for the patient. These skills are critical. Although these skills were probably addressed in the Paramedic’s basic EMS classes, they will be expanded for the Paramedic as a higher skill level is required.
Inspection
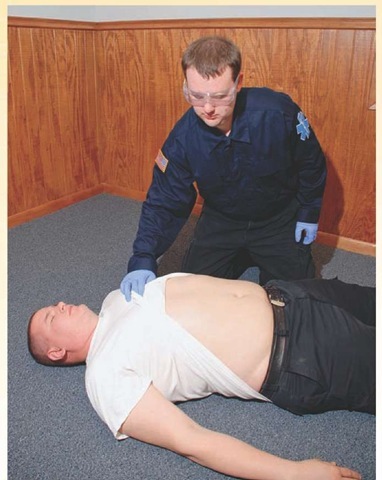
Inspection is a physical examination technique that involves looking at the patient (Figure 16-1). This can take many forms depending upon the specific body system under inspection. The Paramedic should observe the patient and her immediate environment. Observing the patient’s posture and apparent level of distress can give clues to the severity of the illness. Making observations about the environment in which the Paramedic finds the patient can help in determining the mechanism of injury, the patient’s ability to carry out the activities of daily living, or hazards in the patient’s living environment that may lead to future injury or illness. Observing the environment may allow the Paramedic to discover information that leads to additional history taking. Make note of such things as mechanism of injury, medication bottles, any evidence of any illicit drug or alcohol use, and general living conditions.2,3
Examples of body system-specific findings from inspection include discovering lacerations, ecchymosis (bruising), or abrasions in an injured extremity; observing jugular venous pressure during a cardiovascular exam; or observing the abdomen for distention. These findings are discussed later in the topic during the system specific examinations.
As inspection is difficult to fully accomplish with a clothed patient, it typically requires the patient to be exposed. Judgment is required to balance the need for a complete examination and the need to keep the patient warm (considering the environment in which the examination is occurring) and the patient’s modesty intact. Certain components of inspection may need to wait until the patient is moved to the relative privacy of the ambulance.
Figure 16-1 Inspection of a trauma patient’s abdomen for ecchymosis.
Auscultation
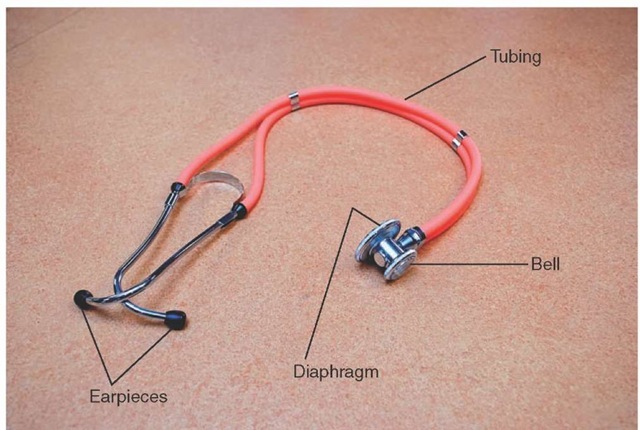
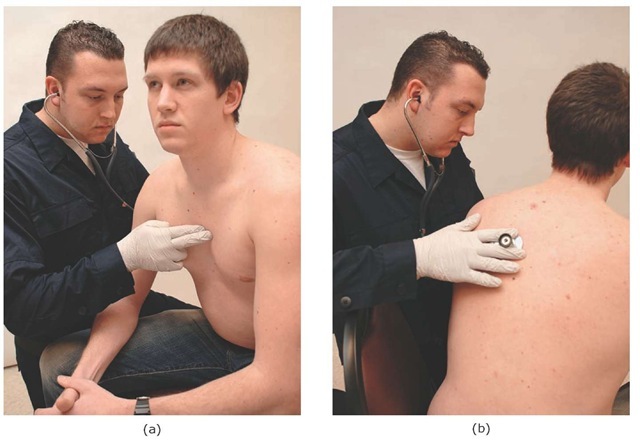
Auscultation is assessing the patient through listening. The assessment tool used during auscultation, the stethoscope, is made up of a hollow flexible tube connected to ear pieces that are placed in the Paramedic’s ears. The other end of the stethoscope comes in several different sizes (depending on whether the patient is a neonate, adolescent, or adult) and typically consists of two heads: one that is flat (called the diaphragm) and one that is cup-shaped (called the bell) (Figure 16-2). The diaphragm is covered with a thin plastic membrane and acts like the tympanic membrane (eardrum) to amplify and transmit sounds up the stethoscope to the Paramedic’s ears. The diaphragm is placed firmly against the bare skin (Figure 16-3a) and is used to pick up higher pitched sounds (e.g., breath sounds). In contrast, the bell is placed lightly on the bare skin (Figure 16-3b) and is used to pick up lower pitched sounds (e.g., the whoosh of a carotid bruit). If the bell is held too tightly against the skin, the skin will stretch tight and act like the diaphragm. In this case, it will lose the ability to detect the lower pitched sounds.4,5
When auscultating the patient, note both normal or abnormal sounds, the location of the sounds, and the intensity of the sounds. Specific auscultation techniques and findings will be detailed later in this topic when discussing specific body system exams.
Palpation
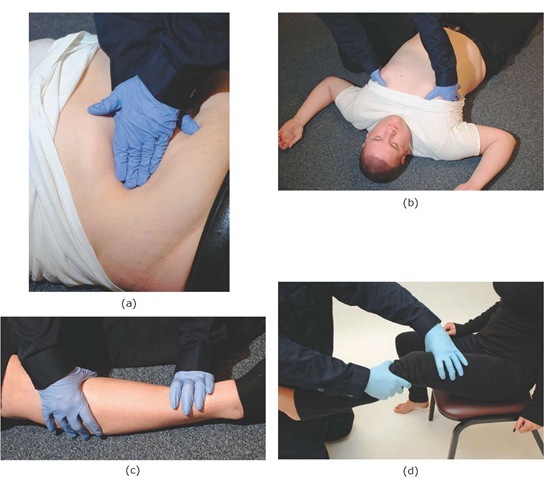
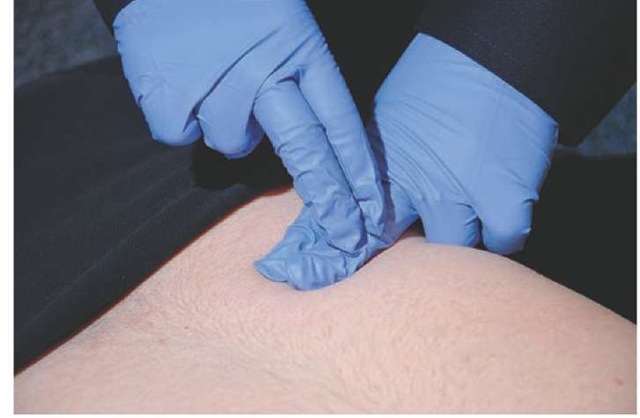
Palpation is the most frequently used physical exam technique. It involves the provider placing his hands or fingers on the patient’s body in an effort to detect any abnormalities. Palpation can take many forms depending upon the abnormality the Paramedic is assessing. Different forms of palpation can be used to assess for stability and assess for tenderness. Deep palpation can be used to assess deeper structures (e.g., deep palpation of the abdomen to detect tenderness or masses) (Figure 16-4a), while light palpation can be used to assess for superficial findings (e.g., light palpation of the anterior chest wall to detect subcutaneous emphysema) (Figure 16-4b). Firm palpation along a bony structure can assess for tenderness or crepitus (Figure 16-4c). The stability of a joint may be assessed by firmly grasping the bones distal and proximal to the joint and applying stress to the joint’s connective tissues (Figure 16-4d). Specific findings and palpation techniques are discussed later in this topic.
Figure 16-2 Anatomy of a stethoscope.
Figure 16-3 (a) Auscultation using the diaphragm. (b) Auscultation using the bell.
Percussion
Percussion is the act of lightly but sharply tapping the body surface to determine the characteristics of the underlying tissue. It is performed by sharply striking the hyper-extended distal joint of one middle finger with the tip of the partially flexed middle finger of the other hand (Figure 16-5). Percussion assesses whether the underlying tissues are air-filled, fluid filled, or solid by the quality of the percussion note. Air-filled structures will produce a hollow, tympanic percussion note similar to that of a drum. Fluid-filled structures will produce a dull percussion note. This can be simulated by taking a full plastic bottle of water, laying it on its side, and percussing the bottle. Solid structures will provide a loud, well-defined percussion note. This can be simulated by performing percussion on a table or desk.
Due to the high level of background noise in the field, it is often difficult to hear the percussion note generated during percussion. In that event, the Paramedic may be able to modify the percussion technique and use her stethoscope to amplify the percussion note (Figure 16-6). Percussion can add valuable information to the patient examination. Specific percussion findings and techniques will be discussed later in the topic.
Vital Signs Measurement
Vital signs are objectively measured characteristics of basic body functions. Vitals signs provide the Paramedic with an indication as to how well the patient’s body is functioning or compensating for an injury or illness. Historically, the vital signs included pulse, respirations, blood pressure, and temperature. In the late 1990s, with the emphasis on appropriate assessment of pain and discomfort by all medical professions, the Joint Commission on Hospital Accreditation suggested adding the assessment of the patient’s pain as the fifth vital sign, even though pain is technically classified as a symptom.6,7 Finally, some consider measurement of the patient’s peripheral oxygen saturation (SpO2), also known as pulse oximetry, as the sixth vital sign. Assessment of the patient’s vital signs is reviewed in the following text and the concept of assessing for orthostatic hypotension is discussed.
Pulse
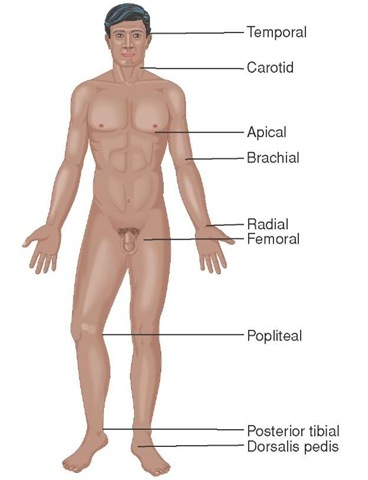
The pulse can be assessed at one of several locations where a major artery lies close to the surface of the skin (Figure 16-7). The most easily accessed area for conscious patients is the radial pulse at the wrist over the radial artery. For unconscious patients, the carotid pulse in the anterior neck is often used during the initial assessment. Other pulses the Paramedic may utilize are the femoral pulse at the patient’s groin and the dorsalis pedis (DP) pulse over the dorsum of the foot. Assess the pulse for rate, rhythm, and quality. The pads of the fingers are used to assess for the pulse by placing light pressure over the location of the pulse. The pads of the fingers are used as they have more nerve endings than the tips and can better detect the presence and quality of the pulse.8 Firm pressure can alter the perception of the pulse quality and rhythm, or in some cases occlude the pulse completely.
Figure 16-4 Examples of palpation. (a) Deep palpation of the abdomen. (b) Light palpation of the anterior chest wall. (c) Palpation along a bony structure. (d) Assessing joint stability.
Figure 16-5 The technique of percussion. Note the finger position used by the Paramedic.
STREET SMART
While it is relatively easy to detect a pulse in a normal patient, it can be very difficult to detect a carotid pulse when the patient is in cardiac arrest.910 This fact is emphasized by research that indicates laypeople could not reliably find a pulse in patients in cardiac arrest. Subsequently, the American Heart Association removed pulse checks from its citizen CPR program and replaced it with "signs of life."
Figure 16-6 Modification of the percussion to allow improved detection of the percussion note.
Figure 16-7 Common pulse points.
Table 16-1 Normal Pediatric Heart Rates by Age
|
Patient Age |
Beats/Minute |
|
Newborn |
120-160 |
|
Infant (0-5 months) |
90-140 |
|
Infant (6-12 months) |
80-140 |
|
Toddler (1-3 years) |
80-130 |
|
Preschooler (3-5 years) |
80-120 |
|
School-ager (6-10 years) |
70-110 |
|
Adolescent (11-14 years) |
60-105 |
|
Young or middle-aged adult (15-64 years) |
60-100 |
A normal pulse rate for an adult is considered anywhere from 60 to 100 beats per minute. The normal pulse rates are different for children (Table 16-1). Bradycardia is defined as a heart rate that is under 60 beats per minute for an adult or below the lower limit of normal for a child. Tachycardia is defined as a heart rate that is over 100 beats per minute for an adult or above the upper limit of normal for a child. While the most accurate way to determine the patient’s pulse rate is to count the number of beats that occur in one minute, two other methods also provide a reasonable determination of pulse rate. One method is to count the number of heartbeats in a 15-second time period and multiply that by four. A second is to count the number of beats in a 30-second time period and multiply that by two. If the patient’s pulse is regular, the shorter time can be used to determine an accurate pulse rate. The more irregular the patient’s pulse, the longer time is required to determine an accurate estimate of the pulse rate. In some cases, the pulse is so irregular or the rate changes so rapidly that a range of pulse rates is reported (e.g., the patient’s pulse rate varies between 120 and 140 beats per minute).
Generally, the Paramedic can assess the pulse rate by palpating the pulse at one of the locations previously described. However, when the patient is significantly tachycardic, in the 180 to 220 beats per minute range, it can be difficult to count the pulse rate using palpation. In this situation, the Paramedic may need to use a stethoscope to listen to the heart and count an apical pulse, or the pulse rate at the chest. In infants and toddlers, where the normal heart rate is well over 100 beats per minute, the Paramedic may also need to assess the apical pulse rate (Figure 16-8).
Assess the rhythm of the pulse to determine its regularity. Is the rhythm regular or does the timing between individual beats vary significantly? Are there premature beats that occasionally and briefly interrupt the underlying regular rhythm, or is the rhythm chaotically irregular, one that does not follow any pattern? This chaotically irregular pulse is sometimes termed an irregularly irregular pulse to indicate the complete absence of a pattern to the pulse rhythm.
Pulse quality is a description of the amplitude or strength of the pulse at that particular location. Pulse quality is often described as normal, absent, strong, bounding, weak, or thready. The term "thready" is usually given to pulses which are both weak and very rapid, as seen with heart rates that are significantly tachycardic. Pulse quality may be different depending on the location of the pulse and the patient’s condition. In a healthy individual free of disease or complaint, the pulse quality should be the same regardless of the location of the pulse. However, some conditions will affect the pulse quality. An injury to an upper extremity may cause the radial pulse to be absent in that extremity. Peripheral vascular disease in a lower extremity, which decreases blood flow to that extremity, can cause a decrease in pulse quality compared to the upper extremities.
Figure 16-8 Paramedic assessing an apical pulse in a child. The stethoscope is held over the lower sternum to the left and the pulse rate is counted as described in the text.
Finally, it is important to note that the pulse rate palpated by the Paramedic, which determines the patient’s mechanical pulse rate, may be different than the heart’s electrical rate as shown on an electrocardiogram (ECG) rhythm monitor.
STREET SMART
During shock, the patient will lose distal pulses first (i.e., radial before femoral and femoral before carotid). A quick survey of pulses can be helpful in establishing the presence of shock. However, no statement can be made about the patient’s blood pressure based upon the presence or absence of distal pulses.
