ActionScript 2 development
You’ve already seen how to use FlashDevelop to create ActionScript 3 projects; you can also use FlashDevelop to create ActionScript 2. In the following sections, we will show a different workflow commonly called AMES because it consists of ASDT, Apache, MTASC, Eclipse, and swfmill.
Installing MTASC
Installing MTASC is a simple matter of downloading and unpacking it:
1. Download a precompiled binary from the download section of the MTASC website (http:// www.mtasc.org). At the time of writing, the latest version of MTASC was 1.13.
2. Unpack the archive to a suitable location. On my Windows system, I have installed MTASC in a folder I created named FlashTools in the root of my C: drive. This means the mtasc.exe executable is located at C:\FlashTools\mtasc-1.13\mtasc.exe. When working on OS X or Linux, I usually create the FlashTools folder in my user directory.
3. After extracting the archive, add the mtasc directory to your system’s search path. (See the earlier “Configuring your system’s search path” section for help with this.)
Testing your installation
After installing MTASC, open a command prompt, and issue the command mtasc. You should receive output similar to the following:
If you get a “command not found” or some other error, review the installation instructions, making sure you set your PATH variable correctly.
Installing an IDE
One of the most important, and certainly the most visible, components of a development environment is the integrated development environment (IDE). This usually consists of a code editor, file management functions, and integration with a compiler. In the following sections, I’ll explain how to install Eclipse as your IDE.
In this topic we use the term Flash IDE to refer to the product that Adobe publishes called Flash (Flash MX 2004, Flash 8, Flash CS3, and so on). Don’t be confused by our use of the term IDE here, because we’re not referring to the Flash IDE.
Installing Eclipse
As a Flash developer, I find myself wearing many hats. One day I might need to edit PHP and manipulate a database, while the next I do nothing but ActionScript. One of the greatest benefits of the Eclipse platform is that it has plug-ins for almost every language imaginable. There’s a plug-in for XML, a plug-in for PHP, yet another plug-in for Ruby, and of course a plug-in for ActionScript. Beyond simple code editing, there are plug-ins to connect to databases, to build UML models, and to connect to version control systems. While the variety of plug-ins is a great benefit of the platform, it can also be a nightmare since tracking down the correct plug-ins and getting them to play nicely with each other can be difficult.
Luckily, there’s help from a group of software developers whose goal is to make Eclipse installation easy. They can be found at the website Easy Eclipse (http://www.easyeclipse.org). They have several distributions of Eclipse aimed at web developers with editions for Windows, Mac OS X, and Linux. I usually choose the Easy Eclipse for LAMP package because it includes most of the functionality I use on a day-to-day basis. If you do other types of development, you may want to take a look at the other options listed on the website.
Downloading and Installing Easy Eclipse
To download and install Easy Eclipse for LAMP, follow these steps:
1. Download your desired distribution from the Easy Eclipse website (http://www.easyeclipse. org/site/distributions/index.html).
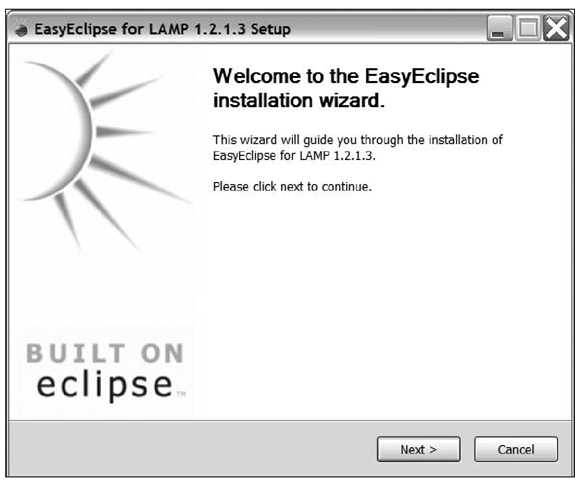
2. Launch the installer. You will be presented with a standard installation wizard, as shown in Figure 3-6.
Figure 3-6. The installation wizard of Easy Eclipse on Windows
3. Click the Next button, and answer the remaining prompts to complete the installation. You can either leave the defaults or customize where your project workspace will be created.
Some people dislike Easy Eclipse because it tends to lag behind the official Eclipse version or because it comes with too many plug-ins. Ifyou prefer to download a more bare-bones or bleeding-edge distribution of Eclipse, you can get it from the official Eclipse website (http://www.eclipse.org).
Installing Eclipse plug-ins
Eclipse, by itself, is not well suited for ActionScript development. To really make it shine, you need to install an ActionScript plug-in. There are currently two options: a fully open source solution called ASDT and a commercial plug-in called FDT. Both offer similar functionality of editing ActionScript, maintaining projects, and compiling applications from within Eclipse. At the time of this writing, ASDT does not support ActionScript 3, whereas FDT does. Table 3-1 compares ASDT and FDT.
Table 3-1. Comparison of ASDT and FDT
|
FDT |
ASDT |
|
ActionScript 2 and 3 support |
ActionScript 2 support |
|
Code completion |
Code completion |
|
Code folding |
Code folding |
|
Compile using MTASC |
Compile using MTASC |
|
Full on-the-fly syntax checking |
Syntax checking on file save; only the first error is displayed |
|
Free for open source development |
Free for all development |
|
Commercial software 299.00 € (euros) price for commercial development Automatic import statements ActionScript 3 support 30-day free trial available |
Open source software |
While deciding which plug-in to use, you may want to install them both to give them a try. In my experience, it is not a good idea to install them both in Eclipse at the same time. Make sure to uninstall your first option before installing your second.
In this topic, I’ll describe how to install both plug-ins. However, after that, the focus will be on ASDT, since it is the open source solution of the two. It may seem odd that we mention FDT at all. The reason behind this is that FDT is a much more polished product, and it offers free licenses to open source developers. The feature list of the two plug-ins seems similar, but that doesn’t capture the fact that many of the features simply work better in FDT. Many developers who have the ability to choose between the two pick FDT over ASDT. Much of the information regarding ASDT development is also directly applicable to development in an FDT environment.
Installing ASDT
Installing Eclipse plug-ins is easy through Eclipse’s software update feature. You can install ASDT through this mechanism by following these steps:
1. Launch Eclipse.
2. Select the Help > Software Updates > Find and Install menu option. A dialog box entitled Install/Update will appear.
3. Select the Search for new features to install radio button, and click the Next button.
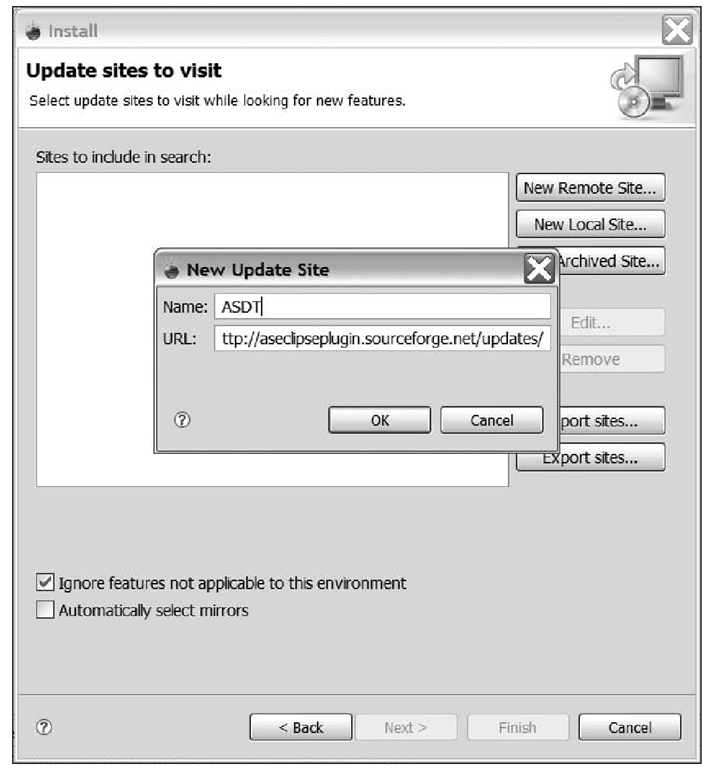
4. Click the New Remote Site button. This will display a dialog box that allows you to enter information about where to find the ASDT Eclipse plug-in.
5. In that dialog box, enter ASDT in the Name field, and enter http://aseclipseplugin.sourceforge. net/updates/ in the URL field, as shown in Figure 3-7. Click the OK button to close the dialog box.
Figure 3-7. Configuring Eclipse to install ASDT
6. Make sure that only the entry for ASDT is checked, and click the Finish button. Eclipse will now download a list of available updates. Once that is complete, you will be presented with a new dialog box to choose which updates to install.
7. Select the ASDT option, and click the Next button.
8. Progress through the rest of the installation wizard until the Finish button is made available, making sure to accept the license agreement.
9. Click the Finish button. Eclipse will now download the plug-in. After all files are downloaded, you will be presented with a dialog box to confirm your installation options.
10. Click the Install All button.
11. When prompted, restart Eclipse.
To configure the plug-in, you can select the Window > Preferences menu option. Then select the ActionScript 2 entry from the tree on the left. The default options are suitable for most users. However, we suggest making sure that the Use separate source and output folders option is enabled.
Installing FDT
The installation process for FDT is nearly identical to the installation for ASDT. The only significant change is typing FDT in the Name field and http://fdt.powerflasher.com/update in the URL field of step 5.
Once installed, you will be able to use FDT for 30 days for trial purposes. Ifyou intend on using FDT long term, you have two options:
■ Buy a commercial software development license from http://fdt.powerflasher.com/.
■ Apply for an open source developer’s license. Follow the instructions posted at http://fdt. powerflasher.com/forum/viewtopic.php?t=139.
To configure FDT, select the Window > Preferences menu option. Then select the FDT entry from the tree on the left. You must make sure to properly set two settings. The first is the location of your core libraries, which is a reference to the standard set of Flash libraries. To edit this setting, choose the Core Libraries option under the FDT heading. Using the Add button, create two entries: one named std8 that points to the std8 directory in your MTASC installation and one named std that points to the std directory in your MTASC installation. Once completed, make sure std8 is checked. This will enable the necessary classes for ActionScript 2 development targeting Flash Player 8 or newer. When completed, your dialog box should look similar to Figure 3-8.
After you set up your core libraries, you need to tell FDT where to find the MTASC compiler. You do this by setting the Location of mtasc.exe option under the Tools > MTASC heading.
Figure 3-8. The FDT configuration dialog box after setting up your core libraries
Installing ActionScript 2 libraries
Third-party libraries are what make open source Flash development so attractive. There are a myriad of libraries out there to do all sorts of useful things. The installation of most libraries simply consists of downloading the source and extracting it to a location where your project can find it. Some libraries will require you to pick out a subdirectory from the archive or to create a directory structure. Since you’re likely to use the same set of libraries across many of your projects, it’s convenient to create a central repository that all your projects can pull from.
I usually have a directory on my computer called projects with subdirectories under that for each project I work on. Choose a location on your computer, and create a projects directory. Inside that directory create a lib directory to store all your third-party libraries. Once you’ve done that, download the following libraries, and extract them into your lib directory.
The commercial Flash authoring environments by Adobe come with a set of classes called the V2 components. These components are not open source, and the license governing them does not allow distribution. This is a significant issue for open source Flash developers because developers who are used to using the tools from Adobe often take it for granted that these classes will be available. This is also a great benefit to open source developers since the V2 components are generally regarded as a less than optimal solution.
One of the open source libraries we want to showcase is Fuse. However, two classes from the V2 components are used in Fuse. We will be replacing those classes with open source alternatives, but that does introduce an extra step in setting up our ideal open source workflow.
Installing Delegate
The Delegate class written by Steve Webster provides a replacement for Adobe’s implementation of its class with the same name that comes with the V2 components. He has published the source for his Delegate class at the URL http://dynamicflash.com/classes/Delegate.as.
To install it, download that file into a com\dynamicflash\utils directory inside your lib directory.
Installing GDispatcher
The GDispatcher class by Grant Skinner replaces the EventDispatcher class from the V2 components. You can download it from http://www.gskinner.com/blog/assets/GDispatcher.as.zip.
To install it, download and then extract the GDispatcher.as file into a com\gskinner\events directory that you create inside your lib directory.
Installing Fuse
Fuse is a library maintained by Moses Gunesch for easily creating animations in Flash applications. You can download it from http://www.mosessupposes.com/Fuse/.
Once you have downloaded the archive, extract it to a temporary location on your hard drive. Find the com directory from that temporary location, and copy it to the lib directory that you’ve already created.
As previously mentioned, Fuse uses two classes from the V2 components that must be replaced by their open source counterparts that you have just installed. Open the Fuse.as file located in the com\mosesSupposes\fuse directory. At the top of the file, replace the following lines:
with the following lines:
Then, further down around line 550 in the file in the Fuse() function, replace the following line:
with the following line:
The version of Fuse included in the downloadable materials with this topic has already been modified in this way.
After installing these libraries, you should have a directory structure similar to the following:
Creating a project
Now that you have Eclipse and MTASC set up, let’s take a break from installations and try some of our new tools.Let’s start creating the structure for that project.
If you haven’t taken my earlier advice of a projects directory while installing libraries, now is a good time to create a directory to hold your projects. Once you’ve decided where your projects should be located, launch Eclipse. Select the File > New > Project menu option, and the New ProjectWizard will be displayed. Select NewActionScript Project from the ActionScript submenu, and click Next.
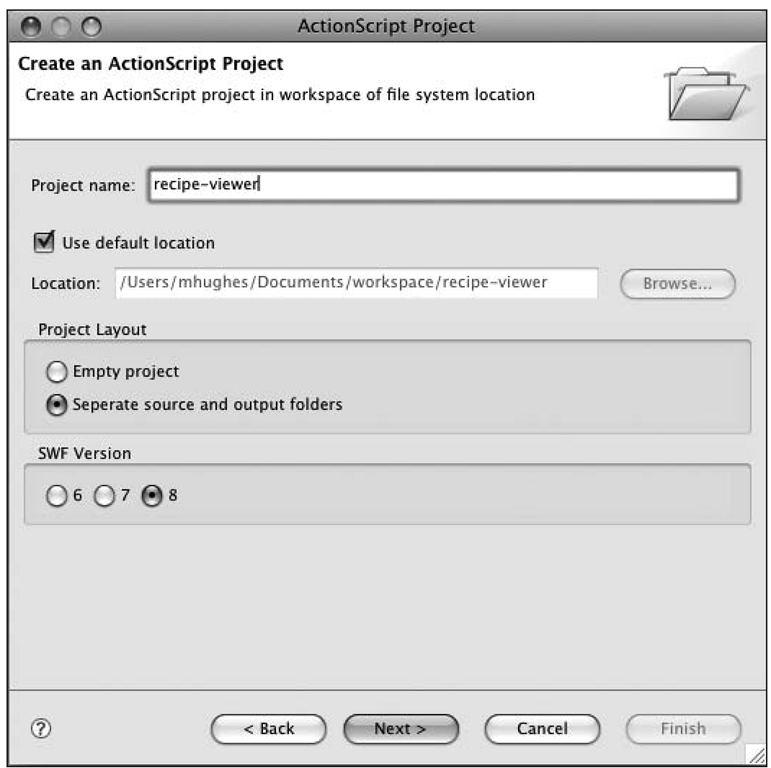
Figure 3-9 shows the ActionScript Project dialog box after configuring it for our new project. Project Name is how this project will be referred to in the Eclipse environment. The Location represents where on your computer the files for this project should be stored. By specifying Separate source and output folders, you’re instructing Eclipse to separate your source code from the compiled output. Once you have made those changes, click the Next button.
Figure 3-9. The new ActionScript Project dialog box after making the necessary modifications for the recipe viewer application
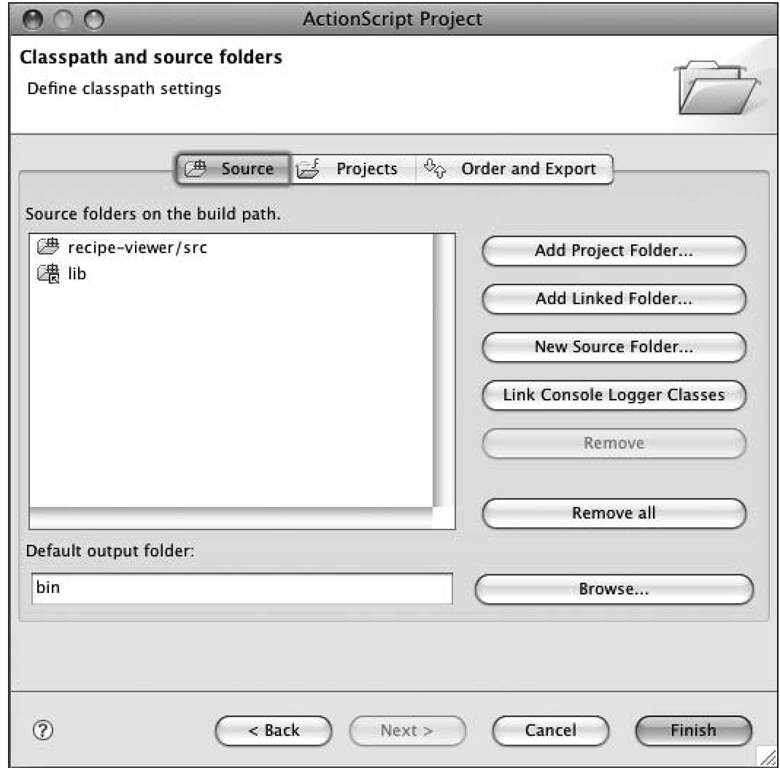
The next dialog box allows you to configure the location of your source code folders. By default, a src folder should be there. The only thing you must do is tell Eclipse where any additional folders that contain source code you need might be. If you followed my suggestion of putting all your libraries in a lib directory, you can now add that directory by clicking the Add Linked Folder button. Specify lib as the name and the correct path to the lib directory in the window that pops up. Once completed, you should see a dialog box similar to Figure 3-10. You can now click the Finish button to complete the project creation. Eclipse should prompt you to ask whether you want to switch to the ActionScript 2 development perspective; answer Yes.
If you’re familiar with Flash development using the Flash IDE, you’re probably now looking for a frame on a timeline as an entry point for the application. The MTASC compiler has no notion of timelines. Although that may seem startling to a long-time Flash developer at first, it’s actually one of the great benefits to this style of development. It allows you to completely separate your code from the graphical assets you or other designers make.
Instead of a timeline, MTASC looks for a static function called main in a class you specify as the launching point of the application. Let’s create a simple “Hello World” example that uses our Fuse library we have already installed.
Figure 3-10. The Classpath and source folders dialog box
![tmpeeee-12_thumb[2] tmpeeee-12_thumb[2]](http://what-when-how.com/wp-content/uploads/2012/06/tmpeeee12_thumb2_thumb.png)


![tmpeeee-16_thumb[2] tmpeeee-16_thumb[2]](http://what-when-how.com/wp-content/uploads/2012/06/tmpeeee16_thumb2_thumb.png)
![tmpeeee-17_thumb[2] tmpeeee-17_thumb[2]](http://what-when-how.com/wp-content/uploads/2012/06/tmpeeee17_thumb2_thumb.png)
![tmpeeee-18_thumb[2] tmpeeee-18_thumb[2]](http://what-when-how.com/wp-content/uploads/2012/06/tmpeeee18_thumb2_thumb.png)


