17.3.
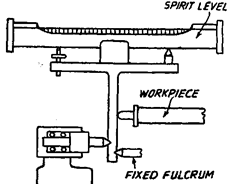
This machine and Zeiss measuring machine and some others have the different features of the sensitive indicator on headstock side. The measurement of difference in length between the workpiece and standard bar length is done by the use of a micrometer screw. The sensitive indicator, in the Newall machine consists of a lever pivoted on a horizontal centre line just below the end of the anvil opposite to the measuring face as shown in Fig. 17.2. The lever is
kept in contact with the end of the anvil member by a light spring pressure. The lever carries a sensitive spirit level at its upper end and the level has graduations, each graduation corresponding to the movement of about 0.0001 mm at the anvil. After the work has been placed between the anvils, the micrometer screw is adjusted until the bubble in the spirit level is brought to a fixed position. Again for other settings, the conditions are then kept same and setting can also be done accurately upto the said accuracy.
In Zeiss measuring machine, indication of contact is provided by the optical system used in Zeiss optimeter (optical comparator) in which movement of the gauging anvil tilts a mirror and this causes movement of the image of the scale in the field of a micro-

Fig. 17.2. Newall measuring machine.
![]()
machine includes a precision glass scale so that length of the work can be found without using a standard length bar. The scale is not placed in the same straight line as work, as this leads to a machine of bigger size. In order to avoid any error due to it or any tilt in the bed of the machine, a special optical system is used for reading the scale.
Newall Measuring Machine (Metrology)
Next post: Optical Projection Comparator (Metrology)
Previous post: Universal Measuring Machine (Metrology)
