2.54.
Graduated scales are accurately graduated at intervals of 1 mm. When used in conjunction
with micrometer microscope, these can provide instrument and machine settings to an accuracy of
the order of ± one-fourth of a micron. A microscope is fitted over the scale markings and have

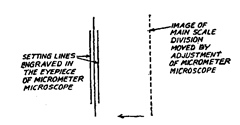
Fig. 2.142. Field of view of microscope.

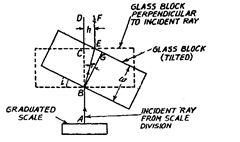
Fig. 2.143. Principle of operation.
micrometer provision to move the setting lines engraved on the microscope eye-piece. For observing
intermediate readings, the micrometer is adjusted so that the two setting lines, symmetrically
straddle the image of main scale division in the field of view of the microscope as shown in
Fig. 2.142.
In other arrangement the optical arrangement is used (instead of moving the eye-piece table
laterally by the micrometer) in which the image of the scale is moved optically as shown in
Fig. 2.142.
A glass block is mounted between the eye-piece and the graduated scale. When the glass
block is perpendicular to the optical axis, then scale division is sensed in the same position, there
being no shift in the incident ray from the main scale and it travels straight along the line ABCD.
(Refer Fig. 2.143) When the glass block is rotated by angle V, then the incident ray AB is refracted
by angle r with reference to lineBG and moves along BE and finally at other end again by refraction
it travels parallel to original line CD, but now along EF, being displaced by distance k.

For a block of 5 mm thickness and \i = 1.5, a rotation of 10 minutes causes displacement of
0.005 mm. Thus rotation of block can be easily calibrated in terms of linear displacement and high
resolution over a long length can be obtained and the cumulative errors likely to occur with other
methods of length measurement are avoided.
Graduated Scales (Metrology)
Next post: Differential Screw Micrometer (Metrology)
Previous post: Digital Micrometers (Metrology)
