2.52.
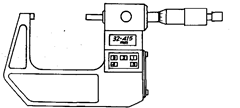
Fig. 2.138 shows a digital micrometer available now-a-days. These offer direct reading to
0.001 mm and employ liquid display operating on a alkaline manganese battery.
Special Features. 1. Stainless steel spindles.
2. Every hundredth in metric (every thousandth in inches) is numbered for easy reading.
3. Measuring faces carbide tipped for a long tool life.
4. Friction thimble or ratchet stop
for exact and repetitive readings.
5. Spindle thread hardened,
ground and lapped.
6. Positive locking clamp ensures
locking of spindle at any desired setting.
7. Large diameter pearl chrome
thimbles for easy reading.
8. Clear, crisp black graduations
and figures for easy reading against
satin-chrome finish.
9. Anvil and spindle hardened and precision ground—with micro-lap finish on ends.
10. Quick and easy wear adjustment.
11. Operation is simple with push button controls for “Zero” reset and indication “hold”
Specifications
Thimble graduation : 0.01 mm
Spindle screw thread : 0.5 mm pitch

Fig. 2.138. Digital micrometer.
Feed error : ± 0.001 mm (20°C)
Quantizing error : ± 1 count max
Resolution : 0.001 mm
Ranges : 25,50,75 and 100 mm
Measuring force : 6 – 10N (constant)
Ambient temperature : 0 ~ 40°C (operation)—10 – 60°C (storage)
Weight : 430 gm.
Control Push Buttons (Refer Fig. 2.138)
1. ON/OFF : Power ON or OFF.
2. IN/MM : To select the unit (in or mm) of measurement.
At power on, the unit of mm is present.
3. ZERO : To reset the display to zero at any desired position.
4. HOLD : To hold measurements taken until you push the button again. Then, the display
shows up the current position of the spindle measured from predetermined zero point. The “hold”
condition can also be released by the ZERO button.
5. ORIGIN : For LCD Micrometers range 25-50 mm (1-2″) and above, ORIGIN button sets
minimum value for the micrometer depending on its size. Micrometer count then commences from
this value.
Alarm indication showing excessive speed of thimble is provided and alarm can be re-set by
the ZERO button.
2.52.1.
Micrometer with Dial Comparator
. Measures quickly and accurately diameters
of cylindrical parts (shafts, bolts, shanks etc.), thicknesses and lengths. Very handy indicating
micrometer for measuring precision parts produced in batches.

Fig. 2.139. Micrometer with dial comparator.
Rugged steel frame with heat insulators. Up to 100 mm one-piece construction of frame and
spindle guide for highest stability. Precision ground stainless steel spindle, hardened throughout.
Positive locking lever. Moveable anvil mounted in extra long guideway, retractable by trigger
control.
Measuring faces carbide tipped. Dial Comparator interchangeable. Frame, moving parts and
scale satin chrom finished.
2.52.2.
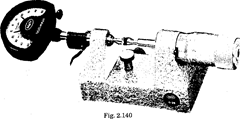
Bench Micrometer with Dial Comparator (with interchangeable Anvils).
Measures quickly and accurately diameters and lengths on workpieces of all types. Ideal for small
precision parts. Rugged, heavy duty base. Micrometer screw incorporates precision ground, non-
rotating sliding spindle. Extra large thimble. Moveable anvil mounted in extra long guideway,

retractable by trigger control. Positive locking lever. Comparator interchangeable. Spindle and
moveable anvil with accurate tapered bores for quick and easy mounting of interchangeable anvils.
Comes with workrest. Moving parts and scales satin chrome finished.
Range 0-25 mm
Reading of Micrometer screw 0.01 mm
Reading of Comparator 1 urn
Range of Comparator ± 50 um
Spindle thread pitch 1 mm
Thimble dia. 30 mm
Throat depth 32 mm
Workrest dia. 14 mm
Workrest height adjustment 12 mm
Measuring pressure 7.5 N
Accuracy (deviations)
Micrometer screw s 2 um
Comparator s 1 um
When setting with gauge block s 1 um
