In This Chapter
Adding different color combinations to your work Making stripes, Fair Isle patterns, and mosaics Discovering tricks to add color to finished pieces knitting allows you to work with colors in unique ways, creating rich fabrics that are unlike those made by any other method. So why not experiment with these techniques and add some color to your knitting? In this chapter, I offer some tips on choosing colors and combining them in pleasing ways. Then, you find out how to work with color using three different knitting techniques: stripes, Fair Isle patterns, and mosaics. Once you understand the basics behind these techniques, you can use them to create colorful patterns on just about anything you knit. Finally, I offer a bit of how-to on duplicate stitch and surface crochet. Both of these methods allow you to add a bit of color to your knitting after it’s done; they’re perfect for personalizing or embellishing your finished projects.
Combining Colors with a Careful Eye
Everything you knit has color — even if the piece is taupe or cream. But sometimes knitters are scared off from working with more than one color. Not because the actual color work techniques are difficult; these knitters don’t trust themselves to put colors together. But everyone has a sense of what they like and don’t like! I don’t think that you can make mistakes with color; you only make choices. So trust yourself.
Here are a few ways to practice combining colors:
Experiment with color combinations at the yarn shop. The next time you go into your local yarn shop, grab a skein of yarn in any color that you’re drawn to. Don’t overthink your choice; just grab one. Choose another and place the two skeins side by side. Add a third and a fourth. Which combinations do you like best? How does swapping one yarn for another change the look of things?
If it’s okay with the people at the shop, snap some pictures of the different combinations. Sometimes looking at a photograph gives you different information than you get with your eye. And back home you may have a different reaction to the colors.
Think about color in terms of percentages. Find a picture that you’re drawn to. This picture might be a painting or postcard or even a newspaper clipping. Think about the colors in it. Does it have, for example, several neutral shades with a small amount of turquoise? Really study the picture and think about colors in terms of percentages. You might say to yourself, “It’s about a third sand-colored, and maybe a quarter gray. The rest is a mix of neutral colors with some green tones and pink tones. And then there’s that turquoise bucket. Maybe the bucket is only five percent of the picture, but that’s definitely what makes the picture interesting.”
When you’re buying yarn and laying out your colors, use these percentages as guidelines for how much of which color to use. Just as the turquoise bucket “makes” the picture, a skinny stripe of turquoise here and there will really make an otherwise neutral sweater much more interesting.
Map out your color patterns on graph paper. Knitter’s graph paper (which you can find online or where you buy yarn) can help you draw the stripe, Fair Isle, and mosaic patterns presented in this chapter. Even designers who work with color patterns every day make sketches like these. You really can’t skip this step if you want to know what you’re going to get in the end. Use crayons or colored pencils to make your sketch.
If you use regular graph paper, your design will look taller on paper and will look shorter when it has been knit because knitting stitches are shorter than they are wide (knitting graph paper takes this into account). Still, regular graph paper is just fine for working out your colors.
Keep color value and contrast in mind. Any time that you’re using multiple colors you have to consider not just the hue of a color but the value of it too. (Hue is the “color,” such as red or yellow; value is the lightness or darkness of the color.) Even if you use a dozen colors, if they’re all the same value, the result will be boring or flat, and your hard work just won’t show. Why? Dark colors appear to recede and light colors seem to come forward. In other words, having both light and dark colors adds the contrast that you need.
To practice identifying light and dark colors (and this can be more difficult than it seems like it should be), look at your colors and squint for a quick assessment of the differences in value. Better still, take a picture and look at it in black and white to see if you have chosen colors with enough contrast.
Use self-striping yarn. If you don’t want to think too hard about color choices, consider using one of the dozens of yarns that stripe themselves. You can knit these yarns on their own to get great stripes, but you can also use one self-striping yarn and one plain yarn in a stripe or mosaic pattern. You’ll be pleasantly surprised by the results. If you’re feeling even more daring, choose two different colorways of a self-striping yarn and make a piece that’s wonderfully rich and colorful.
Get in Line: Stripes
Stripes are the easiest way to make your knitting colorful. Just because they’re easy to knit doesn’t make them boring, though. Stripes can be narrow or wide, or you can use a combination of the two. You can knit stripes with two colors or four (or even 20!) to use up every last yard of leftover yarn you have. Allover stripes in bold colors can be great for a blanket or for kids’ pieces. Choosing two similar colors can yield a more subtle but lively sense of style for a garment that’s a little more sophisticated. And remember that stripes can be used sparingly and still have great effect. For instance, a couple of broad stripes across the chest makes a jaunty men’s sweater; skinny stripes on the lower arm and torso makes a women’s top fun without overwhelming the shape and structure of the garment.
You can add your stripes to any design — just follow the pattern as written, but change colors as needed to create the stripes you want. Remember to use yarns that meet the gauge requirements for that pattern. However, it’s okay to throw a couple of rows in here and there in a yarn that’s a little thicker or narrower.
In the following sections, I show you how to make three different types of stripes: two-row stripes, regularly repeating stripes, and random stripes. If you want to get a handle on them, why not create a playful sampler scarf that uses them all? Choose a stitch pattern that doesn’t roll, such as garter stitch, seed stitch, or rib. Then cast on enough stitches to create a scarf that’s 6 inches wide (go to Chapter 2 to read up on gauge and figure out the correct cast-on number for the weight of yarn you want to use). Follow the stripe patterns laid out here to create your scarf (I give specific scarf instructions after each set of stripe steps). You need at least three colors of yarn for your scarf.
Two-row stripes
Two-row stripes (see Figure 7-1) are easy to work and can be applied to any pattern. A baby sweater knit in two-row stripes has a nautical look. And a two-row striped scarf knit with two self-striping yarns has a lot of visual appeal.
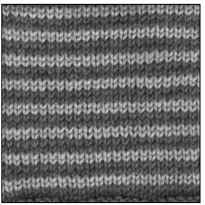
Figure 7-1:
Two-row stripes are the easiest kind of stripe to make.
You can make two-row stripes knitting flat or in the round with these directions. With two colors (color A and color B), follow these steps:
1. With color A, cast on the number of stitches called for in the pattern that you’re making.
2. Work 2 rows with color A following your pattern.
3. Drop color A and start knitting with color B.
Don’t cut color A; just leave it hanging. (See Chapter 8 for tips on changing colors.)
4. Work 2 rows with color B.
5. Drop color B and pick up color A.
Don’t cut color B.
6. Repeat Steps 2 through 5 as you follow the knitting directions in your pattern.
Because the stripes are only 2 rows long, you don’t need to cut the yarn between stripes and you won’t have extra ends to weave in.
For your sampler scarf, continue with the 2-row stripes until the scarf measures about 12 inches. Leave the stitches on the needle, and carry on with the regularly repeating stripes in the following section.
Regularly repeating stripes
Stripes can be as wide or narrow as you like. If you’re knitting back and forth between different widths of stripes, however, it’s easiest if your stripes cover an even number of rows. That way, you’re always changing yarn at the same edge and minimizing the number of ends you need to weave in.
Just as you can make two-row stripes (see the previous section for the basics of knitting these stripes and changing colors), you also can knit four- or eight-row stripes. But it’s often more interesting to knit (and look at) something with a little more variety. For example, the knit sample in Figure 7-2 uses four-row stripes in the darkest color (color C) and eight-row stripes in a medium color (color B), which are always separated by two rows in the lightest color (color A).
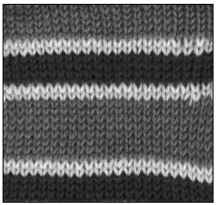
Figure 7-2:
A pattern of regular stripes.
The knit sample in Figure 7-3 uses the same stripes (2 rows, 4 rows, 2 rows, 8 rows), but instead of the color sequence A, B, A, C, A, B, A, C, it uses the sequence A, B, C, A, B, C. As you can see, you can get different looks by using the same yarn and stripes in different ways. Use your graph paper and colored pencils to make a quick sketch before you start knitting (see the earlier section “Combining Colors with a Careful Eye” for tips on trying out different groups of colors).
When making your sampler scarf, work 12 inches with each of the regular stripe sequences described. That is, 12 inches with the color sequence A, B, A, C . . . and 12 inches with the color sequence A, B, C . . . Your scarf now measures 36 inches. Leave the stitches on the needles; you’ll finish your scarf with random stripes in the following section.
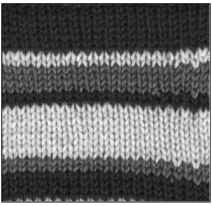
Figure 7-3:
A different arrangement of colors on the same stripe pattern.
Random stripes
Sometimes you may want more chaos and less order. Stripes that aren’t repeated in any regular way can give you great results. You can alternate regularly between three or five colors and have their widths vary, or you can let chance tell you which color to use and how wide to make the stripes. But how do you introduce randomness? Here are some options:
Roll dice. Whatever number you roll is the number of rows you knit in the next color.
Flip through a topic and use the last digit of a page number to determine the width of your stripe.
Do a Web search for a random stripes generator. Yes, there really is such a thing!
Put all the yarns that you’re willing to use in a paper bag (they should all knit to the same gauge), and pull one out at random each time you’re ready to change colors. Then, to determine how many rows to knit, roll the dice and knit away. With this technique, you’ll come up with something totally unique. Besides, it’s fun to be surprised!
See an example of random stripes in Figure 7-4; it uses five different colors in stripes of varying widths.
Complete your sampler scarf with random stripes, continuing until the scarf measures 60 inches or the length you desire. Bind off and weave in the remaining loose ends (see the appendix for more about these tasks).
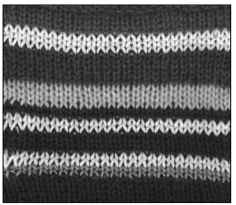
Figure 7-4:
Random stripes create visual interest.
Classic Color: Fair Isle Patterns
Fair Isle, or stranded, knitting patterns are made up of repeated multicolor motifs. These patterns are named after the Scottish islands where they were developed (even if the particular pattern you’re working on actually comes from the British Isles, Scandinavia, or your own imagination). There can be any number of colors in a Fair Isle pattern, but usually just two colors are used in each row. And thank goodness for that!
While you knit with one color, you carry the other color along (or strand it along the back), creating what knitters call floats. So, you need to figure out a way to carry both yarns comfortably across the row. Some knitters put both yarns in their right hand. Others find it easier to carry one yarn in their right hand and carry the second yarn in their left hand. If, at first, you find that you can hold only one yarn at a time, alternating which yarn you hold, don’t worry; this technique works fine. You’ll get more comfortable holding the yarn as you go along.
Keep one ball of yarn on your left and one on your right so they don’t become tangled as you knit.
Don’t pull the yarn tightly when you knit the first stitch with a new color. The float you’re creating needs to span the back of as many stitches as it passes over. As you knit, take a moment to look at the back of your work, and be mindful of making your floats long enough. Some knitters find it useful to spread out the stitches on the right needle rather than bunching them up. Try working back and forth on a circular needle to give yourself more room to stretch the stitches out if you need to.
The following sections contain a few Fair Isle motifs that you can use to practice or to include in a few different patterns in this topic. If you’re new to knitting from charts or need a quick refresher, have a look at Chapter 4.
Simple stranded pattern
This simple stranded pattern creates little polka dots of color. Use white on a dark background to suggest snowflakes (as you see in Figure 7-5). You only carry both colors on those rows with the dots (that is, Rows 1 and 5 of the eight-row pattern repeat).
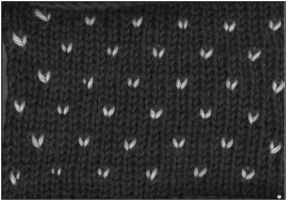
Figure 7-5:
A simple stranded pattern creates dots of color.
You can read stranded patterns from a chart like the one in Figure 7-6. When reading the chart, remember to read right-side rows from right to left and wrong-side rows from left to right.
To practice making a flat swatch with this simple stranded pattern, you need two colors, the main color (MC) and the contrasting color (CC). Cast on 27 stitches (or any multiple of 8 stitches plus 3) with MC, and then purl 1 row. Then check out Figure 7-6, repeating the 8 rows of the chart to form the pattern. Bind off when your swatch reaches the desired length, ending after Row 8.
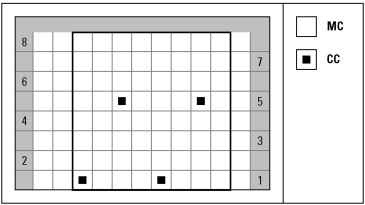
Figure 7-6:
A chart of the simple stranded pattern.
Small Fair Isle motif
A small Fair Isle motif, like the one in Figure 7-7, can be used as a simple border or as an allover pattern. For example, try it as a design for the throw pillows in Chapter 9. To do so, cast on 67 or 75 stitches (a multiple of 8 plus 3). You can also use this motif as a border on either the lacy V-neck top or the women’s scoop neck pullover in Chapter 14. The numbers for this pattern work out just right; you won’t have to modify the number of stitches you cast on for your top.
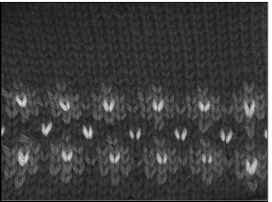
Figure 7-7:
A simple Fair Isle motif.
To practice this pattern, cast on 27 stitches (or any multiple of 8 plus 3) with color A. Color A is the same as the main color (or MC) if you intend to use this pattern as a detail on a larger project. Before you begin the chart, create a plain-colored border with color A. To do so, knit for 1 inch, ending with a wrong-side row. Then follow the chart in Figure 7-8. Repeat the 7 rows for the pattern. If you’re using this as a border stripe, repeat the 7 rows as many times as desired, ending the last repeat after Row 5, and then continue with color A only.
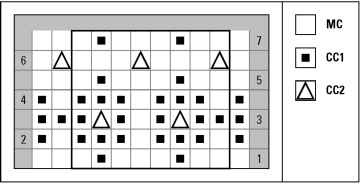
Figure 7-8:
A chart of the small Fair Isle motif.
If you’re making a swatch, work a few more rows with color A, and then bind off.
Fair Isle border
Figure 7-9 shows a classic-looking Fair Isle border pattern. Because this pattern uses five colors, it’s worth experimenting a bit with your graph paper and colored pencils (as I explain in the earlier section “Combining Colors with a Careful Eye”) to get the look that you’re after (whether that’s a vintage ski sweater or a more contemporary take on this classic). In fact, I think someone should create a Fair Isle coloring topic; if you’re like me, you’ll be fascinated by how different the same pattern can look when you simply exchange one color for another! Put your favorite Fair Isle border color combination into action on the women’s scoop neck pullover in Chapter 14.
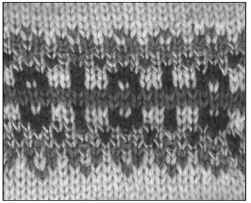
Figure 7-9:
A Fair Isle border pattern.
The same knitting principles for any stranded color work apply, whether it’s a simple two-color pattern or something more ambitious like Fair Isle. Even though five colors are used, remember that you’re only using two colors in any row. So the knitting will be the same. Reading the chart may demand a little more attention though; using a ruler or sticky note to mark what row of the pattern you’re on can help. See Chapter 4 for more on deciphering patterns and working from charts.
Before you start on a new row, take a moment to see what two colors are used in it. Cut the yarn for any color you won’t be using in the next couple of rows and leave a tail to weave in. Taking time to keep your yarns tidy helps prevent irritating tangles down the road.
It’s always smart to make a swatch with a Fair Isle pattern because you want to make sure that your gauge is right. Swatching also gives you a chance to see what the pattern will really look like knit up. To make your swatch of this pattern, cast on 27 stitches (or any multiple of 8 plus 3) with color A (which should be your main or background color), and work a few rows. Then follow the chart in Figure 7-10.
After completing the 18 rows of the pattern continue on with color A only. Work at least 4 inches in color A if you’re using this piece as a swatch to measure, and then bind off. That way you can be sure that your gauge over the color work section and the single color section are the same.
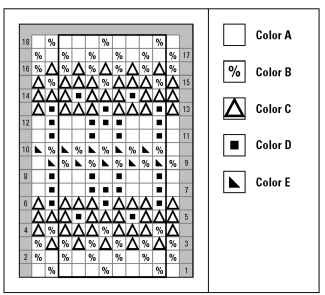
Figure 7-10:
A chart of a Fair Isle border.
Slip in Some Color: Mosaics
When it comes to color patterns, I love mosaics. Why? Their repeating geometric patterns are pleasing, and I find them much easier to knit than other multicolor techniques. If you can knit two-row stripes (which I discuss earlier in this chapter) and can slip a stitch, you’re more than halfway there. In mosaic knitting, instead of knitting with two strands of yarn, you only use one at a time. On right-side rows, any stitch that needs to be the “new” color (the color of yarn you’re holding), you knit. Any stitch that’s supposed to stay the old color (the color from the previous row), you slip, bringing the new color along on the wrong side of the work. (Chapter 4 has the basics of reading mosaic charts.) And wrong-side rows are even easier: If the stitch is the same color as the yarn in your hand, purl it; if it isn’t the same, slip it.
Here are a few things to remember about mosaic knitting:
Choose yarns that have the same weight. If one yarn is thicker than the other, the design won’t look its best.
When it comes to yarn color, contrast is vital to a pleasing final result. Choose two colors that have different values (that is, one darker and one lighter) so that the pattern pops out. To get more complex color results without the fuss of changing yarns all the time, choose a plain-colored yarn and a variegated yarn. A bright multicolored foreground with a black background, for example, looks almost like stained glass.
Work two rows in the first color and then two rows in the second color. Repeat. In the second row of a color, knit or purl the stitches that were worked in the previous row, and slip the slipped stitches. No stitches change color in this row.
Always slip stitches purlwise with the yarn held to the wrong-side of the work. (See Chapter 5 for how-to on slipping stitches.)
Mosaic patterns that are knit flat usually include some extra stitches for the edges so that the patterns stay evenly centered. For example, you’re likely to see directions that ask you to use, say, a multiple of 16 stitches plus 3. When you knit a mosaic in the round, though, throw out those extra stitches and stick to the even multiple only.
Stitches are slipped exactly twice. If you find yourself slipping a stitch more (or fewer) times, back up and read your knitting to see what went wrong.
If you tend to knit tightly, remember that the yarn carried behind the slipped stitch should be as wide as the normal stitches. Keep the stitches on the right needle stretched out a bit to help you overcome the tendency to pull too tight. Use a needle long enough to do so; working back and forth on a circular needle may help.
In the following sections, I give you two 16-stitch mosaics and three 8-stitch mosaics. Here are some general facts about each of them:
Mosaics with 16 stitches, like the puzzle piece mosaic and woven cord mosaic, can be substituted directly into the mosaic bags pattern in Chapter 11. The pattern for this eye-catching bag is a good one to help you get comfortable with mosaic knitting. Because you’re knitting in the round, you’ll find it easy to keep things lined up.
The written directions for both 16-stitch mosaics in this chapter are designed for knitting in the round (so they’re easy to use in the mosaic bags pattern); if you’re using this pattern to knit flat, add the 3 selvedge stitches shown in the charts (1 at the beginning of the row and 2 at the end of the row) to complete the pattern. If you’re using the charted pattern to work in the round, read only the outlined 16-stitch pattern repeat.
Smaller mosaics, such as the little mosaic, little boxes mosaic, and miniature mosaic are 8 stitches wide, which makes them perfect for the women’s scoop neck pullover and lacy V-neck top patterns in Chapter 14 (if you want to use a mosaic pattern in lieu of Fair Isle or lace). You can also use these smaller mosaics in the mosaic bags pattern. Just remember to throw out the 3 selvedge stitches given in the directions for knitting flat; you won’t need them to work in the round. Or try them on the throw pillows in Chapter 9, using 67 or 75 stitches.
If you want to get your hands on more mosaic patterns, any of the brilliant treasuries by Barbara G. Walker offer lots of inspiring options.
Puzzle piece mosaic
The puzzle piece mosaic, as the name suggests, looks a bit like jigsaw puzzle pieces. You can see this mosaic in Figure 7-11. You’ll find this mosaic to be quite predictable: After you get going with it, you’ll be able to see what should come next and will soon fall into its rhythm.
You can get a feel for this mosaic by making a swatch with 35 stitches. You’ll use two colors. I call them main color (MC) and contrasting color (CC), but the colors will be used equally. Cast on 35 stitches with CC and knit 2 rows, and then follow the chart in Figure 7-12 or the upcoming written directions. Remember, because you’re knitting flat, you need to use those 3 edge stitches!
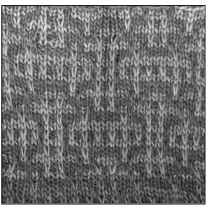
Figure 7-11:
Puzzle piece mosaic.
Set-up rounds: Knit 2 rounds with CC.
Round 1: With MC, *(k1, sl 1) 8 times, repeat from * to end.
Round 2 and all even-numbered rounds:
If a stitch was knit in the previous row (it will be the same color as the yarn in your hand), knit it (or purl it if you’re working back and forth).
If a stitch was slipped in the previous row (it won’t be the color of the yarn in your hand), slip the stitch purlwise with the yarn held to the wrong-side of the work.
Round 3: With CC, *k2, sl 1, k11, sl 1, k1, repeat from * to end.
Round 5: With MC, *k1, sl 1, k3, sl 1, k5, sl 1, k3, sl 1, repeat from * to end.
Round 7: With CC, *k4, sl 1, k1, sl 1, k3, sl 1, k1, sl 1, k3, repeat from * to end.
Round 9: With MC, *k1, sl 1, k5, sl 1, k1, sl 1, k5, sl 1, repeat from * to end.
Round 11: With CC, *k2, sl 1, k1, sl 1, k7, sl 1, k1, sl 1, k1, repeat from * to end.
Round 13: With MC, *k3, sl 1, k3, sl 1, k1, sl 1, k3, sl 1, k2, repeat from * to end.
Round 15: With CC, *k6, sl 1, k3, sl 1, k5, repeat from * to end.
Round 17: With MC, *(k1, sl 1) 8 times, repeat from * to end.
Round 19: Repeat Round 15.
Round 21: Repeat Round 13.
Round 23: Repeat Round 11.
Round 25: Repeat Round 9. Round 27: Repeat Round 7. Round 29: Repeat Round 5. Round 31: Repeat Round 3. Repeat Rounds 1-32 for pattern.
When your swatch is large enough to measure accurately and you feel comfortable knitting the mosaic pattern, bind off.
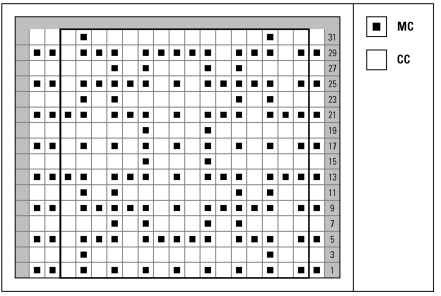
Figure 7-12:
Puzzle piece mosaic chart.
Woven cord mosaic
The woven cord mosaic, shown in Figure 7-13, creates a dynamic design with strong diagonal elements. Try it with the mosaic bags pattern as I have (see Chapter 11).
If you’re knitting flat, remember that you need the 3 edge stitches shown in the chart. If you’re knitting in the round, ignore the selvedge stitches and use only the 16-stitch pattern repeat outlined by the dark box. The written directions describe how to work the pattern in the round, so they’re easy to use with the mosaic bag pattern. But remember not to include the 3 edge stitches.
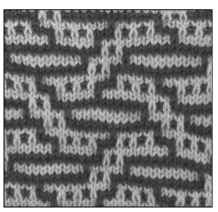
Figure 7-13:
The woven cord mosaic.
You can practice this mosaic by making a swatch that’s made with 35 stitches or any multiple of 16 plus 3. Choose two colors, referred to as MC and CC. MC is the foreground color, represented as black in the chart in Figure 7-14. CC is the background color, represented by white in the chart. To begin your swatch, cast on 35 stitches, knit 2 rows with CC, and then follow the chart or these written directions:
Set-up rounds: Knit 2 rounds with CC.
Round 1: With MC, *k8, sl 1, k1, sl 1, k5, repeat from * to end. Round 2 and all even-numbered rounds:
If a stitch was knit in the previous row (it will be the same color as the yarn in your hand), knit it (or purl it if you’re working back and forth).
If a stitch was slipped in the previous row (it won’t be the color of the yarn in your hand), slip the stitch purlwise with the yarn held to the wrong-side of the work.
Round 3: With CC, *k1, sl 1, k5, sl 1, k8, repeat from * to end.
Round 5: With MC, *k2, sl 1, k1, sl 1, k1, sl 1, k3, sl 1, k1, sl 1, k1, sl 1, k1, repeat from * to end.
Round 7: With CC, *k9, sl 1, k5, sl 1, repeat from * to end.
Round 9: With MC, *sl 1, k1, sl 1, k13, repeat from * to end.
Round 11: With CC, *k3, sl 1, k9, sl 1, k2, repeat from * to end.
Round 13: With MC, *sl 1, k13, sl 1, k1, repeat from * to end.
Round 15: With CC, *k1, sl 1, k5, sl 1, k8, repeat from * to end.
Round 17: With MC, *k2, sl 1, k1, sl 1, k1, sl 1, k3, sl 1, k1, sl 1, k1, sl 1, k1, repeat from * to end.
Round 19: With CC *k9, sl 1, k5, sl 1, repeat from * to end.
Round 21: With MC, *k6, sl 1, k1, sl 1, k7, repeat from * to end.
Round 23: With CC, *k5, sl 1, k5, sl 1, k4, repeat from * to end.
Repeat Rounds 1-24 for pattern. To complete your swatch, repeat the 24 rows of the chart, and then bind off.
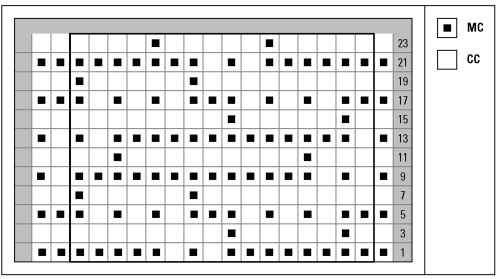
Figure 7-14:
The woven cord mosaic, charted.
Little mosaic
The little mosaic is shown at the bottom of Figure 7-15. Use it instead of the Fair Isle pattern on the women’s pullovers in Chapter 14 or try it on a throw pillow using 67 or 75 stitches and worsted weight yarn (see the throw pillow pattern in Chapter 9).
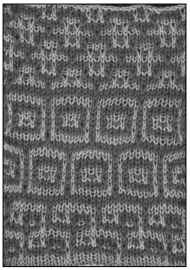
Figure 7-15:
Three 8-stitch mosaics from top to bottom.
To practice the little mosaic, use two colors, referred to as MC and CC. Cast on 27 stitches with MC and follow these directions to get started (or check out Figure 7-16 for a chart):
Set-up rows: With MC, knit a row, purl a row.
Row 1: With CC, k1, *k4, sl 1, k3, repeat from * to last 2 sts, k2.
Row 2 and all wrong-side rows: Purl the sts knit in the previous row and slip the sts slipped in the previous row.
Row 3: With MC, k1, *k3, sl 1, k1, sl 1, k1, sl 1, repeat from * to last 2 sts, k2.
Row 5: With CC, k1, *sl 1, k1, sl 1, k1, sl 1, k3, repeat from *to last 2 sts, sl 1, k1.
Row 7: With MC, k1, *k3, sl 1, k4, repeat from * to last 2 sts, k2.
Row 9: With CC, k1, *sl 1, k7, repeat from * to last 2 sts, sl 1, k1.
Row 11: With MC, k1, *k1, sl 1, k1, sl 1, k3, sl 1, repeat from * to last 2 sts, k2.
Row 13: With CC, k1, *sl 1, k3, sl 1, k1, sl 1, k1, repeat from * to last 2 sts, sl 1, k1.
Row 15: With MC, k1, *k7, sl 1, repeat from * to last 2 sts, k2.
Repeat Rows 1-16 for pattern. To complete your swatch, repeat the 16 rows once more and then bind off.
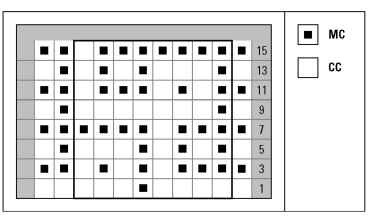
Figure 7-16:
Little mosaic chart.
Little boxes mosaic
The little boxes mosaic is a miniaturized version of the larger pinbox mosaic in Chapter 11. This mosaic is shown in the center of Figure 7-15 and charted in Figure 7-17.
To practice the little boxes mosaic, use 27 stitches to make a swatch. Use two colors, referred to as MC and CC. For your swatch, cast on 27 stitches with MC and follow these directions (or the chart in Figure 7-17):
Set-up rows: With MC, knit a row, purl a row. Row 1: With CC, knit.
Row 2 and all wrong-side rows: Purl the sts knit in the previous row and slip the sts slipped in the previous row.
Row 3: With MC, k1, *k4, sl 1, k3, repeat from * to last 2 sts, k2.
Row 5: With CC, k1, *k3, sl 1, k1, sl 1, k2, repeat from * to last 2 sts, k2.
Row 7: With MC, k1, *k2, sl 1, k1, sl 1, k1, sl 1, k1, repeat from * to last 2 sts, k2.
Row 9: With CC, k1, *k1, sl 1, k1, sl 1, k1, sl 1, k1, sl 1, repeat from * to last 2 sts, k2.
Row 11: With MC, k1, *k2, sl 1, k1, sl 1, k1, sl 1, k1, repeat from * to last 2 sts, k2.
Row 13: With CC, k1, *k3, sl 1, k1, sl 1, k2, repeat from * to last 2 sts, k2.
Row 15: With MC, k1, *k4, sl 1, k3, repeat from * to last 2 sts, k2.
Row 17: With CC, knit.
Row 19: With MC, k1, *sl 1, k7, repeat from * to last 2 sts, sl 1, k1.
Row 21: With CC, k1, *k1, sl 1, k6, sl 1, repeat from * to last 2 sts, k2.
Row 23: With MC, k1, *sl 1, k1, sl 1, k3, sl 1, k1, repeat from * to last 2 sts, sl 1, k1.
Row 25: With CC, k1, *k1, sl 1, k1, sl 1, k1, sl 1, k1, sl 1, repeat from * to last 2 sts, k2.
Row 27: With MC, k1, *sl 1, k1, sl 1, k3, sl 1, k1, repeat from * to last 2 sts, sl 1, k1.
Row 29: With CC, k1, *k1, sl 1, k6, sl 1, repeat from * to last 2 sts, k2.
Row 31: With MC, k1, *sl 1, k7, repeat from * to last 2 sts, sl 1, k1.
Repeat Rows 1-32 for pattern. If you’re making a swatch, bind off after Row 32.
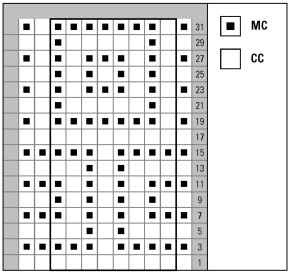
Figure 7-17:
The chart for the little boxes mosaic.
Miniature mosaic
The miniature mosaic, another 8-stitch mosaic pattern, can be used in the same places as the other small mosaic patterns. It’s also a great allover pattern; try it on a throw pillow (see Chapter 9 for the throw pillow pattern). Or you can knit it as a scarf using garter stitch instead of stockinette stitch — just remember to keep the yarn to the wrong-side when you slip your stitches! This mosaic is shown at the top of Figure 7-15 and is charted in Figure 7-18.
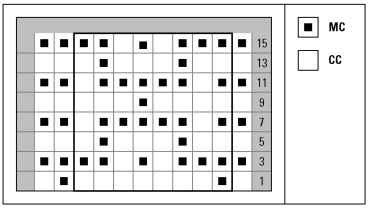
Figure 7-18:
Miniature mosaic chart.
To practice this mosaic pattern with a swatch, cast on 27 stitches with MC and follow these directions (or the chart in Figure 7-18):
Set-up rows: With MC, knit a row, purl a row.
Row 1: With CC, k1, *sl 1, k7, repeat from * to last 2 sts, sl 1, k1.
Row 2 and all wrong-side rows: Purl the sts knit in the previous row and slip the sts slipped in the previous row.
Row 3: With MC, k1, *k3, sl 1, k1, sl 1, k2, repeat from * to last 2 sts, k2.
Row 5: With CC, k1, *k2, sl 1, k3, sl 1, k1, repeat from * to last 2 sts, k2.
Row 7: With MC, k1, *k1, sl 1, k5, sl 1, repeat from * to last 2 sts, k2.
Row 9: With CC, k1, *k4, sl 1, k3, repeat from * to last 2 sts, k2.
Row 11: With MC, k1, *k1, sl 1, k5, sl 1, repeat from * to last 2 sts, k2.
Row 13: With CC, k1, *k2, sl 1, k3, sl 1, k1, repeat from * to last 2 sts, k2.
Row 15: With MC, k1, *k3, sl 1, k1, sl 1, k2, repeat from * to last 2 sts, k2.
Repeat Rows 1-16 for pattern. To complete your swatch, repeat the 16 rows once more and then bind off.
Color for Cheaters: Adding Details after You Finish Knitting
So what do you do when you want to add a bit of color or personalization to a hand-knit after the fact? Or what do you do if you’re reaching despair with the line of duckies that you’re supposed to have in a row on that sweater? My answer: cheat. Well, it’s not really cheating, but in the following sections, I show you two great ways to add little bits of color detail after the piece has been knit: duplicate stitch and surface crochet. I find these techniques particularly useful for things like monogramming a baby’s name or initial onto an already knit piece after he or she arrives. That way, you can have the hat or blanket done in a neutral color, and just add the details (in whatever you deem to be a gender-appropriate color) at the last minute.
Here’s a little secret: You don’t actually even have to knit the thing that you’re personalizing. These techniques work just fine on purchased knits too.
Duplicate stitch
Duplicate stitch, also called Swiss Darning, allows you to go back over your stitches with a different color. When done carefully, you can’t even tell that the stitches weren’t knit in the contrasting color (or at least not without scrutiny).
To work duplicate stitch, you need a finished piece in stockinette stitch, a good yarn needle, and some contrasting yarn of the same weight as the knitted piece. Tape or ribbon yarns work very nicely. Also consider a yarn with some variegation; this type of yarn adds shading to your finished work.
Before you start working the duplicate stitch, decide what you want to stitch, where you want to stitch it, and how big it should be. Say, for example, that you want to make letters that are about 2 inches tall. To figure out how many stitches you have to work with vertically, multiply your row gauge by 2. (See Chapter 2 for gauge basics.) At 5 rows per inch, for example, that’s 10 stitches. So, using knitter’s graph paper, draw out your design so that it’s ten spaces tall.
From here, duplicate stitch is a bit like counted cross-stitch and a bit like weaving in your ends. Thread your needle with the contrasting yarn, and, looking at your chart, begin stitching (following the steps I provide later in the section). The trick to duplicate stitch is to follow the serpentine path that the yarn takes: up, over, down, over, up, over, down, over (which makes little horseshoes).
The technique that you use for duplicate stitch is also a tidy way to weave in ends. When worked from the wrong side, the ends are almost invisible and have the same stretch as the finished knitting.
To work duplicate stitch, follow these steps:
1. Insert the needle from the wrong-side to the right-side at the base of the first stitch (you see the yarn come out the front of the piece in Figure 7-19).
2. Follow the line of the stitch and put the needle back in at the top of the stitch (that is, in the row above the stitch that you’re duplicating) as shown in Figure 7-19).
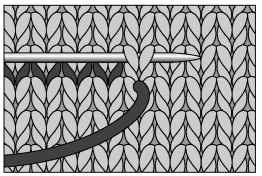
Figure 7-19:
Starting the duplicate stitch technique.
3. Go under the full stitch (two legs) in the row above, and then bring the needle back out to the right side.
4. Put the needle back in where you came out, at the bottom of the stitch.
5. Go under one full stitch (two legs) in the row below the stitch you’re duplicating, and then bring the needle back out to the front as shown in Figure 7-20.
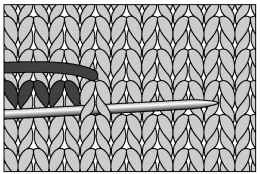
Figure 7-20:
Showing progress on duplicate stitch.
6. Follow Steps 2-5 for each stitch that you want to duplicate.
If the stitches aren’t consecutive, it’s fine to skip spaces. However, always begin by bringing the needle from back to front at the base of the stitch to be duplicated.
To practice duplicate stitching, first make a swatch that’s about 20 stitches wide and about 30 rows tall and bind it off (or use a leftover swatch from another project). On graph paper, sketch out your initial, no more than 10 stitches wide or 20 stitches tall. With a contrasting yarn, duplicate stitch your initial onto the swatch. When practicing this technique, you may find it useful to have a swatch knit in a variegated yarn; this makes following the path of the yarn easier. Be sure the yarn you’re stitching with contrasts strongly with the yarn of the swatch.
Surface crochet
Like duplicate stitch, surface crochet is a great way to add colorful details to a finished piece. However, it’s a little more free-form than duplicate stitch and it has a different look. It’s a fun technique to experiment with and can be used on top of any stitch pattern. In other words, unlike duplicate stitch, surface crochet doesn’t require your finished piece to be knit in stockinette stitch.
To try surface crochet, you need your finished knit, some contrasting yarn, and a crochet hook. Before you start, you should have a rough idea of what sort of designs you want to add and where. But because surface crochet is pretty easy to redo, feel free to experiment with the technique, adding flowers, geometric motifs, or abstract designs as the spirit moves you. You can work with a single color or with many.
To surface crochet, follow these steps:
1. Insert your crochet hook through a purl bump or the ladder rung between columns of stitches.
Grab the contrasting yarn with the hook and pull it through, forming your first loop or crochet chain.
2. Stick the hook under the next purl bump or ladder rung.
Wrap the yarn around the hook and pull it through the loop on the hook. See Figure 7-21 to see what this step looks like.
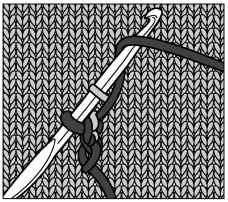
Figure 7-21:
Adding detail with surface crochet.
3. Continue in this way until your design is done.
You can move up, down, sideways, or diagonally. Figure 7-22 shows a finished surface crochet design.
As you’re working, take care to keep your stitches loose enough that you don’t cause the finished piece to pucker. Try a larger hook or work 1 chain stitch between stitches if you have trouble keeping your stitches loose.
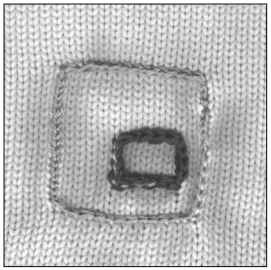
Figure 7-22:
A quick design adds personality.
Experiment with surface crochet techniques using spare swatches and scrap yarn. Try your hand at making circles, triangles, letters, or abstract designs using one color or several.
