Unless you’ve had some experience reading topographic maps, trying to figure out terrain elevation based on contour lines can be challenging. (Contour lines are a way of representing height on a map.) Terrain Navigator has two features — 3-D View and the Terrain Profile tool — that help you better visualize where the land starts to get steep or flatten. You can use the map from earlier sections of this topic to see just how much of a climb you’re in for.
Other Maptech products
In addition to Terrain Navigator, Maptech has several other topographic map products that you might find useful, including
Terrain Navigator Pro is Maptech’s high-end version of Terrain Navigator targeted toward professional map users and is priced around $300 per state. Use its enhanced features to
- Display aerial photographs downloaded from the Maptech’s Internet servers.
- Locate street addresses.
- Link digital photos, spreadsheets, and other files with locations on maps.
- Export maps for use with Geographic Information System (GIS) programs such as ArcGIS and AutoCAD.
- National Park Digital Guide has topographic maps of all the National Parks in the United States, including photos and information about sights and services both inside and outside the parks. The guide costs around $50.
- Appalachian, Continental Divide, and Pacific Crest Trail products contain topographic maps for the areas around each one of these classic trails and cost under $100. The Appalachian Trail software, priced around $50, has extensive guidebook information along with maps.
- Outdoor Navigator is a mapping program for Pocket PCs and Palm PDAs that lets you load detailed topographic maps on your PDA. The product is priced around $100.
- You can find more about these products and their features by visiting: www.map tech.com
Using a 3-D map image
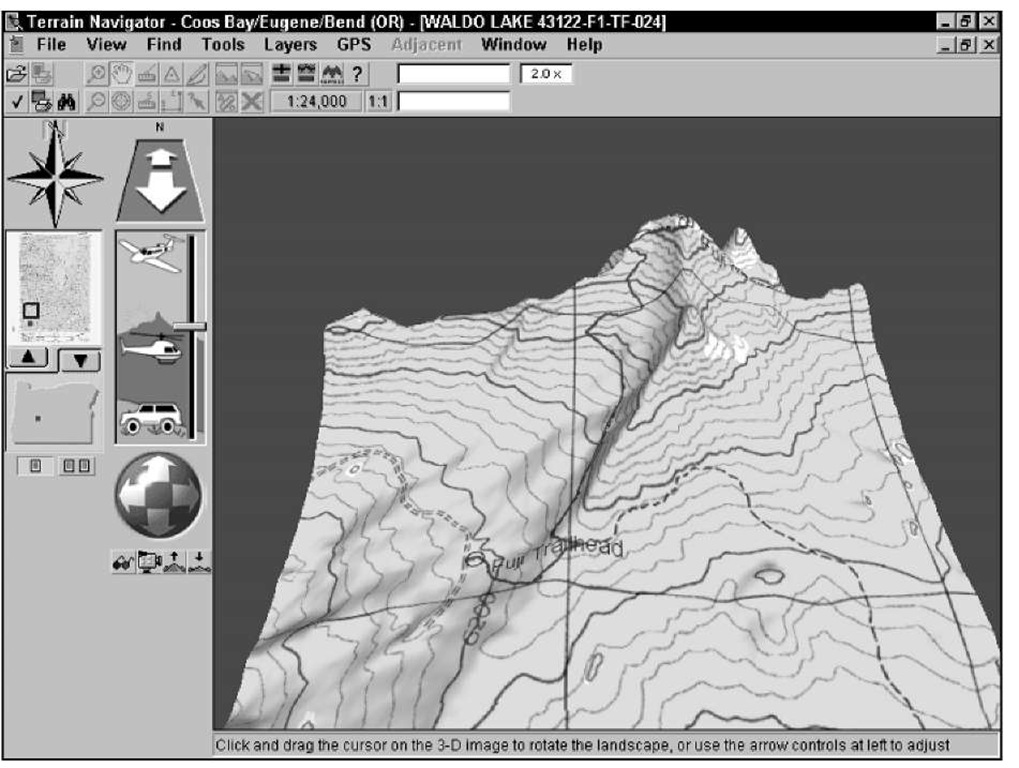
Use Terrain Navigator to display 3-D, shaded relief images of a map to help you better understand the terrain. To show a 3-D image of the map that’s currently displayed onscreen, click the 3-D View button on the toolbar. (It looks like mountains with a small bar underneath.)
The topographic map of Fuji Mountain (including the markers and track added in the earlier section, "Planning a Trip with Terrain Navigator") is displayed in 3-D, as shown in Figure 13-5.
A red rectangle appears on the overview map, showing you the general location of the terrain, based on the current 3-D view of the map.
To control the view of the 3-D map
Click and drag the cursor on the map to rotate the image.
Use the trackball control to the left of the map to rotate up, down, left, and right. You can also use the keyboard navigation arrow keys.
Use the Elevation slider bar control (it has a picture of a truck, a helicopter, and an airplane) to adjust the height you’re viewing the map from.
Use the zoom arrows above the Elevation slider bar to control how close forward or backward your view of the terrain is.
Use the Vertical Exaggeration buttons beneath the trackball control to increase and decrease the vertical scale so elevation differences are easy to distinguish.
To toggle back to a 2-D version of the map, click the 3-D View toolbar button.
If you want a true 3-D experience, Terrain Navigator comes with a special pair of red-and-blue-lens, stereoscopic glasses. If you click the 3-D Glasses icon, the map is colored so it appears to have three-dimensional depth when you’re wearing the glasses.
Figure 13-5:
Manipulate a topographic map in 3-D.
Charting elevation profiles
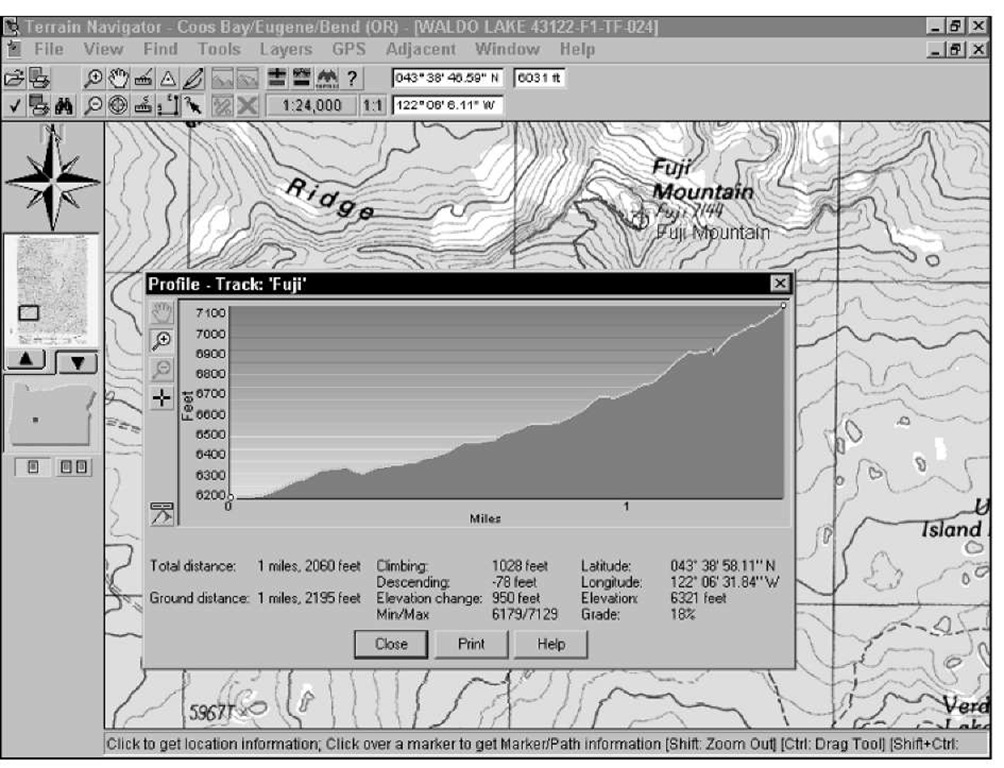
Although the 3-D map view gives you a visual sense of how steep your hike is, you can get even more detailed information by using the Terrain Profile tool. This feature shows you the elevation gain/loss of your hike in pictures and numbers. Here’s how to use this tool:
1. Make sure that the map is displayed in 2-D.
See the preceding section for how to do this.
2. Click the Information tool on the toolbar (an arrow with a question mark).
3. Right-click the track and select Profile from the pop-up menu.
A Profile dialog box opens, as shown in Figure 13-6, that displays an elevation chart of the trail as well as how many feet you’ll be climbing and descending over the course of the trip.
Figure 13-6:
Show elevation profile information for a selected track.
Vertical profiles may have a lot of vertical exaggeration to show relative steepness. This can make terrain appear steeper than it actually is.


