In This Chapter
Exploring VBA examples
Making your VBA code run as fast as possible
The philosophy for learning how to write Excel macros places heavy emphasis on examples. I find that a well-thought-out example often communicates a concept much better than a lengthy description of the underlying theory. Because you’re reading this topic, you probably agree with me. This chapter presents several examples that demonstrate common VBA techniques.
I organize these examples into the following categories:
Working with ranges Changing Excel settings Working with charts Speeding up your VBA code
Although you might be able to use some of the examples directly, in most cases you must adapt them to your own needs.
Working with Ranges
Most of your VBA programming probably involves worksheet ranges. (For a refresher course on Range objects, refer to Chapter 8. When you work with Range objects, keep the following points in mind:
Your VBA doesn’t need to select a range to work with it.
If your code does select a range, its worksheet must be active.
The macro recorder doesn’t always generate the most efficient code. Often, you can create your macro by using the recorder and then edit the code to make it more efficient.
It’s a good idea to use named ranges in your VBA code. For example, using Range(Total) is better using than Range(D45). In the latter case, if you add a row above row 45, you need to modify the macro so it uses the correct range address (D46).
When running a macro that works on the current range selection, the user might select entire columns or rows. In most cases, you don’t want to loop through every cell in the selection (that could take a long time). Your macro should create a subset of the selection consisting of only the nonblank cells.
Excel allows multiple selections. For example, you can select a range, press Ctrl, and select another range. (Do your range selection with the mouse, of course.) You can test for this in your macro and take appropriate actions.
The examples in this section, which are available at this topic’s Web site, demonstrate these points.
If you prefer to enter these examples yourself, press Alt+F11 to activate the VBE. Then insert a VBA module and type the code. Make sure that the workbook is set up properly. For example, if the example uses two sheets named Sheet1 and Sheet2, make sure that the workbook has sheets with those names.
Copying a range
Copying a range ranks right up there as one of the most favorite Excel activities of all time. When you turn on the macro recorder and copy a range from A1:A5 to B1:B5, you get this VBA macro:

Notice the last statement. This statement was generated by pressing Esc, which cancels the marching ants display that appears in the worksheet when you copy a range.
This macro works fine, but you can copy a range more efficiently than this. You can produce the same result with the following one-line macro, which doesn’t select any cells:

This procedure takes advantage of the fact that the Copy method can use an argument that specifies the destination. This example also demonstrates that the macro recorder doesn’t always generate the most efficient code.
Copying a Variable-sized range
In many cases, you need to copy a range of cells but don’t know the exact row and column dimensions. For example, you might have a workbook that tracks weekly sales. The number of rows changes as you add new data.
Figure 14-1 shows a range on a worksheet. This range consists of several rows, and the number of rows can change from day to day. Because you don’t know the exact range address at any given time, writing a macro to copy the range can be challenging. Are you up for the challenge?
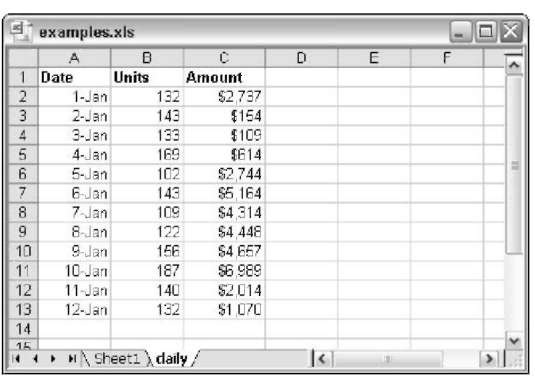
Figure 14-1:
This range can consist of any number of rows.
The following macro demonstrates how to copy this range from Sheet1 to Sheet2 (beginning at cell A1). It uses the Current Region property, which returns a Range object that corresponds to the block of cells around a particular cell. In this case, that’s A1.

Using the Current Region property is equivalent to choosing the Edit Go To command, clicking the Special button, and selecting the Current region option. To see how this works, record your actions while issuing that command. Generally, the Current Region consists of a rectangular block of cells surrounded by one or more blank rows or columns.
You can make this macro even more efficient by not selecting the destination. The following macro takes advantage of the fact that the Copy method can use an argument for the destination range:

Selecting to the end of a row or column
You’re probably in the habit of using key combinations such as Ctrl+Shift+ Right Arrow and Ctrl+Shift+Down Arrow to select a range that consists of everything from the active cell to the end of a row or a column. Not surprisingly, you can write macros that perform these types of selections.
You can use the Current Region property to select an entire block of cells. But what if you want to select, say, one column from a block of cells? Fortunately, VBA can accommodate this type of action. The following VBA procedure selects the range beginning at the active cell and extending down to the cell just above the first blank cell in the column. After selecting the range, you can do whatever you want with it — copy it, move it, format it, and so on.

This example uses the End method of the Active Cell object, which returns a Range object. The End method takes one argument, which can be any of the following constants:
xlUp
xlDown
xlToLeft xlToRight
Keep in mind that it’s unnecessary to select a range before doing something with it. The following macro applies bold formatting to a variable-sized range without selecting the range:

Selecting a row or column
The following procedure demonstrates how to select the column containing the active cell. It uses the Entire Column property, which returns a Range object that consists of a full column:

As you may expect, VBA also offers an Entire Row property, which returns a Range object that consists of an entire row.
Moving a range
You move a range by cutting it to the Clipboard and then pasting it in another area. If you record your actions while performing a move operation, the macro recorder generates code like the following:

As with the copying example earlier in this chapter, this is not the most efficient way to move a range of cells. In fact, you can move a range with a single VBA statement, as follows:

This macro takes advantage of the fact that the Cut method can use an argument that specifies the destination. Notice also that the range was not selected. The cell pointer remains in its original position.
Looping through a range efficiently
Many macros perform an operation on each cell in a range, or they might perform selected actions based on each cell’s content. These macros usually include a For-Next loop that processes each cell in the range.
The following example demonstrates how to loop through a range of cells. In this case, the range is the current selection. A variable named Cell refers to the cell being processed. Within the For-Next loop, the single statement evaluates the cell and changes its interior color if the cell contains a positive value.

This example works, but what if the selection consists of an entire column or row? This is not uncommon because Excel lets you perform operations on entire columns or rows. In such a case, the macro seems to take forever because it loops through each cell in the selection — even the blank cells. To make the macro more efficient, you need a means for processing only the nonblank cells.
The following routine does just that by using the Special Cells method. (Refer to the VBA Help system for specific details about its arguments.) This routine uses the Set keyword to create two new objects: the selection’s subset that consists of cells with constants and the selection’s subset that consists of cells with formulas. The routine processes each of these subsets, with the net effect of skipping all blank cells. Pretty slick, eh?

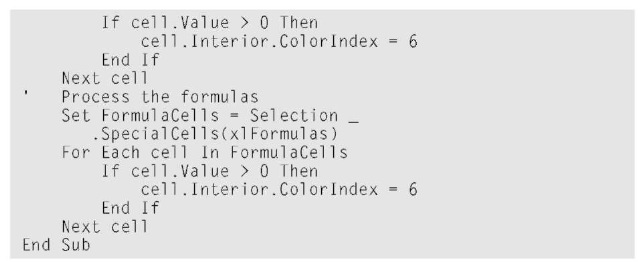
The Skip Blanks procedure works equally fast, regardless of what you select. For example, you can select the range, all columns in the range, all rows in the range, or even the entire worksheet. It’s a vast improvement over the ProcessCells procedure presented earlier in this section.
Notice that I use the following statement in this code:
![]()
This statement tells Excel to ignore any errors that occur and simply process the next statement (see Chapter 12 for a discussion of error handling). This statement is necessary because the Special Cells method produces an error if no cells qualify.
Using the Special Cells method is equivalent to choosing the Edit Go To command, clicking the Special button, and selecting the Constants option or the Formulas option. To get a feel for how this works, record your actions while you issue that command and select various options.
Prompting for a cell value
As shown in Figure 14-2, you can use VBA’s InputBox function to get a value from the user. Then you can insert that value into a cell. The following procedure demonstrates how to ask the user for a value and place the value in cell A1 of the active worksheet, using only one statement:


Figure 14-2:
Use the VBA InputBox function to get a value from the user.
If you try out this example, you find that clicking the Cancel button in the Input Box erases the current value in cell A1. The following macro demonstrates a better approach: using a variable (x) to store the value entered by the user. If the value is not empty (that is, the user didn’t click Cancel), the value of x is placed into cell A1. Otherwise, nothing happens.

The variable x is defined as a variant because it could be a number or an empty string (if the user clicks Cancel).
Determining the selection type
If you design your macro to work with a range selection, the macro must be able to determine whether a range is actually selected. If something other than a range is selected (such as a chart or a shape), the macro will probably bomb. The following procedure uses the VBA Type Name function to identify the type of object that is currently selected:

If a Range object is selected, the MsgBox displays Range. If your macro works only with ranges, you can use an If statement to ensure that a range is selected. This example displays a message and exits the procedure if the current selection is not a Range object:

Identifying a multiple selection
As you know, Excel allows multiple selections by pressing Ctrl while choosing objects or ranges. This can cause problems with some macros. For example, you can’t copy a multiple selection that consists of nonadjacent ranges. (Try it if you don’t believe me.)
The following macro demonstrates how to determine whether the user made a multiple selection, so your macro can take appropriate action:

This example uses the Areas method, which returns a collection of all objects in the selection. The Count property returns the number of objects in the collection.
Changing Excel Settings
Some of the most useful macros are simple procedures that change one or more of Excel’s settings. For example, simply changing the recalculation mode from automatic to manual requires numerous steps. You can save yourself some keystrokes and menu choices (not to mention time) by creating a macro that automates this task.
This section presents two examples that show you how to change settings in Excel. You can apply the general principles demonstrated by these examples to other operations that change settings.
Changing Boolean settings
Like a light switch, a Boolean setting is either on or off. For example, you might want to create a macro that turns the worksheet row and column headings on and off. With the headings turned on, Excel generates the following code if you record your actions while accessing the Options dialog box:
![]()
On the other hand, if the headings are turned off when you record the macro, Excel generates the following code:
![]()
This may lead you to suspect that you need two macros: one to turn on the headings and one to turn them off. Not true. The following procedure uses the Not operator to effectively toggle the heading display from True to False and from False to True:

The first statement ensures that the active sheet is a worksheet. (Chart sheets don’t have headings.) If a worksheet is not active, the procedure ends. You can use this technique with any settings that have Boolean (True or False) values.
Changing non-Boolean settings
Use a Select Case structure for non-Boolean settings. This example toggles the calculation mode between manual and automatic and displays a message indicating the current mode:

You can adapt this technique for changing other non-Boolean settings.
Working with Charts
Charts are packed with different objects, so manipulating charts with VBA can be quite confusing. To get a feel for this, turn on the macro recorder, create a chart, and perform some routine chart-editing tasks. You may be surprised by the amount of code Excel generates. After you understand the objects in a chart, however, you can create some useful macros.
To write macros that manipulate charts, you must understand some terminology. An embedded chart on a worksheet is a Chart Object object. You can activate a Chart Object much like you activate a sheet. The following statement activates the Chart Object named Chart 1:
![]()
After you activate the chart, you can refer to it in your VBA code as the Active Chart. If the chart is on a separate chart sheet, it becomes the active chart as soon as you activate that chart sheet.
When you click an embedded chart, Excel actually selects an object inside the Chart Object object. You can select the Chart Object itself by pressing Ctrl while clicking the embedded chart. Select the Chart Object if you want to change an embedded chart’s name. After selecting the Chart Object object, use the Name box (the control to the left of the formula bar) to change the name.
Modifying the chart type
Here’s a confusing statement for you: A Chart Object object acts as a container for a Chart object.
To modify a chart with VBA, you don’t have to activate the chart. Rather, the Chart method can return the chart contained in the Chart Object. Are you thoroughly confused yet? The following two procedures have the same effect — they change the chart named Chart 1 to an area chart. The first procedure activates the chart first; the second one doesn’t. The built-in constant xlArea represents an area chart.

Looping through the Chart Objects collection
This example changes the chart type of every embedded chart on the active sheet. The procedure uses a For-Next loop to cycle through each object in the Chart Objects collection, access the Chart object in each, and change its Type property.

The following macro performs the same function but works on all the chart sheets in the active workbook:

Modifying properties
The following example changes the Legend font for all charts on the active sheet. It uses a For-Next loop to process all Chart Object objects:

Note that the Font object is contained in the Legend object, which is contained in the Chart object, which is contained in the Chart Objects collection. Now do you understand why it’s called an object hierarchy?
Applying chart formatting
This example applies several different types of formatting to the active chart:
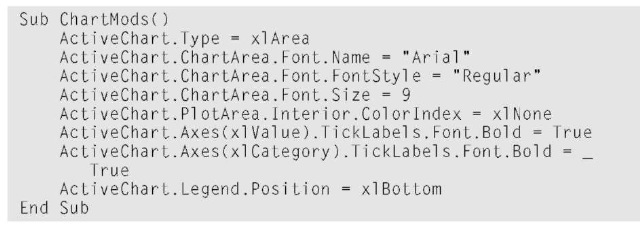
You must activate a chart before executing this macro. Activate an embedded chart by clicking it. To activate a chart on a chart sheet, activate the chart sheet.
To ensure that a chart is selected, you can add some error-handling code. (See Chapter 12 for details about error handling.) Here’s the modified macro, which displays a message if a chart is not selected:
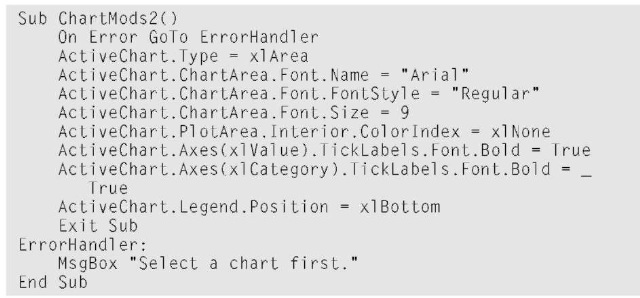
I created this macro by recording my actions as I formatted a chart. Then I cleaned up the recorded code by removing irrelevant lines.
VBA Speed Tips
VBA is fast, but it’s not always fast enough. (Computer programs are never fast enough.) This section presents some programming examples you can use to speed up your macros.
Turning off screen updating
When executing a macro, you can watch everything that occurs in the macro. Although this can be instructive, after getting the macro working properly, it’s often annoying and can slow things down considerably. Fortunately, you can disable the screen updating that normally occurs when you execute a macro. To turn off screen updating, use the following statement:
![]()
If you want the user to see what’s happening at any point during the macro, use the following statement to turn screen updating back on:
![]()
To demonstrate the difference in speed, execute this simple macro, which fills a range with numbers:
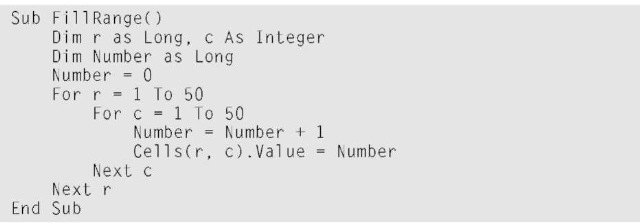
You see each value being entered into the cells. Now insert the following statement at the beginning of the procedure and execute it again:
![]()
The range is filled up much faster, and you don’t see the end result until the macro is finished running.
Turning off automatic calculation
If you have a worksheet with many complex formulas, you may find that you can speed things up considerably by setting the calculation mode to manual while your macro is executing. When the macro finishes, set the calculation mode back to automatic.
The following statement sets the Excel calculation mode to manual:
![]()
Execute the next statement to set the calculation mode to automatic:
![]()
Eliminating those pesky alert messages
As you know, a macro can automatically perform a series of actions. In many cases, you can start a macro and then go hang out at the water cooler while Excel does its thing. Some operations performed in Excel, however, display messages that require a human response. For example, if your macro deletes a sheet, Excel displays the message shown in Figure 14-3. These types of messages mean you can’t leave Excel unattended while it executes your macro.

Figure 14-3:
You can instruct Excel to not display these types of alerts while running a macro.
To avoid these alert messages, insert the following VBA statement in your macro:
![]()
When the procedure ends, Excel automatically resets the Display Alerts property to True (its normal state).
Simplifying object references
As you probably already know, references to objects can become very lengthy. For example, a fully qualified reference to a Range object may look like this:

If your macro frequently uses this range, you may want to create an object variable by using the Set command. For example, the following statement assigns this Range object to an object variable named Rate:

After defining this object variable, you can use the variable Rate rather than the lengthy reference. For example, you can change the value of the cell named Interest Rate:
![]()
This is much easier to type (and understand) than the following statement:

In addition to simplifying your coding, using object variables also speeds up your macros considerably. After creating object variables, I’ve seen some macros execute twice as fast as before.
Declaring variable types
You don’t usually have to worry about the type of data you assign to a variable. Excel handles all the details for you behind the scenes. For example, if you have a variable named MyVar, you can assign a number of any type to that variable. You can even assign a text string to it later in the procedure.
But if you want your procedures to execute as fast as possible (and avoid some potentially nasty problems), tell Excel what type of data will be assigned to each of your variables. This is known as declaring a variable’s type. (Refer to Chapter 7 for complete details.) Get into the habit of declaring all variables that you use.
In general, you should use the data type that requires the smallest number of bytes yet can still handle all the data assigned to it. When VBA works with data, execution speed depends on the number of bytes VBA has at its disposal. In other words, the fewer bytes data uses, the faster VBA can access and manipulate the data.
If you use an object variable (as described in the preceding section), you can declare the variable as a particular object type. Here’s an example:

Using the With-End With structure
Do you need to set a number of properties for an object? Your code runs faster if you use the With-End With structure. An additional benefit is that your code may be easier to read.
The following code does not use With-End With:

Here’s the same code, rewritten to use With-End With.

If this structure seems familiar to you, it’s probably because the macro recorder uses With-End With whenever it can.
