In This Chapter
Using a custom dialog box in your application Creating a dialog box: A hands-on example
The previous chapters show you how to insert a UserForm (which contains a custom dialog box), add controls to the UserForm, and adjust some of the control’s properties. These skills, however, won’t do you much good unless you understand how to make use of custom dialog boxes in your VBA code. This chapter provides these missing details and presents some useful techniques and tricks in the process.
Using Dialog Boxes
When you use a custom dialog box in your application, you normally write VBA code that does the following:
Initializes the UserForm controls. For example, you may write code that sets the default values for the controls.
Displays the dialog box by using the UserForm object’s Show method.
Writes event-handler procedures for the various controls.
Validates the information provided by the user (if the user did not cancel the dialog box). This step is optional.
Takes some action with the information provided by the user (if the information is valid).
A UserForm Example
This example demonstrates the five points I describe in the preceding section. (In Chapter 16, I present a different, simple hands-on dialog box example.) You use a dialog box to get two pieces of information: a person’s name and sex. The dialog box uses a TextBox control to get the name and three OptionButtons to get the sex (Male, Female, or Unknown). The information collected in the dialog box is then sent to the next blank row in a worksheet.
Creating the dialog box
Figure 18-1 shows the finished custom dialog box for this example. For best results, start with a new workbook with only one worksheet in it. Then follow these steps:
1. Press Alt+Fll to activate the VBE.
2. In the Project window, select the empty workbook and choose Insert UserForm.
An empty UserForm is added to the project.
3. Change the UserForm’s Caption property to Get Name and Sex. If the Properties window isn’t visible, press F4.
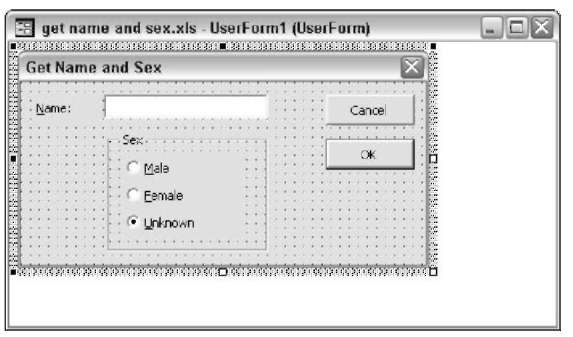
Figure 18-1:
This dialog box asks the user to enter a name and a sex.
This dialog box has eight controls:
‘ A Label. I modified the following properties for this control: Property Value
Accelerator N Caption Name
TabIndex 0
‘ A TextBox. I modified the following properties for this control: Property Value
Name TextName
TabIndex 1
A Frame object. I modified the following properties for this control: Property Value
Caption Sex
TabIndex 2
‘ An OptionButton. I modified the following properties for this control: Property Value
Accelerator M Caption Male
Name OptionMale
TabIndex 0
Another OptionButton. I modified the following properties for this control:
Property Value
Accelerator F Caption Female
Name OptionFemale
TabIndex 1
Another OptionButton. I modified the following properties for this control:
Property Value
Accelerator U Caption Unknown
Name OptionUnknown
TabIndex 2 Value True
A CommandButton. I modified the following properties for this button: Property Value
Caption OK
Default True
Name OKButton
TabIndex 3
Another CommandButton. I modified the following properties for this button:
Property Value
Caption Cancel
Cancel True
Name CancelButton
TabIndex 4
If you’re following along on your computer (and you should be), take a few minutes to create this UserForm using the preceding information. Make sure to create the Frame object before adding the OptionButtons to it.
In some cases, you may find copying an existing control easier than creating a new one. To copy a control, press Ctrl while you drag the control.
If you prefer to cut to the chase, you can download the example from this topic’s Web site.
Writing code to display the dialog box
After you’ve added the controls to the UserForm, your next step is to develop some VBA code to display this dialog box:
1. In the VBE window, choose InsertOModule to insert a VBA module.
2. Enter the following macro:

This short procedure uses the UserForm object’s Show method to display the dialog box.
Making the macro available
The next set of steps makes executing this procedure an easy task:
1. Activate Excel.
2. Right-click a toolbar and select Forms from the shortcut menu.
Excel displays its Forms toolbar.
3. Use the Forms toolbar to add a button to the worksheet: Click the Button tool and drag in the worksheet to create the button.
The Assign Macro dialog box appears.
4. Assign the GetData macro to the button.
5. Edit the button’s caption so that it reads Data Entry.
Trying out your dialog box
Follow these steps to test your dialog box.
1. Click the Data Entry button on the worksheet.
The dialog box appears, as shown in Figure 18-2.
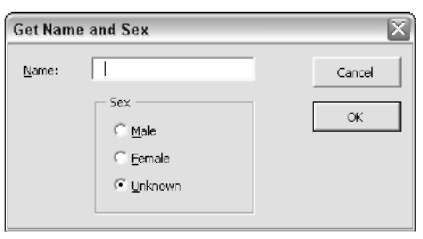
Figure 18-2:
Executing the GetData procedure displays the dialog box.
2. Enter some text into the edit box.
3. Click OK or Cancel.
Nothing happens — which is understandable because you haven’t created any procedures yet.
4. Click the Close button in the dialog box’s title bar to get rid of the dialog box.
Adding event-handler procedures
In this section, I explain how to write the procedures that handle the events that occur when the dialog box is displayed.
1. Press Alt+Fll to activate the VBE.
2. Make sure the UserForm is displayed; double-click the Cancel button.
The VBE activates the Code window for the UserForm and provides an empty procedure named CancelButton_Click.
3. Modify the procedure as follows:

This procedure, which is executed when the user clicks the Cancel button, simply unloads the dialog box.
4. Press Shift+F7 to redisplay UserForm1.
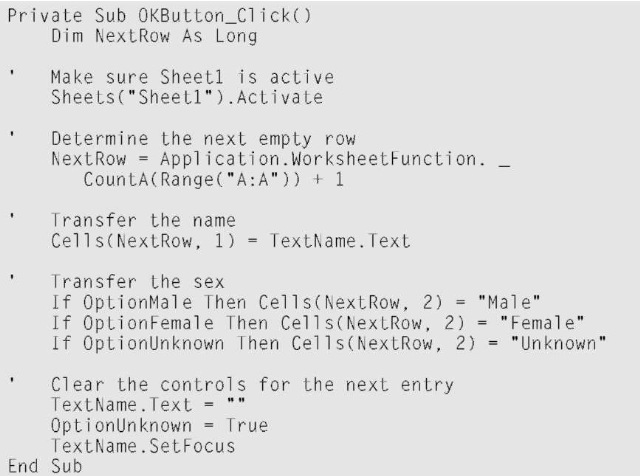
5. Double-click the OK button and enter the following procedure:
6. Now activate Excel and run the procedure again by clicking the Data Entry button.
The dialog box works just fine. Figure 18-3 shows how this looks in action.
Here’s how it works:
First, the procedure makes sure that the proper worksheet (Sheet1) is active.
It then uses the Excel COUNTA function to count the number of entries in column A and to determine the next blank cell in the column.
Next, the procedure transfers the text from the TextBox to Column A.
It then uses a series of If statements to determine which OptionButton was selected and writes the appropriate text (Male, Female, or Unknown) to column B.
Finally, the dialog box is reset to make it ready for the next entry. Notice that clicking OK doesn’t close the dialog box. To end data entry, click the Cancel button.
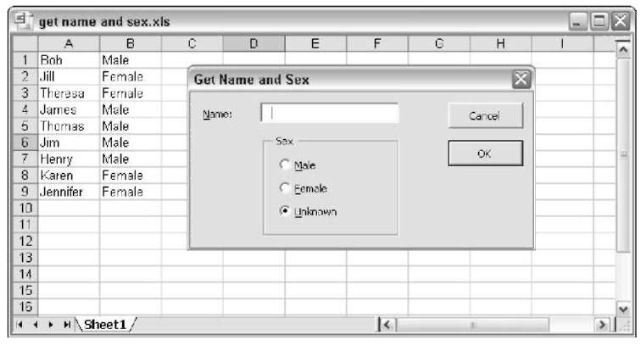
Figure 18-3:
Use the custom dialog box for data entry.
Validating the data
Play around with this routine some more and you find that the macro has a small problem: It doesn’t ensure that the user actually enters a name into the TextBox. The following code — which is inserted in the OKButton_Click procedure before the text is transferred to the worksheet — ensures that the user enters some text in the TextBox. If the TextBox is empty, a message appears and the routine stops.

Now the dialog box works
After making these modifications, you find that the dialog box works flawlessly. In real life, you’d probably need to collect more information than just name and sex. However, the same basic principles apply. You just have to deal with more UserForm controls.
More UserForm Examples
I could probably fill an entire topic with interesting and useful tips for working with custom dialog boxes. Unfortunately, this topic has a limited number of pages, so I wrap it up with a few more examples.
A ListBox example
ListBoxes are useful controls, but working with them can be a bit tricky. Before displaying a dialog box that uses a ListBox, fill the ListBox with items. Then, when the dialog box is closed, you need to determine which item(s) the user selected.
When dealing with list boxes, you need to know about the following properties and methods:
AddItem: You use this method to add an item to a ListBox.
ListCount: This property returns the number of items in the ListBox.
ListIndex: This property returns the index number of the selected item or sets the item that’s selected (single selections only). The first item has a ListIndex of 0 (not 1).
MultiSelect: This property determines whether the user can select more than one item from the ListBox.
RemoveAllItems: Use this method to remove all items from a ListBox.
Selected: This property returns an array indicating selected items (applicable only when multiple selections are allowed).
Value: This property returns the selected item in a ListBox.
Most of the methods and properties that work with ListBoxes also work with ComboBoxes. Thus, after you have figured out how to handle ListBoxes, you can transfer that knowledge to your work with ComboBoxes.
Filling a list box
For best results, start with an empty workbook. The example in this section assumes the following:
You’ve added a UserForm.
The UserForm contains a ListBox control named ListBoxL The UserForm has a CommandButton named OKButton.
The UserForm has a CommandButton named CancelButton, which has the following event-handler procedure:
The following procedure is stored in the Initialize procedure for the UserForm:
1. Select your UserForm and press F7 to find this predefined procedure.
The VBE displays the Code window for your form and stands ready for you to input the code for the Click event. (The procedure is UserForm_Click.)
2. Using the Procedure drop-down list at the top of the Code window, choose Initialize.
3. Add the initialization code for the form:
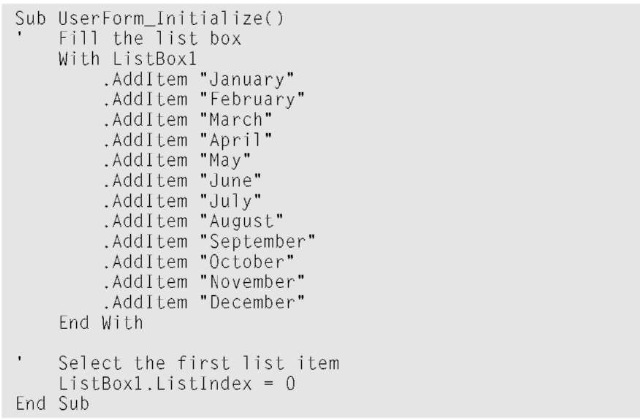
This initialization routine runs automatically whenever your UserForm is loaded. Thus, when you use the Show method for the UserForm, the code is automatically run and your list is populated with 12 items, each added via the AddItem method.
4. Create a VBA module with a small Sub procedure to simply display the dialog box:

It is not mandatory to use the Initialize event procedure to populate your lists. You could do so in a regular VBA procedure. Using an Initialize event procedure just seems like a natural place to take care of such a mundane (though important) step, however.
Determining the selected item
The preceding code merely displays a dialog box with a ListBox filled with month names. What’s missing is a procedure to determine which item in the ListBox is selected.
Add the following to the OKButton_Click procedure:

This procedure displays a message box with the selected item number and the selected item. Figure 18-4 shows how this looks.
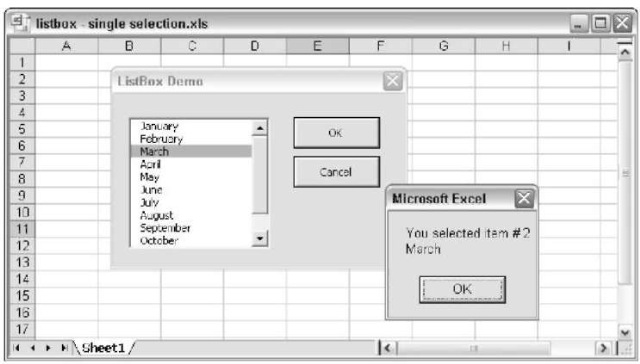
Figure 18-4:
Determining which item in a ListBox is selected.
The first item in a ListBox has a ListIndex of 0, not 1 (as you may expect). This is always the case, even if you use an Option Base 1 statement to change the default lower bound for arrays.
This example is available at this topic’s Web site.
Determining multiple selections
If your ListBox is set up so the user can select more than one item, you find that the ListIndex property returns only the last item selected. To determine all selected items, you need to use the Selected property, which contains an array.
To allow multiple selections in a ListBox, set the MultiSelect property to either 1 or 2. You can do so at design time by using the Properties window or at run time by using a VBA statement such as this:
![]()
The MultiSelect property has three possible settings. The meaning of each is shown in Table 18-1.
| Table 18-1 | 1 Settings for the MultiSelect Property | |
| Value | VBA Constant | Meaning |
| 0 | fmMultiSelectSingle | Only a single item can be selected. |
| 1 | fmMultiSelectMulti | Clicking an item or pressing the spacebar selects or deselects an item in the list. |
| 2 | fmMultiSelectExtended | Items are added to or removed from the selection set in the traditional manner: holding down the Shift or Ctrl key as you click items. |
The following procedure displays a message box that lists all selected items in a ListBox. Figure 18-5 shows an example.
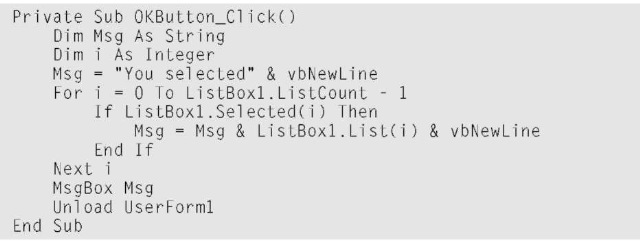
This routine uses a For-Next loop to cycle though each item in the ListBox. Notice that the loop starts with item 0 (the first item) and ends with the last item (determined by the value of the ListCount property minus 1). If an item’s Selected property is True, it means that the list item was selected.
This example is available at this topic’s Web site.
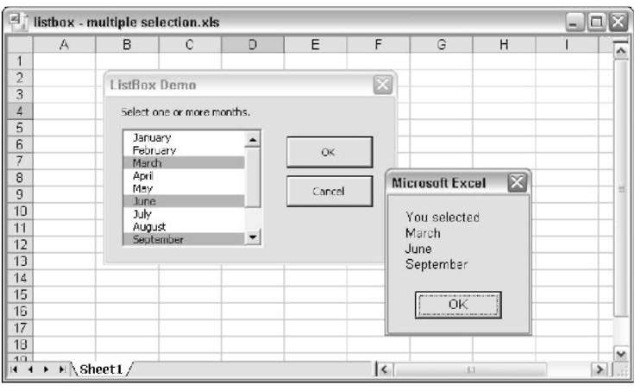
Figure 18-5:
Determining the selected items in a ListBox allows multiple selections.
Selecting a range
In some cases, you may want the user to select a range while a dialog box is displayed. An example of this choice occurs in the second step of the Excel Chart Wizard. The Chart Wizard guesses the range to be charted, but the user is free to change it from the dialog box.
To allow a range selection in your dialog box, add a RefEdit control. The following example displays a dialog box with the current region’s range address displayed in a RefEdit control, as shown in Figure 18-6. The current region is the block of nonempty cells that contains the active cell. The user can accept or change this range. When the user clicks OK, the procedure makes the range bold.
This example assumes the following:
You have a UserForm named UserForm1.
The UserForm contains a CommandButton control named OKButton. The UserForm contains a CommandButton control named CancelButton. The UserForm contains a RefEdit control named RefEdit1.
The code is stored in a VBA module and shown here. This code does two things: initializes the dialog box by assigning the current region’s address to the RefEdit control and displays the UserForm.
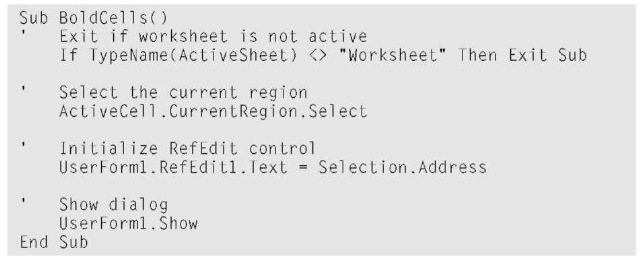
The following procedure is executed when the OK button is clicked. This procedure does some simple error checking to make sure that the range specified in the RefEdit control is valid.

If an error occurs (most likely an invalid range specification in the RefEdit control), the code jumps to the BadRange label and a message box is displayed. The dialog box remains open so the user can select another range.
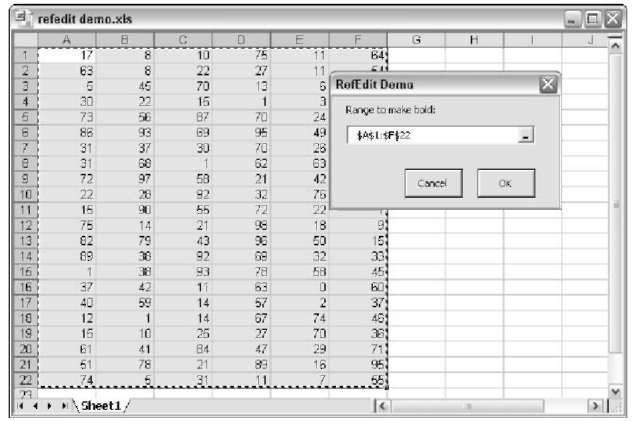
Figure 18-6:
This dialog box lets the user select a range.
Using multiple sets of OptionButtons
Figure 18-7 shows a custom dialog box with three sets of OptionButtons. If your UserForm contains more than one OptionButtons set, make sure that each set of OptionButtons works as a set. You can do so in either of two ways:
Enclose each set of OptionButtons in a Frame control. This approach is the best and also makes the dialog box look better. It’s easier to add the Frame before adding the OptionButtons. You can, however, also drag existing OptionButtons into a Frame.
Make sure that each set of OptionButtons has a unique GroupName property. If the OptionButtons are in a Frame, you don’t have to be concerned with the GroupName property.
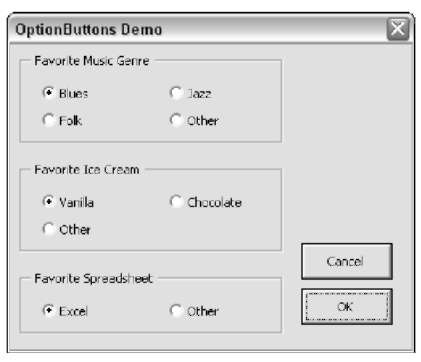
Figure 18-7:
This dialog box contains three sets of Option Button controls.
Only one OptionButton in a group can have a value of True. To specify a default option for a set of OptionButtons, just set the Value property for the default item to True. You can do this directly in the Properties box or do it using VBA code:
![]()
This example is available at this topic’s Web site. It also has code that displays the selected options when the user clicks OK.
Using a SpinButton and a TextBox
A SpinButton control lets the user specify a number by clicking arrows. This control consists only of arrows (no text), so you usually want a method to display the selected number. One option is to use a Label control, but this has a disadvantage: The user can’t type text in a Label. A better choice is to use a TextBox.
A SpinButton control and TextBox control form a natural pair. Excel uses them frequently. (Check out the Print dialog box for a few examples.) Ideally, the SpinButton and its TextBox should be in sync: If the user clicks the SpinButton, the SpinButton’s value should appear in the TextBox. And if the user enters a value directly into the TextBox, the SpinButton should take on that value. Figure 18-8 shows a custom dialog box with a SpinButton and a TextBox.
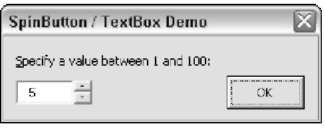
Figure 18-8:
A UserForm with a SpinButton and a companion TextBox.
This UserForm contains the following controls:
A SpinButton named SpinButton1, with its Min property set to 1 and its Max property set to 100
A TextBox named TextBox1
A CommandButton named OKButton
The event-handler procedure for the SpinButton follows. This procedure handles the Change event, which is triggered whenever the SpinButton value is changed. When the SpinButton’s value changes (when it’s clicked), this procedure assigns the SpinButton’s value to the TextBox. To create this procedure, double-click the SpinButton to activate the Code window for the UserForm.

The event-handler for the TextBox, which is listed next, is a bit more complicated. To create this procedure, double-click the TextBox to activate the Code window for the UserForm. This procedure is executed whenever the user changes the text in the TextBox.

This procedure uses a variable, which stores the text in the TextBox (converted to a value with the Val function). It then checks to ensure that the value is within the proper range. If so, the SpinButton is set to the value in the TextBox. The net effect is that the SpinButton’s value is always equal to the value in the TextBox (assuming that the SpinButton’s value is in the proper range).
This example is available at this topic’s Web site. It also has a few other bells and whistles that you may find useful.
Using a UserForm as a progress indicator
One of the most common Excel programming questions I hear is “How can I make a UserForm display the progress of a lengthy macro?”
Use Excel’s custom dialog box to easily create an attractive progress indicator, as shown in Figure 18-9. Such a use of dialog boxes does, however, require a few tricks — which I’m about to show you.
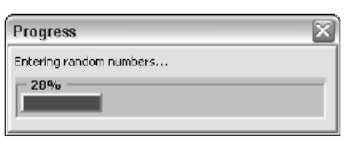
Figure 18-9:
This UserForm functions as a progress indicator for a lengthy macro.
Creating the progress indicator dialog box
The first step is to create your UserForm. In this example, the dialog box displays the progress while a macro inserts random numbers into 25 columns and 100 rows of the active worksheet. To create the dialog box, follow these steps:
1. Activate the VBE and insert a new UserForm.
2. Change the UserForm’s caption to Progress.
3. Add a Frame object and set the following properties:
Property Value
Caption 0%
Name FrameProgress
SpecialEffect 2 — fmSpecialEffectSunken Width 204
Height 28
4. Add a Label object inside the Frame and set the following properties:
Property Value
Name LabelProgress
BackColor &H000000FF& (red)
Caption (no caption)
SpecialEffect 1 — fmSpecialEffectRaised
Width 20
Height 13
Top 5
Left 2
5. Add another Label above the frame and change its caption to Entering random numbers. . . .
The UserForm should resemble Figure 18-10.
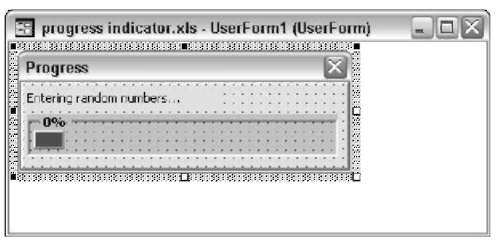
Figure 18-10:
The progress indicator UserForm.
The procedures
This example uses four procedures.
Start. Located in a VBA module, Start is the entry procedure that is executed to get things going:

UserForm_Activate. This procedure, located in the Code window for the UserForm object, is executed when the UserForm is displayed. This procedure simply calls another procedure called Main:

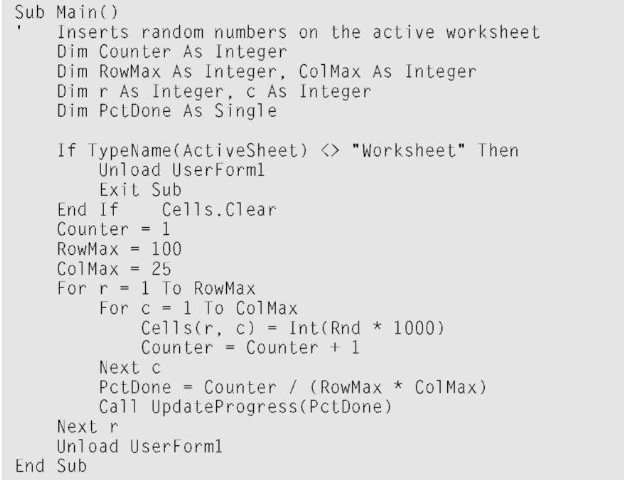
Main. It does all the work and is executed when the UserForm is shown. Notice that it calls the UpdateProgress procedure, which updates the progress indicator in the dialog box:
UpdateProgress. This procedure accepts one argument and updates the progress indicator in the dialog box:

How this example works
When the Start procedure is executed, it sets the width of the LabelProgress label to 0 and then shows the UserForm, which triggers an Activate event for the UserForm. The UserForm_Activate( ) procedure is executed, which in turn executes the Main procedure.
The Main procedure checks the active sheet. If it’s not a worksheet, the UserForm is closed and the procedure ends with no action. If the active sheet is a worksheet, the procedure does the following:
1. Erases all cells on the active worksheet.
2. Loops through the rows and columns (specified by the RowMax and ColMax variables) and inserts a random number.
3. Increments the Counter variable and calculates the percentage completed (which is stored in the PctDone variable).
4. Calls the UpdateProgress procedure, which displays the percentage completed by changing the width of the LabelProgress label.
5. Unloads the UserForm.
If you adapt this technique for your own use, you need to figure out how to determine the macro’s progress, which varies, depending on your macro. Then call the UpdateProgress procedure at periodic intervals while your macro is executing.
This example is available at this topic’s Web site.
Creating a tabbed dialog box
Tabbed dialog boxes are useful because they let you present information in small, organized chunks. The Excel Options dialog box (which is displayed when you choose ToolsOOptions) is a good example. This dialog box uses a whopping 13 tabs to add some organization to an overwhelming number of options.
Creating your own tabbed dialog boxes is relatively easy, thanks to the MultiPage control. Figure 18-11 shows a custom dialog box that uses a MultiPage control with three pages, or tabs. When the user clicks a tab, a new page is activated and only the controls on that page are displayed.
Keep the following points in mind when using the MultiPage control to create a tabbed dialog box:
Use only one MultiPage control per dialog box.
Make sure to use the MultiPage control, not the TabStrip control. The TabStrip control is more difficult to use.
Make some controls (such as OK and Cancel buttons) visible at all times. Place these controls outside the MultiPage control.
Right-click a tab on the MultiPage control to display a shortcut menu that lets you add, remove, rename, or move a tab.
At design time, click a tab to activate the page. After it is activated, add other controls to the page using normal procedures.
To select the MultiPage control itself (rather than a page on the control), click the border of the MultiPage control. Keep your eye on the Properties window, which displays the name and type of the selected control. You can also select the MultiPage control by selecting its name from the dropdown list in the Properties window.
You can change the look of the MultiPage control by changing the Style and TabOrientation properties.
The Value property of a MultiPage control determines which page is displayed. For example, if you write code to set the Value property to 0, the first page of the MultiPage control is displayed.
This example is available at this topic’s Web site.
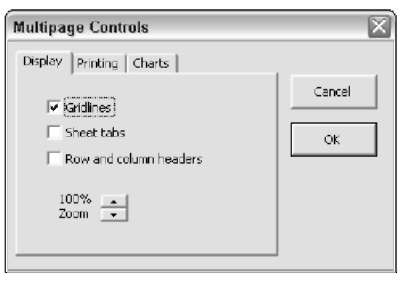
Figure 18-11:
This dialog box uses a MultiPage control.
Displaying a chart in a dialog box
If you need to display a chart in a UserForm, you find that Excel doesn’t provide any direct way to do so. Therefore, you need to get creative. This section describes a technique that lets you display one or more charts in a UserForm.
The UserForm has an Image control. The trick is to use VBA code to save the chart as a GIF file and then specify that file as the Image control’s Picture property.
displayed chart.
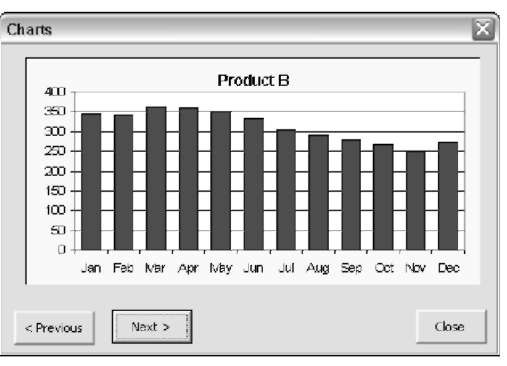
Figure 18-12:
Displaying a chart in a UserForm.
In this example, which is also available on this topic’s Web site, the three charts are on a sheet named Charts. The Previous and Next buttons determine which chart to display, and this chart number is stored as a Public variable named ChartNum, which is accessible to all procedures. A procedure named UpdateChart, which is listed here, does the actual work.
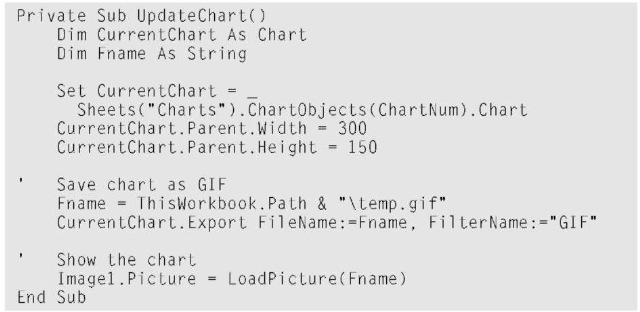
This procedure determines a name for the saved chart and then uses the Export method to export the GIF file. Finally, it uses the VBA LoadPicture function to specify the Picture property of the Image object.
A Dialog Box Checklist
I wrap up this chapter with a checklist for use when creating dialog boxes:
□ Are the controls aligned with each other?
□ Are similar controls the same size?
□ Are controls evenly spaced?
□ Does the dialog box have an appropriate caption?
□ Is the dialog box overwhelming? If so, you may want to use a series of dialog boxes.
□ Can the user access every control with an accelerator key?
□ Are any accelerator keys duplicated?
□ Are the controls grouped logically, by function?
□ Is the tab order set correctly? The user should be able to tab through the dialog box and access the controls sequentially.
□ If you plan to store the dialog box in an add-in (which I discuss in Chapter 22), did you test it thoroughly after creating the add-in? Remember that an add-in is never the active workbook.
□ Will your VBA code take appropriate action if the user cancels the dialog box or presses Esc?
□ Does the text contain any misspellings? Unfortunately, the Excel spell checker doesn’t work with UserForms, so you’re on your own when it comes to spelling.
□ Will your dialog box fit on the screen in the lowest resolution to be used (usually 800×600 mode)? In other words, if you develop your dialog box by using a high-resolution video mode, your dialog box may be too big to fit on a screen in lower resolution.
□ Do all TextBox controls have the appropriate validation setting?
□ Do all ScrollBars and SpinButtons allow valid values only?
□ Do all ListBoxes have their MultiSelect property set properly?
The best way to master custom dialog boxes is by creating dialog boxes — lots of them. Start simply and experiment with the controls and their properties. And don’t forget about the Help system; it’s your best source for details about every control and property.

