This part of the topic will help you make the most of elements of the recording environment you can’t control, while offering suggestions about ways to get better quality audio and video out of any situation.
Without investing in an expensive three-CCD camcorder, low light is the amateur movie maker’s worst enemy. Especially for digital movies, low light leads to digital artifacts that make your final movie look less than stellar. Knowing how to light the room for movies makes the difference between clear pictures and those shots on 60 Minutes where the person is disguising their identity with shadow.
One of the key areas in which amateur movie makers end up losing their audience is poor audio. Hearing a person talk in a room may sound good to your ear, but what does it sound like to the camera? The built-in microphones on DV camcorders are better than nothing, but the people you are recording probably aren’t going to be right next to the camera. Several of the tips in this part of the topic are designed to help you achieve better audio.
In addition to improving elements of your movies, we examine advanced methods for importing existing analog footage into your computer.
Bad Photo
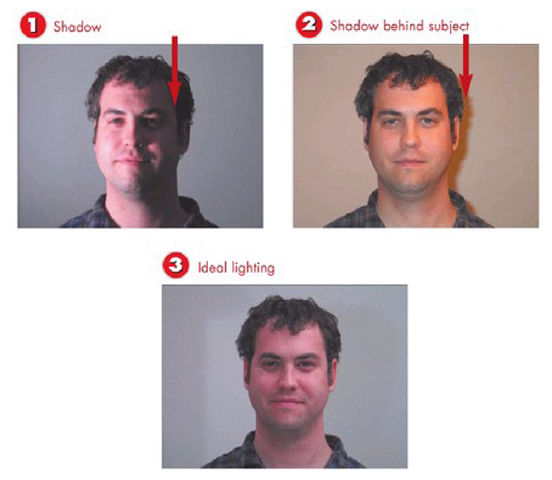
Achieving Proper Lighting
1 Wlien lighting looks like this in the view finder, try to get your subject to turn the dark side of their face toward the light.
2 A strong shadow directly behind your subject indicates light shining directly at them. Wlien possible, diffuse the light by putting something sheer between the light and the person you are recording.
3 For most home movies, this is about as close to perfect as you could expect to get. Notice the slight shadow on the left eye, indicating light coming from my right side.
INTRODUCTION
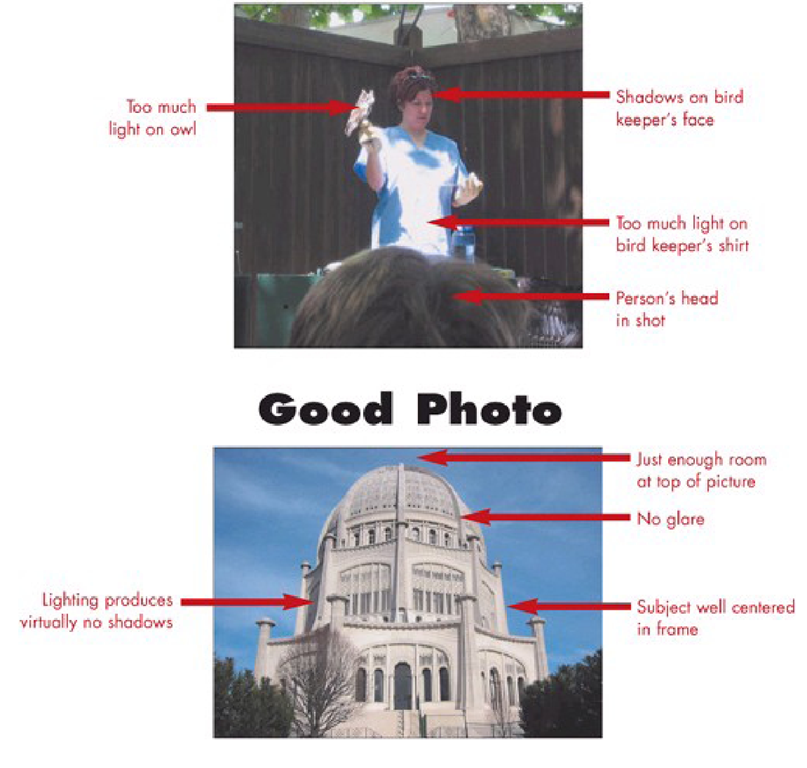
Lighting is one of the toughest aspects of movie making. Positioning the camera so that light sources act as an ally rather than an enemy of your movie is crucial to making great home movies.
TIP Natural Lighting
Use natural sunlight whenever possible. Rooms well-lit by the sun tend to be diffused and free of most shadows.
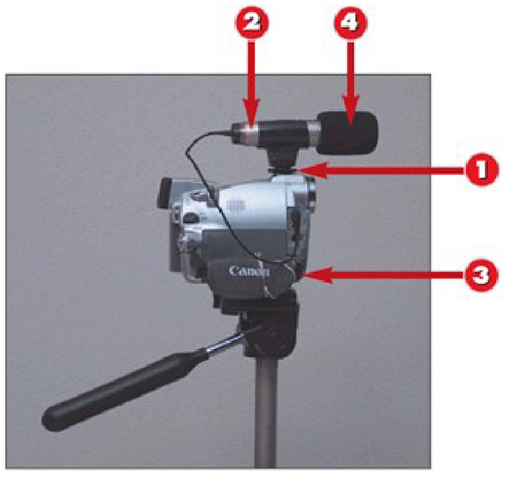
Using an External Microphone
1 Mount the microphone clip in the camcorder shoe.
2 Place the microphone in the clip.
3 Connect the microphone to the camcorder microphone line in jack.
4 Use the windscreen on the microphone when recording outdoors to reduce wind noise.
INTRODUCTION
Using a shoe mounted external microphone results in better audio than the built-in microphone. In most cases, using an external microphone from the company who manufactures your camcorder is the best solution, although the microphones are fairly universal and should work with other models.
TIP Operator Noise
Remember, the closest person to the camcorder microphone is the operator. Talking and hand movements will result in extraneous noise.
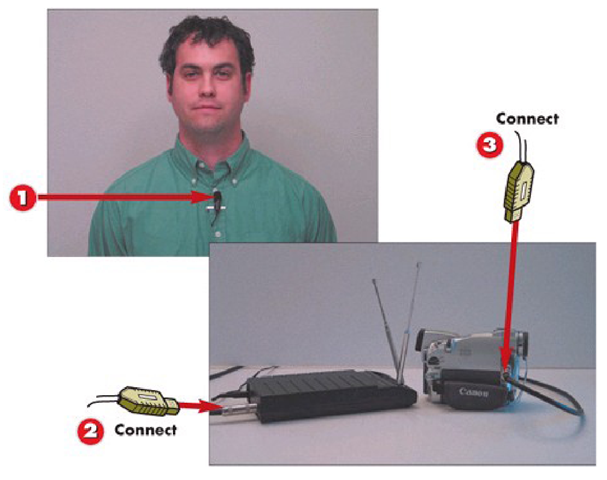
Using an External Clip-on Microphone
1 Clip the microphone to the speaker’s shirt, just below the collar.
2 Connect the wireless microphone receiver to one end of its connecting cable.
3 Connect the opposite end of the receiver cable to the camcorder microphone line in.
INTRODUCTION
The closer the microphone is to the source of your audio, the better it will sound. For recording interviews, putting a microphone on the person speaking is the difference between amateur video and looking like a pro.
HINTS Gain Control
Unlike the onboard microphones on many DV camcorders, most external microphones provide more control over the gain (input volume).
Gain control lets you adjust the volume of audio up or down to improve sound.
HINT Hide the Wire
Tuck the wire into the speaker’s shirt to add professionalism to the shot by keeping it from dangling.
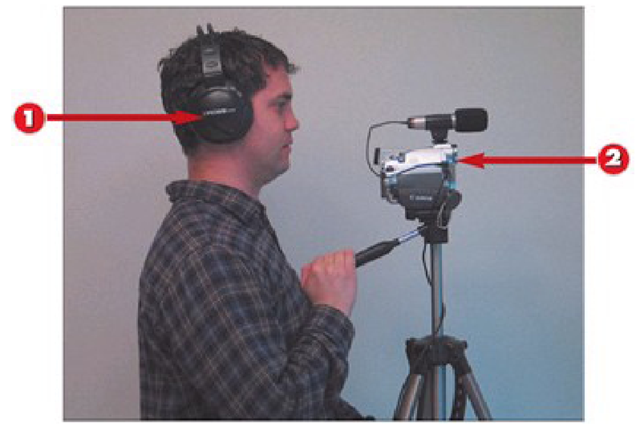
Monitoring Audio with Headphones
1 With an external microphone connected to the mic in on the camcorder, connect headphones to the AV in jack.
2 Place the headphones on your ears to monitor the audio being picked up by the microphone.
Make adjustments to the audio level of the microphone as necessary. This particular step isn’t pictured because gain adjustment varies from microphone to microphone.
INTRODUCTION
Getting the most you can out of available audio is best achieved by listening to what the camera is recording, by monitoring audio through headphones and making necessary adjustments to the audio level.
TIP Not Too Loud
Keeping audio from being too loud is almost more important than adjusting soft volumes. When audio is too soft, it can be adjusted louder with software. When audio is too loud, it becomes distorted and cannot be fixed.
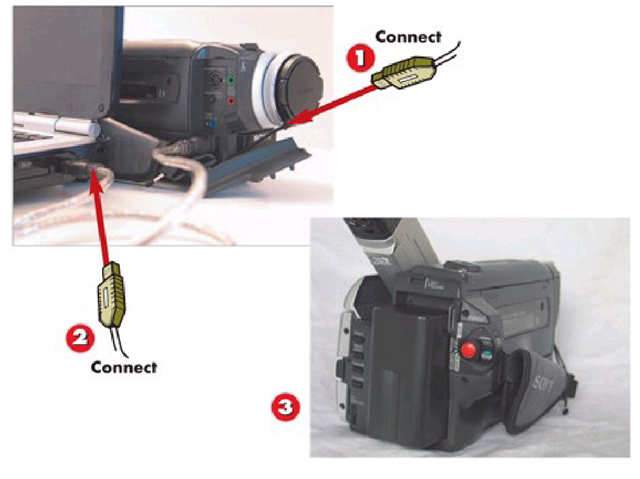
Connecting a Digital8 Camcorder to Your PC with FireWire
1 Make sure your Digital8 camera is turned off. Connect one end of the FireWire cable to the i.LINK port on your camcorder.
2 Connect the other end of the FireWire cable to your PC.
3 Turn on your Digital8 camera in playback mode (usually VTR or VCR on the camcorder).
INTRODUCTION
Digital8 is Sony’s proprietary digital video format. To connect a Digital8 cam-corder to your PC, you need a FireWire port and the appropriate cable. Most PC FireWire ports are 6-pin ports, while Digital8 camcorders have 4-pin connectors referred to as i.LINK by Sony. For this example, the Toshiba laptop pictured uses a 4-pin connection as well.
HINT Hi8 Transfer with Digital8
One advantage Digital8 offers over the MiniDV format is backward compatibility. If you have old Hi8 video tape, you can transfer it via FireWire using a Digital8 camcorder.
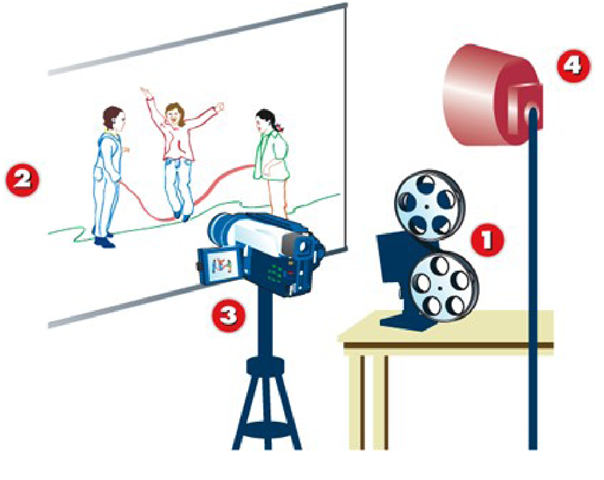
Recording 8mm (Super8) Projection Movies with a DV Camera
1 Set up the film projector to play the film on a screen or smooth white wall at 20 frames per second.
2 Adjust the projection lens so that the image is as small and tightly focused as possible.
3 Set up the DV camcorder on a tripod next to the film projector, so that there is minimal angle between what the DV camcorder sees and what the projector is displaying on the wall.
4 Zoom in tight on the projection, so that little or no white wall is showing around the edge of the film. When the picture is tightly in focus, start recording. INTRODUCTION
Capturing Super8 film with a DV camera is one of the most affordable ways to preserve the old footage.
TIP Recording 8mm Sound
For best results in capturing sound from 8mm film, connect the sound output on the projector to the audio in on the DV camcorder.
Otherwise, you will get film projector fan noise on the entire recording.
