Working with Share My Screen
On the following pages, you’ll be guided through the process of setting up an online meeting to discuss the magazine cover. To share this document from your desktop, you’ll use the Share My Screen feature from within Acrobat.
You’ll be guided through the process of setting up your online meeting. However, you do need an active Internet connection to work with Share My Screen. If you’re not connected to the Internet, you can still follow some of the steps in this exercise and simply skim others.
1 Switch back to Adobe Bridge, select your Lessons folder in the Favorites panel, and then navigate to the Lesson08 folder. Double-click the file Local_Magazine_ start_cover.pdf, which should open in Acrobat.
2 In Acrobat, choose File > Collaborate > Share My Screen. Enter the e-mail address and password that you use as your Adobe ID, and click Sign In.
If you don’t already have an Adobe ID, click Create Adobe ID and when you’re done with that, return to Step 2.
• Note: CS Live online services are complimentary for a limited time. See the sidebar "Accelerate your workflow with Adobe CS Live” on page 25 for details and limitations related to all Adobe online services.
Tip: In CS5 components other than Acrobat that support Share My Screen, holding down the CS Live button at the right end of the Application Bar is another place to choose Share My Screen, and also a way to use other CS Live online services*.
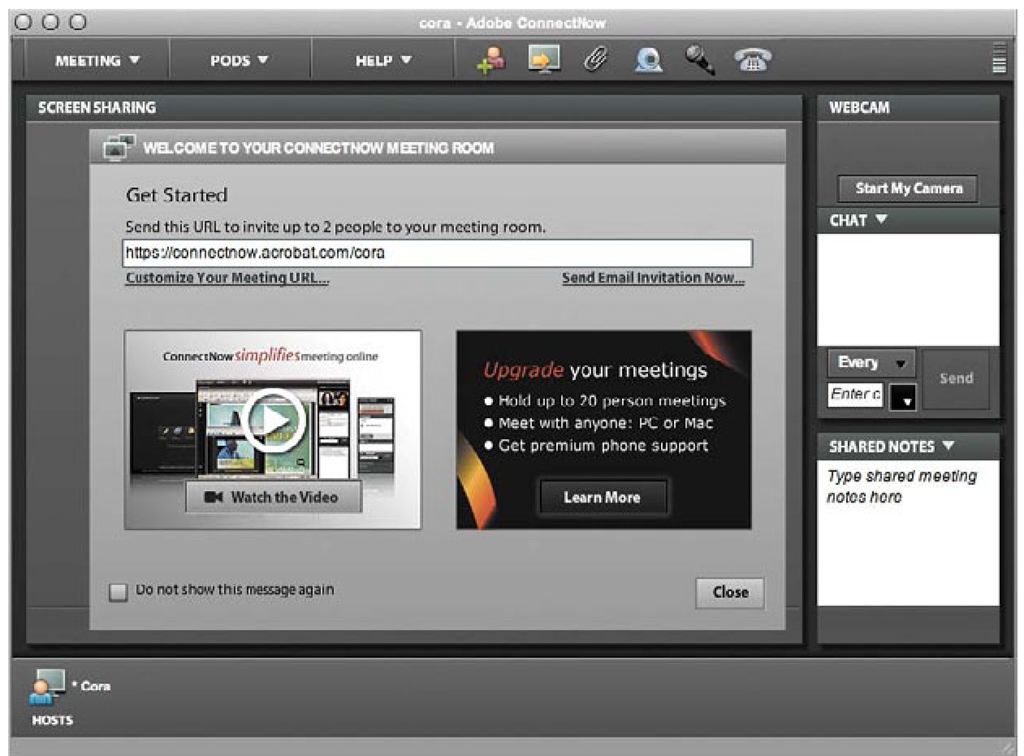
It will take a moment for the server to sign you in; then the Welcome to Connect Now Meeting Room dialog appears offering you two choices:
• Customize Your Meeting URL. The end of the URL is your name by default, but you can change it to something that better describes the nature of the meeting, or to a word or phrase that’s shorter or easier to remember.
• Send E-Mail Invitation Now. This option opens the default e-mail client on your system with a message that contains the URL for your meeting. You’ll have an opportunity to edit the message before you send it.
3 If there’s someone who can join you for this exercise and they have Acrobat 9 or Acrobat Reader 9 installed, you can click Send E-Mail Invitation Now, and they can be your attendee. Or you can make a note of the URL and click Close.
If you have access to another networked computer, you can enter the URL into a web browser on that computer to see how Share My Screen looks from the point of view of an attendee. Attendees don’t need an Adobe ID; they can sign in as a guest and the meeting host can decide whether to let them in.
4 Click Share My Computer Screen to start the meeting. You may be asked to approve the installation of the Adobe Connect.
Now add-in for your web browser; click Yes.
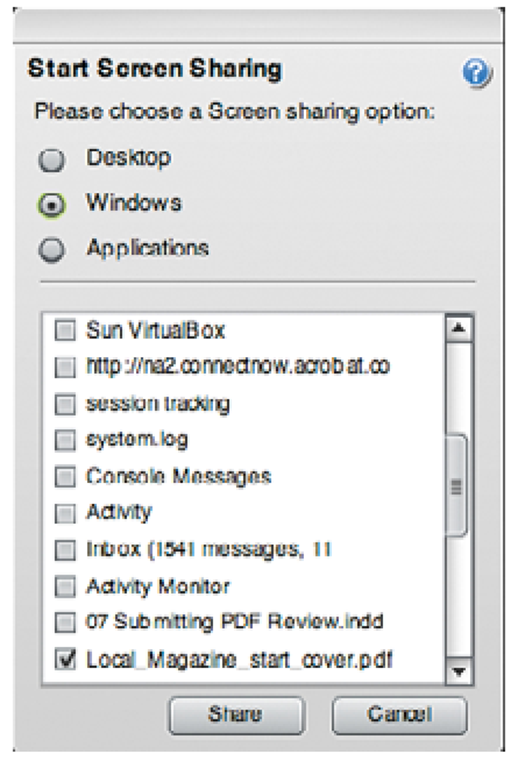
You’ll be asked what you want to share—your entire computer desktop, individual windows, or a specific application. When you’ve got windows open with information you don’t want the meeting participants to see, it’s a good idea to restrict what you display to others, limiting screen sharing to one application or even just one window.
• Note: On Mac OS X, at this step ConnectNow may open the Universal Access system preferences pane and display a message about assistive devices. If this happens, turn on the Enable Access for Assistive Devices option and return to your web browser.
Tip: To make your messages stand out, you can customize your Chat pod by choosing fonts, sizes, colors, and emoticons.
5 Click Windows, then in the list select Local_Magazine_start_cover.pdf.
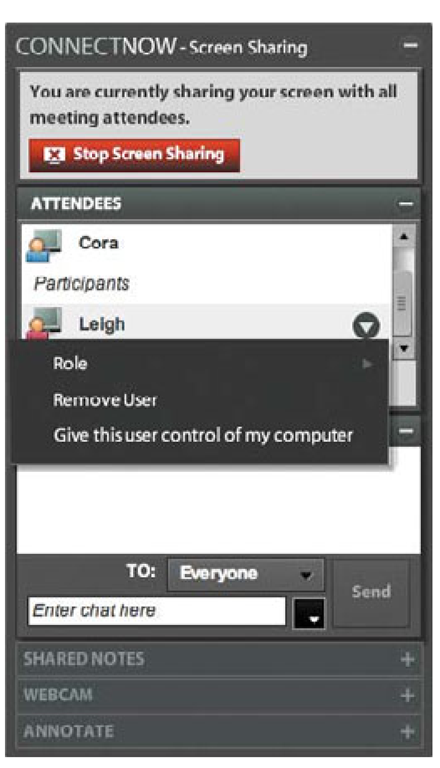
While the meeting is in progress, the ConnectNow screen sharing panel is displayed, giving you access to key meeting features and enabling you to share notes, send chat messages to one person or the whole group, use an online whiteboard to sketch ideas, activate a webcam, and even turn over the control of your desktop to another attendee, which can be very productive for collaborative work sessions and technical support. You can position the ConnectNow screen sharing panel wherever you want on your desktop.
6 The open Acrobat file on your desktop is now shared with the other participants. Notice the ConnectNow screen sharing panel where you can type chat messages to other attendees, and also control various meeting tools such as your webcam.
7 When an attendee wants to join the meeting, an alert will appear. Click Accept to admit that attendee to the meeting room. The attendee receives a note to let them know that the host has been notified of the attendee’s presence.
The Chat window is useful for side discussions during the meeting, as a way to ask questions, and to provide any instructions for the attendees.
8 In the Chat window, type a message (such as "Welcome to the meeting”) then click Send. If you have an attendee set up, you can have them enter a reply.
Imagine how helpful it could be if the tech person could sort out problems directly on your computer, even though the tech is only present online. That’s possible with Share My Screen, because you can hand over control of your computer to another participant in the meeting.
9 In the ConnectNow screen sharing panel, click the triangle to the right of the attendee’s name and choose Give This User Control Of My Computer.
Being able to work in the application that was used to create the artwork has the advantage that you or any trusted reviewer can quickly react to a suggestion. For example, it would take you only a couple of seconds to demonstrate how the cover would look with a different headline.
Note: You can use the microphone on your computer to speak with other meeting attendees using VoIP. Alternatively, use one of the conference numbers provided for traditional teleconferencing.
10 To leave the online conference, click Exit Adobe ConnectNow.
Bravo! You finished the online review and with it the last lesson in this topic. You’ve covered a lot of ground: from creating basic assets to publishing a magazine in both printed and interactive form—from prototyping and building a website and designing for mobile devices to experimenting with different review workflows. There is so much more you can do with Adobe Creative Suite 5 Design Premium—this is just the beginning!
Troubleshooting checklist
This checklist may help if you encounter difficulties setting up or attending an online conference:
• Ensure that you are connected to the Internet.
• Check that your software and hardware meet the system requirements. For a complete list, see www.adobe.com/go/acrobatconnect_systemreqs.
• Disable any pop-up blocker software.
• Clear the browser cache.
• Try connecting from another computer.
• Ensure that you have entered the correct URL.
• Try joining the meeting as a registered user or as guest.
• Confirm that you are using the correct password.


