Graphics Programs Reference
In-Depth Information
Chapter 6, but it will need eyes, teeth, and fin-
gernails, too. As these wouldn't be sculpted or
retopologized in any way, I aimed straight for the
final mesh.
Coupling
For the coupling between the body and abdo-
men, I initially created the shape with curves and
then duplicated it and converted the duplicate to a
mesh (
alt
-C). Because Blender's default curve fill-
ing creates ugly, long triangles that don't deform
well, I fixed the topology by hand by deleting the
inside faces and filling in the shape manually (see
Figure 5-27).
Eyes
There are many ways to model eyes, but in general
it helps to model some of the internal structure of
the eye first to allow the rendered eye to catch light
and reflections realistically. My model for the eye
(see Figure 5-28) consisted of an outer layer, which
will have a transparent material and which makes up
the cornea and the reflective surface of the eye, and
an inner layer, which will later be textured with the
pupil, iris, and sclera (the white of the eye).
Both the inner and outer layers are made in the
same way, beginning with a UV sphere (in Object
mode
shift
-A
4
Mesh
4
UVSphere) and then using
proportional edit to push in the end of the sphere
for the inner part or to push it out a little for the
outer part to add a bulge to the cornea. For the
inner part, after pushing the surface in with pro-
portional editing, I extruded back the most central
faces to create a pit for the pupil. For the cornea, I
deleted the end triangular faces of the UV sphere
and replaced them with a subdivided plane to avoid
artifacts when a Subdivision Surface modifier is
added (see the left of Figure 5-27). Using the To
Sphere operator (
alt
‑
shift
-S) can help you regain
the spherical shape of the eye after adjusting its
topology.
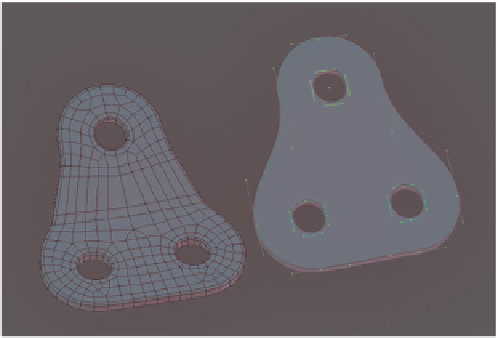
Figure 5-27: Creating the coupling. I converted the curve
object (right) into a mesh and then deleted some of the edge
loops around the edges to even out the distribution of faces.
I filled the inner faces with nicer topology by hand. Then,
using proportional editing, I added a bend in the middle.
Other Parts
I placed the Spider Bot's eyes using Blender's
Snapping tools: I turned on Snapping to Faces,
added spheres in Object mode, and then snapped
them to the surface of the head. The fangs are
simply cubes, extruded and with loop cuts added to
make constrictions where they bend. I added some
further embellishments using a mix of Blender's
modeling tools and retopology techniques. (See
Chapter 7 for these parts and the finished model.)
Teeth and Nails
Both the teeth and nails were derived from cubes
(see Figure 5-29). To create the teeth, I began with
a cube, scaled it down, and extruded from the bot-
tom. By repeatedly scaling down the bottom of the
tooth and then extruding again, I was able to refine
the tooth into a point. I then positioned and dupli-
cated the teeth and used a Mirror modifier to fill in
the other side of the mouth.
For the nails, I flattened the cube a bit, added a
loop cut down the middle, and moved it out a little
to give the nail a bit of a curve. I then repeated the
same process I had used for the teeth, refining them
into a point and then placing them by hand and
duplicating as many as I needed.
Modeling the Details of the
Bat Creature
The final Bat Creature will consist only of
one mesh for the body, which we'll discuss in
Search WWH ::

Custom Search