Graphics Programs Reference
In-Depth Information
2.
Create a new sketch on the XY plane.
3.
Click the Image option in the Insert panel of the Sketch tab.
4.
In the Open dialog box, navigate to the
Parts\Chapter9
folder, click
the
c09-01.png
file, and then click Open.
5.
Click a place in the Design window, and click to place the image. Hit
Esc to finish placing.
The size of an image can be controlled by a parametric dimension
as well.
6.
Place a dimension on the top of the image file, and set the value to 60.
Hit the Esc key to finish the dimension tool.
7.
You might have to use Zoom All to find the image in the sketch.
8.
Drag the sketch so it is roughly centered on the recessed face of the part.
9.
Finish editing the sketch.
10.
On the 3D Model tab, expand the Create panel by clicking the arrow
next to the panel name, and select the Decal tool.
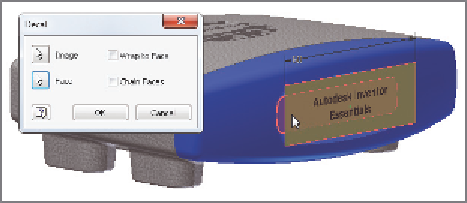
11.
Uncheck the Chain Faces option in the dialog box, and then click the
image and the flat face behind it. See Figure 9.15.
12.
Click OK to place the feature.
FIGURE 9.15
Selecting the face onto which to project
the decal
TIP
This was a simple placement of a decal. The tool doesn't really
shine until you start wrapping images around faces. The Decal tool is capa-
ble of that as well.


Search WWH ::

Custom Search