Graphics Programs Reference
In-Depth Information
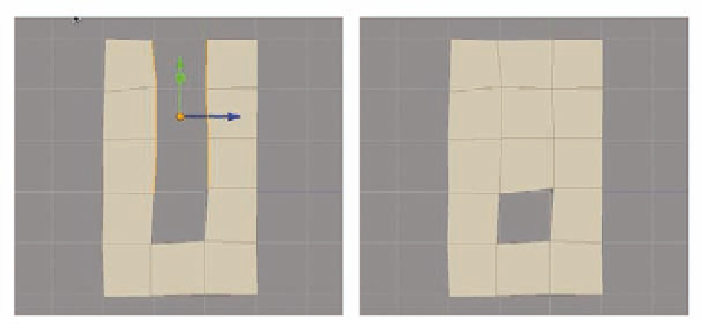
congruent, selected faces into a polygon tunnel, but for our purposes, we'll
just focus on connecting sides.
●
To try it, go back to the object we created in Figure 3.17 and select the top
three inside edges on either side of the U shape.
●
Next, select
Modify
>
Bridge
or press
Shift
B
, and the space should be
neatly been i lled with quads ( Figure 3.18b ).
M erge
Rather than connecting geometry by creating something new,
Merge
connects separate pieces of geometry by combining them. If two vertices are
selected, the i rst will be moved to the position of the second and they will be
merged to create a single vertex. If more than two vertices are selected, any
selected vertices that are closer together than the tolerance specii ed in the
merge options (
Modify
>
Merge
>
opt
) will be merged with one another.
This is particularly useful if you have separate pieces of mesh whose vertices
are aligned and you want to join them. If faces or edges are selected, each
face or edge will be collapsed into a single vertex. This can do things like
quickly turn a face loop into an edge loop, removing the extra geometry.
Merge; Modify
Merge;
Control
M;
Let's eliminate the hole we've created in our mesh from the previous
commands and close a seam using
Merge
.
●
First, select the two vertical edges surrounding the hole.
●
Next, select
Modify
>
Merge
or press
Control
M
. The sides should now
be eliminated and the top and bottom of the former hole will be a single
edge ( Figure 3.19b ).
●
Now eliminate the triangles on the sides by selecting the two vertices on
the outside of each triangle and again pressing
Control
M
.
You'll notice that the i rst point selected merged to the second point,
rather than meeting in the middle so the lines are no longer straight across.
Straighten the edges (as in Figure 3.20a) and we can move on to merging two
unconnected sides of an object.
FIG. 3.18
The Bridge tool can also i ll
in the gaps adding multiple polygons
at once.