Graphics Programs Reference
In-Depth Information
Now that we're in ACR, let's get to work!
Tip:
To automatically
straighten a crop, hold
(Shift Command)
and draw a straight line
for the Crop tool to set
guidelines from.
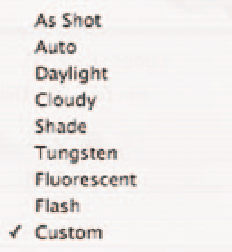
Step 1: Crop
1.
Select the Crop tool (C) from ACR's horizontal tool bar.
2.
Simply draw, drag or pull corner points to set crop guidelines.
3.
Now select any other tool (in this case the White Balance tool) to apply the
crop.
Note:
As with all aspects of
Adobe Camera Raw,
crops are completely
non-destructive and can
be undone or modii ed
simply by reselecting the
Crop (C) tool.
Step 2: White Balance
1.
Select the White Balance tool (I).
2.
The White Balance tool is used to approximate the true color temperature
of your image; to do so, click on a tone likely to be a true white.
If your image needs further adjustment, either the Temperature slider or
White Balance drop-downs are good places to start.
Step 3: Tone
1.
First, let's remind ACR to show us regions of the highlights or shadows
that will be clipped, so that we can be certain to preserve all of our image's
details. To do so, click each arrow icon at the far left and right of the
histogram.
Tip:
Unbeknownst to many,
you can also click on
an area thought to be
true black.
2.
Move the Exposure slider until red overlays (clipped highlights) begin to
appear.

Search WWH ::

Custom Search