Graphics Programs Reference
In-Depth Information
3
This time, press and hold the Alt (Windows) or Option (Mac OS) key, and click the same Visibility
icon. By using the Alt/Option modifier, you can hide all layers except the one you clicked.
4
Alt/Option+click the same Visibility icon to make all the layers visible again.
Using masks in a layer
There is one last feature fundamental to understand before you delve further into layers: the layer mask
feature. Without the mask feature, making realistic composites or blending one image smoothly into anoth-
er would be much more difficult.
1
With the
mylayers.psd
file still open, choose the red square layer in the Layers panel.
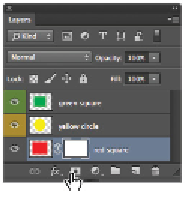
2
Click the Add Layer Mask button ( ) at the bottom of the Layers panel. A blank mask is added to the
right of the red square layer.
Adding a layer mask.
3
To make sure your foreground and background colors are set to the default black and white, press
D
on
your keyboard.
4
Select the Gradient tool ( ) from the Tools panel, and make sure that the Linear Gradient option is selec-
ted in the Options bar.
5
Confirm that you have the layer mask selected by clicking it once in the Layers panel.
6
Click and drag across the red square in the image from the left side of the square to the right. Note that
some of the red square becomes transparent, while some remains visible. Click and drag with the
Gradient tool as many times as you like. Note that in the Layers panel, wherever black appears in the
mask thumbnail, the red square is transparent, as the mask is essentially hiding the red square from
view.
Select the layer mask.
Click and drag using the Gradient tool across the image.