Image Processing Reference
In-Depth Information
Now the fun and magic starts. Just follow these steps:
1.
Select the window with the darker of the two images. Choose Edit
>
Select All
(Ctrl/Cmd+A), and then choose Edit
>
Copy (Ctrl/Cmd+C).
2.
Now select the window with the lighter image, and choose Edit
>
Paste
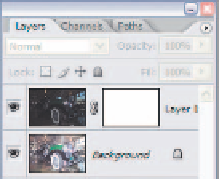
(Ctrl/Cmd+V). If you look at the Layers palette, you'll see two layers (Figure
7.6). The Background is the lighter image, and Layer 1 is the darker image.
Figure 7.6
The Layers palette shows both
versions of the file and is now
ready for optimizing.
Note:
Yo u can close the darker image to free up memory. All edits will be performed on the com-
bined image.
131
At this point, the two programs differ. The next step for Photoshop users is to
add a layer mask to Layer 1. Photoshop Elements users should skip this Step 3 and go
down to the alternative Step 3 that follows Figure 7.10.
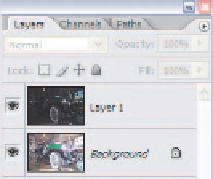
3.
With Layer 1 selected in the Layers palette, click the Layer Mask icon at
the bottom of the palette. Layer 1 will then have a white rectangle next to the
thumbnail, as seen in Figure 7.7.
Figure 7.7
After adding a Layer Mask, a
white rectangle is shown next to
the thumbnail for Layer 1.
4.
Select the Background in the Layers palette, and copy it with Select
>
All and
Edit
>
Copy.
5.
Press the Alt/Option key, and click the white rectangle in Layer 1. The image
looks like Figure 7.8.
6.
Select Edit
>
Paste. Both the Layer Mask icon and the image window will have a
black-and-white version of your image, as seen in Figure 7.9.


Search WWH ::

Custom Search