Graphics Programs Reference
In-Depth Information
How to Have Mini Bridge Tuck Itself
Away After You Open an Image
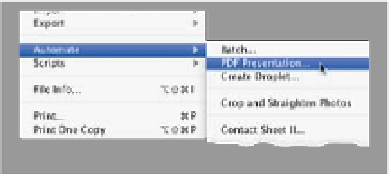
(see Chapter 11), but they also brought back
two more built-in automations that users
have missed since they were removed
back in CS4. We have PDF Presentation
and Layer Comps to PDF back in Photo-
shop CS6 (they're found under the File
menu, under Automate and Scripts).
Opening a Second Image from
Mini Bridge Using Drag-and-Drop
In the Mini Bridge chapter, I mentioned
that you can drag-and-drop a thumbnail
out into Photoshop's image area and it
opens (Mac users must have the Appli-
cation Frame [found under the Window
menu] turned on). Anyway, what happens
if you drag one image out to the image
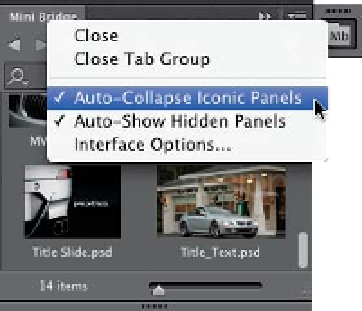
If you have Mini Bridge docked to
the right side of your screen (rather
than its default location along the
bottom), you can Right-click directly
on Mini Bridge's tab and from the
pop-up menu that appears choose
Auto-Collapse Iconic Panels
. That
way, when you double-click on an
image to open it, as soon as it opens
and you click anywhere outside Mini
Bridge, it will tuck itself out of sight
automatically (saving you from hav-
ing to close it yourself each time).
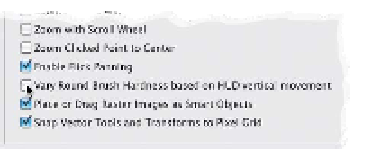
a preview of your currently selected
brush tip (as shown here), with a little
heads-up display showing you the cur-
rent size, hardness amount, and brush
opacity. Now you can drag straight
upward to make it softer or down
to make it harder. Drag left to make
the brush size smaller; right to make
it larger. That's cool, but now here's
the trick: You can change one setting
so that, instead of softness/hardness,
dragging up/down changes the brush
opacity. To do that, press
Command-K
(PC: Ctrl-K)
to bring up Photoshop's
Preferences, and then in the General
preferences, turn off the checkbox for
Vary Round Brush Hardness Based on
HUD Vertical Movement. Now when
you drag up/down, it changes the
brush opacity instead.
area and it opens, but then you want to
drag another image out there? If you drag
over the open image, it thinks you want to
add the second image as a layer on top of
the first image (and hey, maybe you do, in
which case this is a tip on how to do that).
If you want to open a second image in its
own separate document, then make sure
your documents open as tabs, and click-
and-drag its thumbnail up until it's just to
the right of the first image's document tab.
Release your mouse and it adds your sec-
ond image as a separate document.
Contact Sheet II Brought
Two More Friends Along
Applying a Layer Style to More
Than One Layer at a Time
Put your layers in a group by Command-
clicking (PC: Ctrl-clicking) on each one
in the Layers panel to select them, and
choosing
New Group from Layers
from
Changing Your Brush's Size, Hard-
ness, and Even Opacity on the Fly
If you press-and-hold
Option-Ctrl (PC:
Alt)
and
click (PC: Right-click)
your brush
anywhere within your image, it brings up
In Photoshop CS6, Adobe brought
back the Contact Sheet II automation