Graphics Programs Reference
In-Depth Information
Photoshop Killer Tips
at the top of the Layers panel. On the left
side of this bar is a search pop-up menu,
which changes your choices to the right of
it. It's set to Kind by default, which gives
you icons, and if you click on those icons,
it filters to just show you particular kinds
of layers. For example, if you click on the
“T” icon, it hides all the other layers but
your Type layers. I don't mean it hides
them from view on your image, I mean
now you only see Type layers in the Layers
panel (every other kind of layer is hidden).
There are filters to just show pixel layers
(regular old image layers), just adjustment
layers, just shape layers, or just smart ob-
ject layers, and all it takes is one click on
any of these to quickly see just those types
of layers. You can also search for layers by
Name (a text field appears, so you can
type in a name to search for), or by Effect
(a pop-up menu of layer styles appears),
or which blend mode you used, or a spe-
cific attribute, or assigned color. It's really
pretty slick, and blindingly fast. When
you're done (and you want to turn the fil-
tering off), click on the little toggle switch
on the far right of the filter bar.
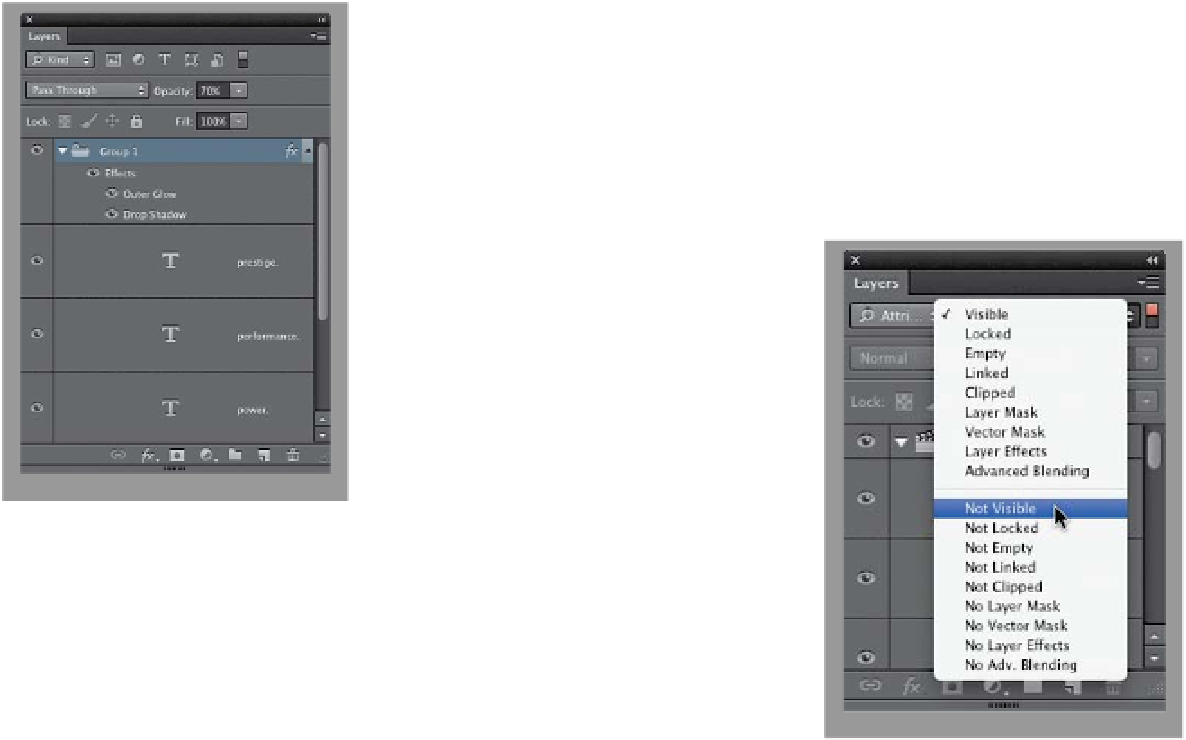
Want to Get Rid of All Your Hidden
Layers Before You Save Your File?
Go to the Layers panel, and from the
search pop-up menu at the top left of
the filter bar at the top of the panel,
choose
Attribute
, and then, from the
pop-up menu that appears to the right,
choose
Not Visible
. Now it displays any
the panel's flyout menu. Now you
can apply your group style (say, a drop
shadow, for example) directly to that
group, and it automatically applies that
layer style to every layer in that group
(and it doesn't matter how many layers
you put inside that group—it adds it to
all of them instantly). You can also add
more than one layer style, if you like:
just click on the group, then double-
click on the fx icon to the right of the
group name to re-open the dialog, and
choose a layer style in the list on the
left (let's say Outer Glow, for example)
and it adds that style, along with the
Drop Shadow you added earlier.
layers you're not using (since they're hid-
den). Select them all and hit the
Delete
(PC: Backspace) key
, and they're gone.
Not only does this make your Layers
panel shorter (less layers to scroll through),
but it also makes your file size smaller by
getting rid of layers you're not using.
A Faster Way to Resize
If You Work with a Lot of Layers,
You're Going to Want to Learn This!
If you've created a big multi-layer file,
you're going to have a long scrolling list
of layers, and sometimes finding the layer
you're looking for gets really time-consum-
ing. Luckily, in CS6, there's now a filter bar
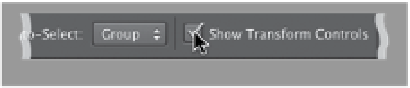
If you find yourself doing a lot of resizing
of objects or selections, you'll be press-
ing
Command-T (PC: Ctrl-T)
a lot to bring
up Free Transform, but there's a faster way:
Click on the Move tool
(V)
, and then up
in the Options Bar, turn on the checkbox