Graphics Programs Reference
In-Depth Information
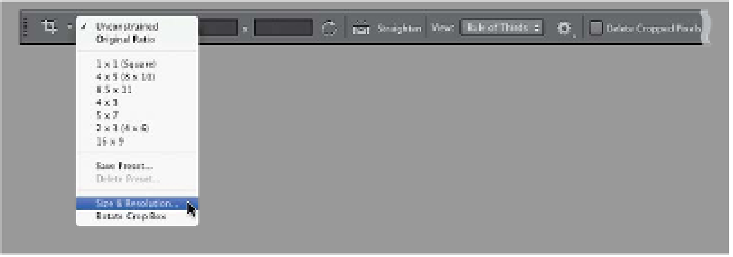
If you're using one of the standard size or cropping ratio presets that appear
in the Crop tool's pop-up menu, then you're set. However, there are only a few
common sizes in that pop-up menu, so you're going to need to know (a) how to
create custom sizes, and (b) how to save that custom size to the pop-up menu,
so you don't have to build it from scratch again next time. Plus, I'm going to show
you another way to crop an image that, well, I'm not proud of, but I know a lot of
photographers that do it this way. (Now, I'm not saying that I've done it that way,
but…well…I've done it that way. More times than I care to admit.)
Cropping to a
Specific Size
Step One:
Here's the image I want to print as a
wide 20x16" print (a very common size
today, even though it's based on the size
of traditional film, not digital images, so
you have to crop just to make it fit). Start
by clicking on the Crop tool
(C)
in the
Toolbox, then from the pop - up menu at
the left end of the Options Bar, choose
Size & Resolution
(as shown here).
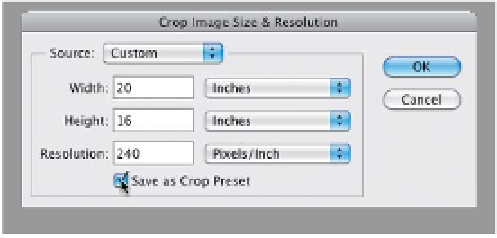
Step Two:
This brings up the Crop Image Size &
Resolution dialog (shown here). Type in
the custom size you want (in this case,
20x16" at a resolution of 240 ppi, which
is pretty ideal for most color inkjet print-
ing). If you think you'll be using this size
again (and chances are, you will), turn on
the Save as Crop Preset checkbox (as
shown here), and it adds this new size to
that pop-up menu, so you don't have to
recreate it every time. When you click OK,
it resizes the cropping border so it's 20"
wide by 16" deep. You can click-and-drag
the border left/right to get the part of
the photo you want to appear inside the
cropping border. Now press the
Return
(PC: Enter) key
and it crops your image
to that size.