Graphics Programs Reference
In-Depth Information
Hand coloring black and white photos
In this technique, we will use the Elements Brush tool to apply a color tint to a photograph.
But to ensure that the detail from the image shows through the coloring we must modify the
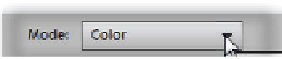
way the hue is added. By switching the Brush mode (this is similar to the Layers blend mode
options) from its Normal setting to a specialized Color setting the paint starts to act more
like traditional watercolor paint. When the hue is applied the detail is changed in propor-
tion to the tone beneath. Dark areas are changed to a deep version of the selected color and
lighter areas are delicately tinted.
Use the Brush tool in Color mode to add realistic
tints to your black and white photographs.
Hand Coloring workflow:
1 With your image open in Elements check to see what Color mode the picture
is stored in. Do this by selecting Image > Mode and then locate which setting
the tick is next to. For most black and white photographs the picture will be
in Grayscale mode. If this is the case change it to RGB Color (Image > Mode >
RGB Color).
2 You will not notice any difference in the picture as a result of its mode change
but now the image is capable of holding colors (not just grays). Now double-
click on the foreground swatch in the toolbox and select a color appropriate
for your picture. Here I chose a dark green for the leaves.
3 Now select the Paint Brush tool from the toolbox and adjust its size and edge
softness using the settings in the options bar. Start to paint onto the surface of
the picture. You will notice straight away that the paint is covering the detail
of the picture beneath. This is because the brush is still in Normal mode. Use
Ctrl/Cmd + Z to undo your painting.


Search WWH ::

Custom Search