Graphics Programs Reference
In-Depth Information
obtained using the Smart Brush Tool in the Full Edit workspace. And new for the Quick edit
workspace is the Type tool providing extra design options for all users.
QUICK
Previewing and fine-tuning changes
In this version Adobe re-introduces the ability to preview the effect
each control has on the image by clicking one of a series of preview
thumbnails located under the manual slider control. Each preview
thumbnail displays a different degree of change. Moving your mouse
over a thumbnail will preview the effect in the After image in the
main workspace. Clicking the thumbnail will apply the adjustment.
Click-dragging the mouse cursor left or right will fine-tune the set-
ting from its current values by small increments allowing you to cus-
tomize the adjustment. Clicking the central thumbnail that features
an orange circular arrow returns the image to its original settings.
1
4
2
3
Adjustments are automatically applied to an image but can be re-
moved by clicking the Reset Panel icon at the top of the panel.
You can see the effects of different levels of change
being applied to the After image by clicking the ad-
justment entry heading (1) and then moving the
mouse cursor over each of the thumbnails (2). The
change will be shown on the After image. Click-drag-
ging the mouse over a thumbnail allows you to fine-
tune the settings (3) and clicking the thumbnail in
the center will return the picture to its original set-
tings (4).
Quick Fix panel controls
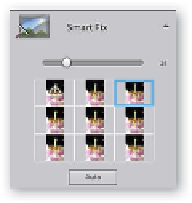
Smart Fix
- This is the same control that is
found in the right-click menu and Fix pane in
the Organizer and the Enhance menu in the
Editor. The Auto button applies color, tone and
sharpness changes automatically whereas the
slider allows the user to gradually change the degree of adjustment.
This is an all-in-one adjustment. The effects of the control can be
undone by selecting the Edit > Undo Smart Fix entry.
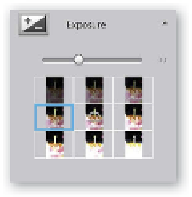
Exposure -
The Exposure control provides the fastest way to change
the overall brightness of the photo. Use this control as your first
adjustment when images are too dark or too light. Be careful to check
that highlight and shadow detail has not been inadvertently lost
when using this adjustment.
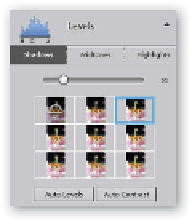
Levels
- A second lighting control comes in the form of the Levels
control. Here we have auto buttons for both Levels and Contrast as
well as slider adjustments for lightening shadows, darkening high-
lights and altering midtone contrast. The auto options are the same
as those found in the Enhance menu. Both controls enhance contrast
with the levels option also changing the color.


Search WWH ::

Custom Search