Graphics Reference
In-Depth Information
any vertex, along the RotoBezier's Path, then dragging left and right will adjust
the Tension of that vertex. The Tension (how smooth or sharp the spline path
will transition into and out of a vertex) is reflected in the Info Window as a
percentage: 0% is tight and sharp, while 100% is loose and smooth. Used in
conjunction, the RotoBezier and the Pen Masking Tools are the first step in
Rotoscope production. Later, we'll experiment with using the RotoBezier on
moving footage to isolate an object out of a scene.
Return to the Master Comp then save your work as
GridBall
-
L3.aep
.
Drag and Replace - Part 3: Comps into
Comps or Footage
The power of Drag and Replace becomes even more evident when you consider
replacing Precomps residing within multiple Comps. Take our project from above
using
With Layered Comp. We have one image of a team
member converted into a Precomp
that's using another image to augment
the player's picture. You can now use
this altered footage Precomp to Drag
and Replace into another player's
Precomp instances.
Replace Footage
Using the same method for Drag and
Replace - Footage Across Multiple
Comps, you hold 'Alt' then drag the new
Precomp atop any Precomps or Footage you want to replace. The new Precomp
then supplants the previous Precomp/Footage everywhere it appears.
Your only limiting factor arises when you attempt to form a paradoxical loop
where some resource footage is used within a Precomp, then you try to Drag and
Replace that Precomp onto your resource footage. This causes a dilemma - the
footage is used within the Comp already, so you can't replace what supplies the
replacement.
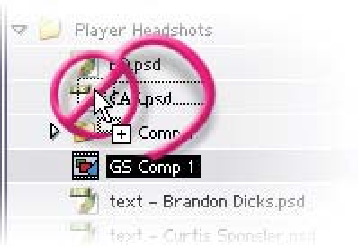
After Effects understands this paradox, so if you try to Drag and Replace you
will not be permitted. Instead of seeing the target item selected as you drag
the replacement over the top, it will not become selected, indicating that your
action will result in a paradox. In the example above,
GS Comp 1
is trying to