Graphics Programs Reference
In-Depth Information
2.
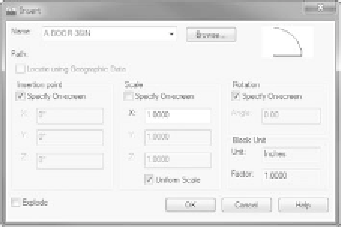
From the Insert dialog box, choose the A-DOOR-36IN block using the
Name drop-down found atop the dialog box.
A preview of the block appears in the upper-right corner (see
Figure 7.9). Below the Name list are three areas with the Specify
On-Screen option. These are used for the insertion procedure.
FiGuRE 7.9
The Insert dialog box
3.
With the A-DOOR-36IN block specified, choose the following settings
within the Insert dialog box:
a.
Under the Insertion Point group, check the Specify On-Screen
option.
b.
Under the Scale group, uncheck the Specify On-Screen option.
c.
Under the Rotation group, check the Specify On-Screen option.
d.
Make sure the Explode check box in the lower-left corner is
unchecked. Explode disassembles the block into its component
parts upon insertion into the drawing.
4.
Click OK to return to your drawing; the A-DOOR-36IN block is now
attached to the cursor, with the hinge point coinciding with the
intersection of the crosshairs (see Figure 7.10).
The command window says
Specify insertion point or
[Basepoint/Scale/X/Y/Z/Rotate]:
.
5.
With the Endpoint osnap running, move the cursor toward the right
end of the lower jamb line in the back door opening. When the Endpoint
marker appears at the jamb line's lower-right endpoint, click.

Search WWH ::

Custom Search