Graphics Reference
In-Depth Information
the actual settings of the Glare node later.
Those are the operational basics of
working with nodes.
Let's take a closer look at the anatomy
of a single node: Render Layers.
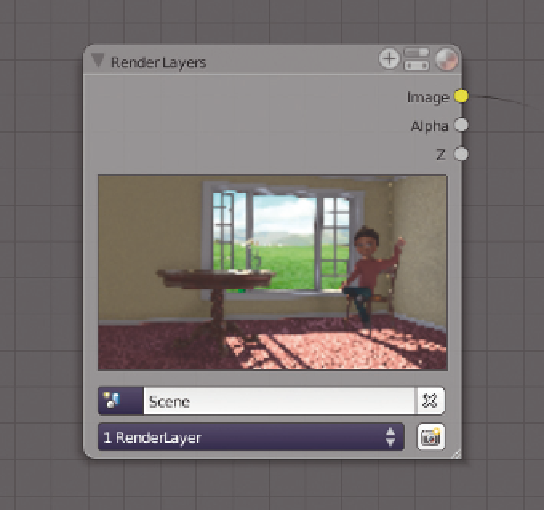
Figure
12.13
shows a close-up of the Render
Layers node, the basic channel of
communications between the renderer
proper and the compositor. It contains
a small preview of the image, as well as
several selection controls. The first
selector below the preview image allows
you to choose from any scenes within
the current BLEND file. The Layer
control below that, which displays
1
RenderLayer
, allows you to select
from any number of rendering groups
that you'll learn how to create later.
Figure 12.13
The Render Layers node.
On the right are three output sockets.
One for the RGB image itself; one for
Alpha, in case your image uses transparency or shows the sky; and one for Z, which tells the compositor
how far away the surface represented by that pixel is from the camera. Notice the little hashed area in the
lower right corner of the node. LMB dragging the corner resizes the node, within certain limits. On the
header of the node are several display controls. The + symbol hides and shows unused sockets. Node trees
can become visually complex, and if you know you're not going to be using certain sockets, hiding them
can help to avoid clutter. The two-tiered control to the right of the + hides and shows all nonsocket
controls on the node. This can save a lot of space, especially when nodes have a large number of controls,
like Glare. Finally, the ball icon that looks like the one from the Material properties context hides and
shows the thumbnail image.
Pressing the N key in the Node Editor opens the familiar panel on the right of the workspace. The panel
displays the nonsocket controls of the active node (the one to last receive an LMB or any kind of action).
This is particularly helpful with large node trees when you might have to zoom out to fit everything onto
your screen. The controls can be difficult to work at those sizes, so a simple LMB click on the node in
question lets you work the controls at full size in the N-key panel. The node's name, displayed on its
header, can also be changed here.
Overall Effects
Let's look at some of the simple and useful effects you can generate.
Search WWH ::

Custom Search