Graphics Reference
In-Depth Information
headers of the nodes to move
them toward the edges of the
screen, making space for a
new node between them.
Use the universal key for
adding elements in Blender
(
Shift-A
) to bring up the
complex Add Node tool. I say
complex, because there are
currently over 60 different
node types, grouped into 8
categories.
Figure 12.12
shows
the menu, choosing
Add >
Filter > Glare
. The Glare
node springs to life in the
workspace. LMB drag it to the
center of the screen.
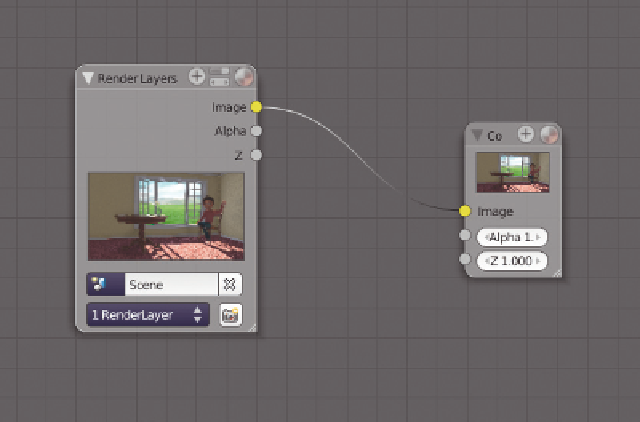
Figure 12.11
The most basic valid node tree.
To create the node tree, LMB drag, starting on the Image
output socket of the Render Layers node, ending on the
Image input socket of the Glare node. That feeds the ren-
dered image to the Glare node. Now, LMB drag from the
Glare node's Image output socket on the right to the Com-
posite node's Image input socket. All done! The node
network might process for a second as it applies the glare
effect to the image.
But what did it do? An easy way to get feedback on what's
going on in a node tree is to add a Preview node. Use
Shift-A again, this time choosing
Output >
Viewer
. A
new node called Viewer is added to the workspace. LMB
drag it to rest just below the Composite node. Go back to
the Glare node, and connect its Image output socket to the
Viewer node's Image input socket (LMB drag). A node's output sockets can feed their information to any
number of input sockets on other nodes. Input sockets, however, can only receive information from a
single source.
Figure 12.12
The Add Node menu.
With the Viewer node hooked up, enable the
Backdrop
option on the Node Editor header. The com-
posited image shows up in the Node Editor's background! A Viewer node pumps whatever image it receives
in its input socket to the Node Editor's background, giving you a convenient way to maximize your
workspace, while retaining a full-resolution preview of what your node tree is doing. We'll fiddle with

Search WWH ::

Custom Search