Graphics Reference
In-Depth Information
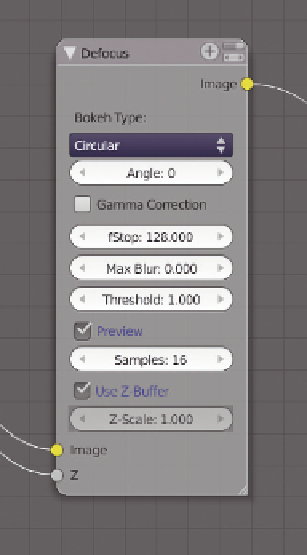
Depth of Field
Figure 12.14
shows the Defocus node. Defocus analyzes the depth
information from the render via the Z-channel, then applies a selec-
tive blur. The final effect is very much like the defocusing that
occurs when shooting a scene through a real lens.
To test this node, you can either create your own simple scene or use
defocus_testing.blend
from the Web Bucket. If you're making your own,
create an array of objects (cubes, spheres, whatever) spread across a
plane, and put a camera looking down on it at an angle. Select your
camera and bring up its properties in a Properties window. At the
bottom of the Camera properties
Lens
panel is a control for
Depth
of Field
>
Distance
. Enable
Limits
below it in the
Display
panel.
This shows the camera's clipping distance within the 3D view as an
orange line. Now, start raising the value of the
Distance
control. A
yellow target moves away from the camera, shown in
Figure 12.15
.
This will be the node's focal point. Objects that are further from this
target point will receive more blurring.
Set the target to fall nicely in the middle of your array of objects.
This has already been done on the sample file. Back in the Node
Editor in the Composite window hook the Render Layers Image
output to the Defocus node's Image input, and pipe the Defocus
output to the final Composite node. You can add a Viewer node
and enable Use Background if you like. Depth information comes along with a render in the Z-channel.
To let the Defocus node access it, connect the Z output socket of the Render Layers node to the Z input
socket of the Defocus node. See how that works?
Figure 12.14
The Defocus node.
Going back to the node parameters themselves, the real ones to be concerned about here are f-Stop,
Preview, and Use Z-Buffer. Enable
Use Z-Buffer
if it isn't automatically set when you connected the
Z-channel to the node. Enable
Preview
. This gives a grainy result, but is very fast. Leave Preview turned
on while you are adjusting settings, but turn it off when you're done to get a fully smoothed final image.
You probably won't see any defocusing going on until you adjust
f-Stop
. This is akin to the f-stop setting
on a camera. The lower you set this number, the more blurring will occur. F-Stop follows a “rule of
halves” of it's own—cutting the number in half doubles the amount of blur. In the example scene, you
can't really see any defocusing until it gets down to around 30 or so. A nice value seems be to around
24. You can see the result in
Figure 12.16
. It's subtle, and most noticeable on the hills in the
background.
As a small suggestion when using Defocus, I'm going to take us back to the beginning of the topic.
Keep it subtle. I
know
that you're probably excited about how easy it is to use a feature like this, but restrain
yourself. In addition to giving depth information to the viewer, the amount of focal blur in an image also
gives hints about scale. Wade through Google image search or Flickr for close-ups of insects and such. Notice
Search WWH ::

Custom Search