Graphics Programs Reference
In-Depth Information
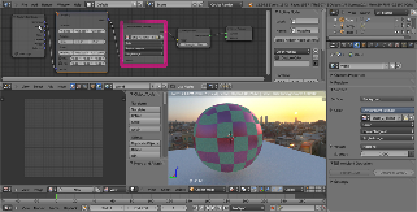
6. Looking in the
Rendered
view, you'll see that the general lighting has
turned to a pink color. This is to show that the
World
material is now using
a texture to light the scene, but that at the moment there is no texture yet.
7. Click on the
Open
button both in the
World
window under the
Properties
panel or in the just added node inside the
Node Editor
window. Browse
to the
texture
folder and load the
Barce_Rooftop_C_3k.hdr
image
(a free high dynamic range image licensed under the Creative Commons
Attribution-Noncommercial-Share Alike 3.0 License from the
sIBL
Archive
http://www.hdrlabs.com/sibl/archive.html
).
8. To better appreciate the effect, click on the little eye icon on the side of
the
Lamp
item in the
Outliner
to disable its lighting. The spheroid is now
exclusively lit by the
.hdr
image assigned to the
World
material. Actu-
ally, you can also see the image as a background in the
Rendered
pre-
view. You can also rotate the viewport and watch the background texture,
"pinned" to the
World
coordinates, rotate accordingly in real time.
9. As for object's materials, the mapping of any texture you are going to use
for the
World
can be driven by the usual
Mapping
and
Texture Coordin-
ates
nodes we have already seen. Generally, for the
World
materials,
only the
Generated
coordinates output should be used, and actually it's
the one used by default if no mapping method is specified. Add the
Map-
ping
and
Texture Coordinates
nodes and connect them to the
Vector
input socket of the
Environment Texture
node, as shown in the following
screenshot:
10. Save the file as
start_07.blend
.
But now, let's imagine a case in which we want to assign a texture to the
World
ma-
terial and use it for the general lighting of the scene, but we don't want it to show in
the background of the render. That is, for example, we are using the
hdr
image to