Graphics Programs Reference
In-Depth Information
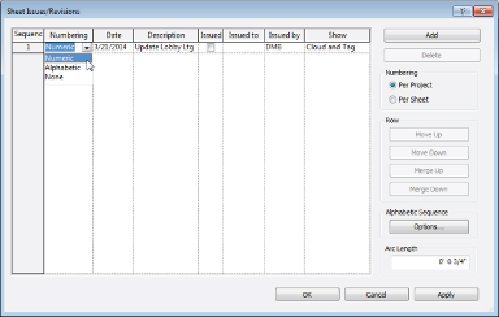
Figure 23.26
Sheet Issues/Revisions dialog box
The settings on the right side of the dialog box allow you to number your
revisions by sheet or by the entire project. Clicking the Add button in the
upper-right corner creates a new revision sequence. The move buttons in
the Row section enable you to move a revision up or down the list to change
the order in which revisions appear in the schedule. The merge buttons
allow you to combine the contents of one revision with another. Once you
have created a revision sequence, it cannot be deleted. You must merge it
with another revision. The Alphabetic Sequence setting can be defined to
eliminate unwanted letters or establish a custom numbering system.
When you use the Per Sheet revision sequence setting, the revisions are
listed as they occur on each sheet. So you could, for example, have a revision
number 2 in your revision sequence that is the first revision to occur on a
sheet. Therefore, it will be listed as number 1 in the revision schedule on the
sheet and in its tag.
If you use the Per Project revision sequence setting, you can have a revision
number 2 in your sequence, and if it is the only revision on a sheet, it will
show up as number 2 in the schedule and its tag.
New to Revit 2015 is the Arc Length setting, which allows you to define the
size of the arcs used to draw your revision clouds. The value you use for this
setting will apply to all revision clouds, including those that have already
been drawn. Use caution because this may affect existing revision clouds in
an undesirable manner.