Graphics Programs Reference
In-Depth Information
With the settings established for a revision, you can use the Revision Cloud
button on the Detail panel of the Annotate tab to draw a cloud around
the modified area. When you click the Revision Cloud button, it activates
the Modify | Create Revision Cloud Sketch contextual tab. The Draw panel
is available on this contextual tab and allows you to choose from various
drafting tools to sketch a revision cloud. Press the spacebar to flip the
orientation of the cloud bubble when drawing clouds. Be sure to select the
green check mark on the Mode panel to finish creating the revision cloud
and exit sketch mode. The properties of the cloud can be used to determine
the revision sequence of which the cloud is a part.
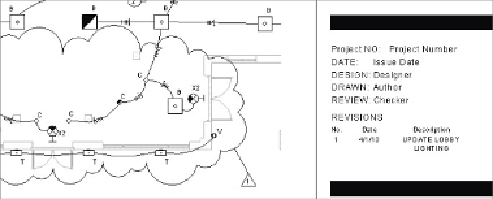
Figure 23.27
shows a
revision cloud that was drawn in a floor plan view and the resulting revision
schedule on the sheet where the view resides. Notice that the cloud has been
tagged using a revision tag that reports the revision number.
Figure 23.27
Revision cloud in a view
You can use the Issued parameter in the Sheet Issues/Revisions dialog box
to establish that a revision has been issued. When a revision sequence has
been marked as issued, you cannot add revision clouds to it. Sorting your
revision schedule by sequence is a good way to organize your revisions. This
allows you to use a custom numbering system without having to sort by it.
The visibility of revision clouds and their tags can be controlled via the
Visibility/Graphic Overrides dialog box. Their categories are located on the
Annotation Categories tab of the dialog box.
If you want to show a revision in the schedule of a sheet but that sheet does
not contain a view with the revision, or the revision is not drawn on that
sheet, you can do so by using the Revisions On Sheet parameter found in
the Instance properties of the sheet. Click the Edit button and choose which
revisions are to be shown in the revision schedule.