Graphics Programs Reference
In-Depth Information
Vertex Mapping
In the lower-right corner of Layout are the
primary VMap selectors. The following are
LightWave's main VMaps:
•
Weight maps
define areas of influ-
ence. They affect bones and sub-patch
details and can be referenced by Texture,
Bump, and Displacement maps in Layout.
•
Texture maps
assign UV maps to your
model, so you can “unwrap” it — that is, lay
out your model
exactly
how it would be easi-
est for you to paint its texture maps in a 2D
paint package.
•
Morph maps
(“endomorphs”) allow
you to store specific, referential deforma-
tions with your object. You can use
endomorphs for facial animation or to
power joint-driven morphing (so bending a
forearm
automatically
bulges the bicep into
the shape you've sculpted!).
Figure 2-24: Layer names can be assigned and
changed by double-clicking on the layer name in
the Layer Browser. A layer's parent can also be set
in this window.
Foreground layers have a check under the
“F” column in the Layer Browser; layers in
the background have a check under the “B”
column. If you have Hierarchy view active
(as in Figure 2-23), you can assign a layer's
parent by clicking and dragging it onto the
desired parent layer.
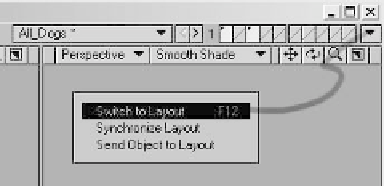
Linking to Layout
When you are running Modeler with the
Hub active (more on the Hub later in this
chapter), you have a “conduit” open
between the two interfaces. The pop-up
menu without a label in the upper-right cor-
ner of Modeler is the direct link to that
conduit. (When you are running LightWave
with the Hub disabled, this pop-up menu
isn't visible.)
Figure 2-26: Weight, Texture, Morph, Color, or
Selection may be chosen. Then the appropriate
map can be selected or created from the pop-up
menu on the right.
•
Color maps
allow you to apply color to
individual points. Unlike the color applied to
an object's surface (which is assigned to
polygons), Color maps are applied to points
and can utilize falloff to provide a soft, feath-
ered edge. Color maps are most useful
when used in conjunction with surface col-
ors and Texture maps to provide localized
color “boosts.”
•
Selection maps
enable you to store
point sets that can be recalled for later use.
When modeling, Selection can be used to
recall parts of an object that require fre-
quent modification (such as the upper
Figure 2-25: The Layout Link pop-up menu lets you
switch your focus to Layout (Switch to Layout). It
can make doubly sure that Layout has the most
recent changes that you've made in Modeler
(Synchronize Layout). Or it can send a model that
you've just sculpted (or just loaded into Modeler)
directly into Layout (Send Object to Layout).


