Graphics Programs Reference
In-Depth Information
Render away!
Step 7: Radiosity
You want even
more
“real?” Okay. Light-
Wave's radiosity lets light
bounce
off
surfaces, illuminating those nearby.
Note
LightWave can do the almost mind-numb-
ingly complex mathematics it takes to
compute radiosity now, thanks to some inge-
nious ways of streamlining the calculations,
but it still takes time. The more complex the
lighting model you use, the more time it
takes to render. Since we're using area
lights for this step to compare and contrast
with the other steps, and area lights are as
complex a light as LightWave has (at the
moment), prepare to kick your feet up on
your desk for a while or head on out for the
most popular pastime of all 3D animators —
the “render-walk”!
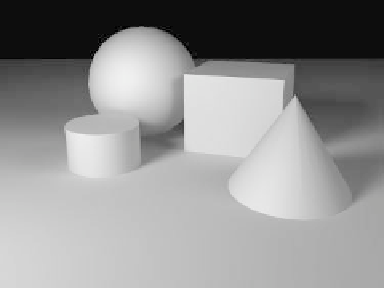
Figure 4-28: The differences are subtle but power-
ful. With light now able to “bounce” from surface
to surface, this looks even more like a snapshot of
something from the real world.
Note
The finished scene for this render is: Scenes\
Chapter_04\StillLife_05_Radiosity1_F.lws.
Now, if you're saying, “Looks good, but
dang
, that took a long time,” I totally hear
you. With radiosity, as with just about
everything else in LightWave, you have the
choice to do things real or do things that
approximate real.
Figure 4-27
Figure 4-29
a.
Leaving everything else as it is, open
the Global Illumination panel again and
choose
Enable Radiosity
, leaving it at
its default Type, Monte Carlo. Don't
forget to increase Ambient Intensity to
25%
.
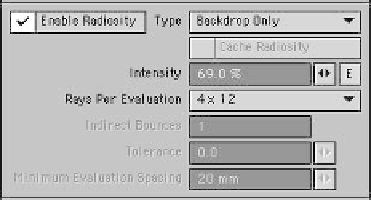
b.
Go back into the Global Illumination
panel, and change the radiosity Type to
Backdrop Only
. Change its Intensity
to
69%
as well.