Graphics Programs Reference
In-Depth Information
Figure 4-30
Figure 4-31
c. <
Ctrl
>+<
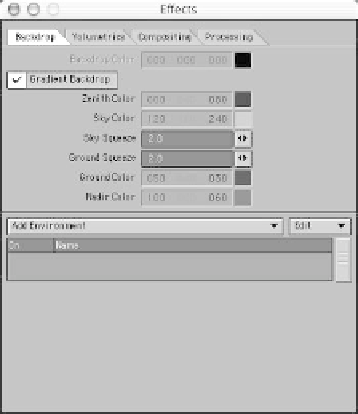
F5
> brings up the Back-
drop tab of the Effects window. Activate
Gradient Backdrop
, and accept the
default colors and settings.
Switch to the
Compositing
tab in the
Effects window, and under the Background
Image pop-up menu, choose
(load Image)
.
In the requester, choose
Images\Black-
Square.iff
.
You'll notice that BlackSquare is only 32
pixels by 32 pixels. However, it is all black
(0, 0, 0), and as the background image, it
will be automatically stretched to perfectly
fill the entire back of the Camera view of
your scene, no matter what resolution you
render.
Note
Zenith
is the part of the sky that is directly
overhead.
Sky
refers to the sky color at the
horizon.
Ground
refers to the ground color
at the horizon.
Nadir
is the ground color
directly below the horizon.
(Zenith and nadir are points on the “celes-
tial sphere,” an imaginary, infinitely large
sphere with the Earth at its center and all
the heavenly bodies appearing to be
“painted” on its inward-facing surface.)
Note
The trick of using tiny solid-colored swatches
of colors as opposed to full-sized images for
background, texturing, or whatever came
about in order to save memory during com-
plex renders. The less memory LightWave
has to reserve for the images in a scene, the
more it has available to calculate before it
has to hit virtual memory.
d.
Now, if we were to render at this point,
we'd see a bit of the gradient back-
drop's color peeking up above the back
of the ground plane of our still life.
Here's a trick I use when I want to use
Backdrop Only radiosity for generating
elements to be composited later onto a
photographic plate, which requires me
to keep the background of my rendered
image black: