Graphics Programs Reference
In-Depth Information
To add the Insert Record behavior:
◗
1.
At the top of the Server Behaviors panel, click the
Add behavior
button
, and
then click
Insert Record
. The Insert Record dialog box opens.
◗
2.
Click the
Submit values from
button, and then click
contact
, if necessary, to
select the contact table in the database.
◗
3.
Click the
Connection
button, and then click
nbf_db_connect
to select the con-
nection to the database, if necessary.
◗
4.
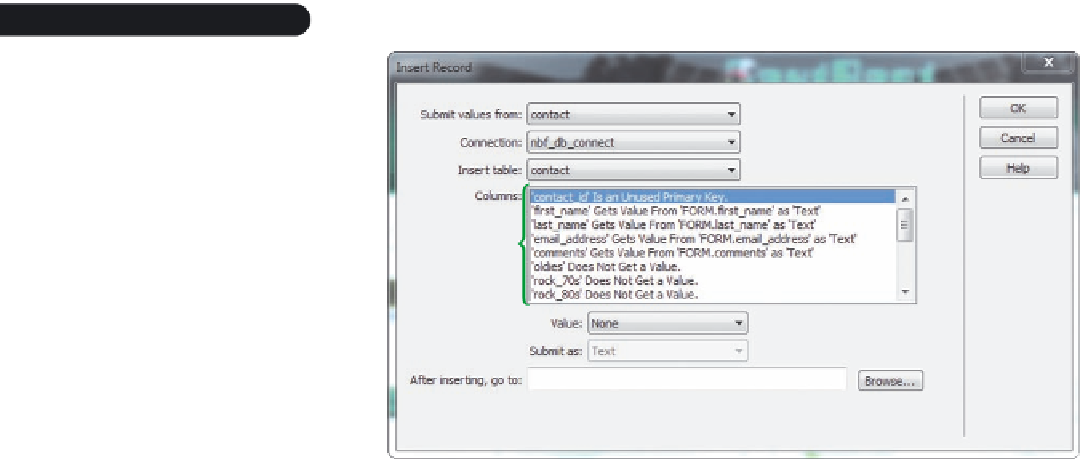
Click the
Insert table
button, and then click
contact
. The columns in the contact
table are displayed in the Columns box. See Figure 9-11.
Figure 9-11
Insert Record dialog box
columns in the
contact table in
the database
click to select the
page you want to
display after the
form is submitted
◗
5.
Click the
Browse
button next to the After inserting, go to box. The Select a redi-
rect file dialog box opens.
◗
6.
Click the
thankyou.html
page in the site's local root folder, and then click the
OK
button. The Select a redirect file dialog box closes, and the page filename appears
in the After inserting, go to box.
◗
7.
In the Insert Record dialog box, click the
OK
button. The Insert Record behavior is
added to the page and appears in the Server Behaviors panel.
◗
8.
Click
Discover
on the bar that appears across the top of the Document window to
enable Dreamweaver to discover any dynamically related pages.
◗
9.
If the logo image is showing that it is out of sync with the original file, select the
Image sync button in the Properties inspector to sync it to the original image
(this sometimes occurs when placing scripts into your pages). After synching, click
the Insert Record behavior in the Server Behaviors panel to redisplay its proper-
ties. See Figure 9-12.


Search WWH ::

Custom Search