Civil Engineering Reference
In-Depth Information
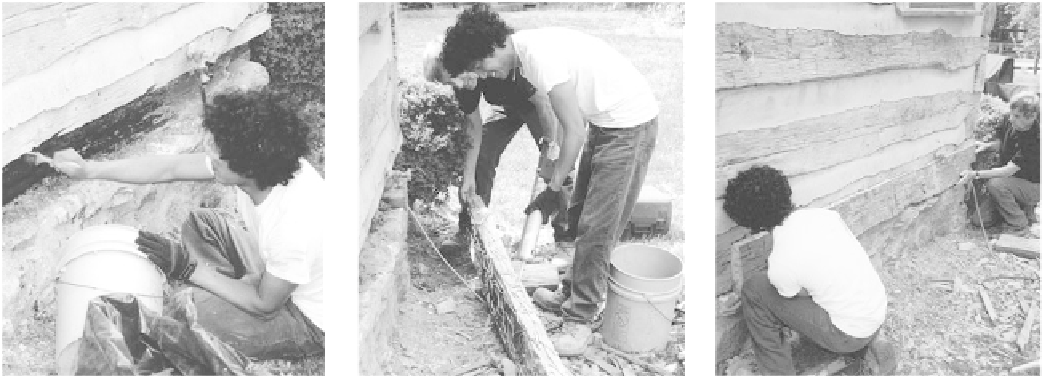
Decayed wood has been removed here, and
the borate-based preservative is being applied
to stop dry rot and possible insect damage.
We use four coats, brushed on or sprayed on.
Construction adhesive is applied to the re-
placement log section which, in this case,
was most of the face of this log.
The replacement section is put in place.
Finish nails, along with the glue, will hold it.
Clear caulk is used to seal out water.
12 inches, using a vertical lap instead of horizontal so
the patch shows less. It's a good idea to leave the
replacement piece a little long, say half an inch, to
allow for adjusting the butt ends of the lap joint. If
they don't fit tight, kerf the gaps with a handsaw to let
them come together tighter. Then, when the joint is
tight, glue, peg, or nail, and cut off what's left at the
end, if anything.
The lap joint can be done without jacking up the
house, so of course it's preferable if the notch area is
sound. All too often, though, the notch is where the
damage is, and it must be replaced. If only the notches
are bad, you can do the same half-lap repair, replac-
ing the notched section and using the split-off tech-
nique mentioned before.
If the house has settled, which it probably has in
this case, do raise it in small increments over several
days, back to just above level. Drive replacements
(logs, stones, wedges — whatever) in tight, then let the
house wall back down. The logs will compress until
rechinking distributes the weight from above along
their entire lengths.
For higher replacements, we use jack posts, which
adjust to most workable heights. One goes inside,
again, and one outside, with channel iron between.
Avoid automotive-type jacks under vertical posts,
because this arrangement can buckle and let the
whole house come down — sometimes onto you.
Rechinking
This is a case for a very close look at the condition of
the log house before you start, or better, before you part
with any money. Rechinking is just about always nec-
essary. If anything turns off the enthusiasm to restore
a log house, the dilemma of replacing rotten, unwork-
able chinking is it. At best, the expansion of the logs
with moisture has pushed the old chinking out, to leave
a direct channel for rainwater behind the masonry.
Often, the logs have rotted from this, or the old
chinking is so broken up it has to come out anyway.
I have found the chinking space between the logs
filled with solid clay and solid concrete as well as
wedged with large rocks, small stones, full bricks and
broken bricks, moss, grass, mud mixed with horsehair
or straw, and wood splits (or “chinks,” the derivation
for the word
chinking
) smeared with a layer of mud
or concrete in varying thicknesses. (More recently,
chunks of Styrofoam have been wedged in.) Early
builders did not have access to metal lath and the
materials we have and so they stuffed anything and
everything they could into the cracks. By doing this,
they actually sabotaged the health of the logs, and
therefore the house, by holding moisture against the
wood.
The best thing to do with old chinking is to knock
it all out. Then, if the log wood is soft or bug-eaten,