Civil Engineering Reference
In-Depth Information
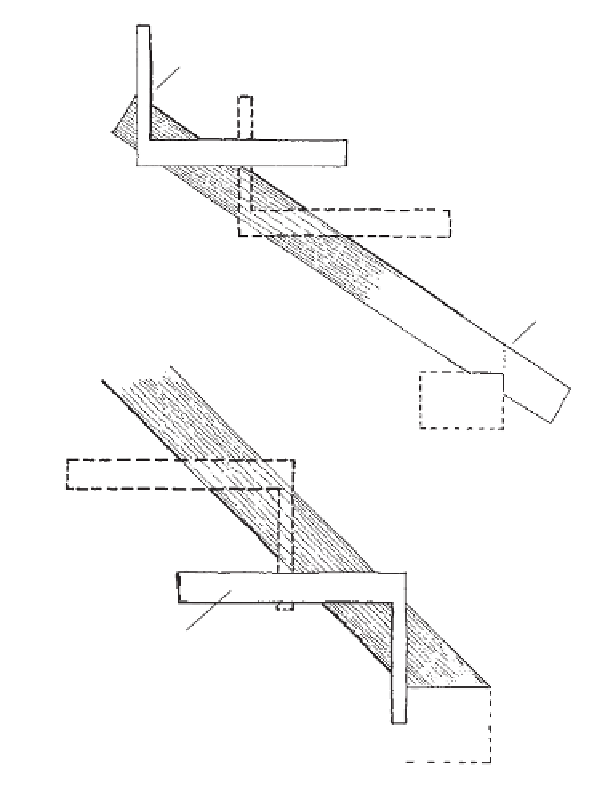
Assuming you're notching the rafters into the plate
and extending them, use a level and chalk line on the
face of the plate and mortise to it. Getting the rafters
notched to give a uniform height is essential to avoid a
roof that humps and swells like surf. It's easier, obvi-
ously, with rafters sawn or hewn to exact dimensions.
With round poles, just notch a bit, try for fit, and notch
some more. A layout string stretched from rafters set
at each end will make this easier and more accurate.
I peg rafters right through the notch into the plate.
A one-inch peg is enough, but you may also toenail it
with a couple of 20-penny spikes. In a windstorm, a
sudden low-pressure cell can cause your roof to lift off
intact, if it is not secure at these points.
Here, the ideal peg is one with a bit of a head to it,
with a hole tapered out in a countersink to hold it. A
lag screw is probably better all around, but I've also
used bolts driven into slightly smaller lead holes.
When measuring rafters for this plate notch, be
sure to mark the apex of the notch. Almost every
builder sooner or later starts the edge of the notch at
the proper point, making the apex off a bit, then has
assorted rafters that are an inch or two too long. It's
the sort of mistake that's okay if you do it consistently.
Otherwise it can cause your ridge to weave. Cut the
bird's-mouth notch about two to four inches deep, just
enough to help hold it in place until you peg it and to
help with the weight.
Now, you'll need to cut the top rafter ends to a
45-degree angle to fit at the peak. No matter how care-
ful you are with round poles, there'll still be variations,
so I have used this method: Measure the total house
depth, or the distance between each plate at the out-
side, at the point each pair of rafters goes. Lay the pair
out with plate notches exactly that distance apart.
Now cross the other ends at the measured peak point,
and saw down through both at once. They have to fit
that way. A log sitter is helpful here to hold things in
line; with sawn rafters, you can get a 45-degree cut
easily.
Now spike these cut angles together and reinforce
with one or two 1≈6 board plates, cut at a 45-degree
angle, near the peak. That keeps the roof halves from
splitting apart in a gale. It's also a good idea to nail a
temporary brace across the rafters at plate-notch
height or put in collar ties. This makes it easier to set
the rafter pairs in place.
Traditionally, each rafter was half-notched or mor-
tised at the peak to fit with its matching tenoned one.
Then both were bored and pegged. This is a simple
operation for a 45-degree roof, but more complicated
when the pitch varies. The important thing is to hold
the matched rafters together at the peak, against out-
ward thrusts from low-pressure cells in windstorms or
to protect the roof against falling trees.
You'll set each rafter pair, or truss, onto the log plate
at the right spot or into the mortise you cut for it. Lay
these out, dividing the plate length evenly for rafter
spacing. Have the outside of the end pairs of rafters
flush with the outsides of the log walls. If the plates are
extended for a trim rafter pair, let these come at the
plate ends, no matter what the spacing.
Using a framing square to lay out rafters. The rise-run legs of the tri-
angle give the hypotenuse (rafter length) when the known center-
to-outside wall is measured off.