Graphics Programs Reference
In-Depth Information
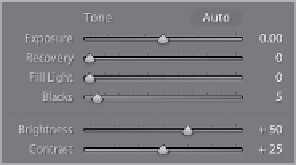
Step Seven:
I'm switching to a different photo for
the next step in adjusting our overall
exposure, where we'll use the Blacks slider
(we're skipping over the Fill Light slider
until Chapter 6, because it's for when you
have trouble with a backlighting situa-
tion). The Blacks slider adjusts the darkest
shadow areas in your photo, and dragging
to the right increases the amount of black
in the shadows—dragging to the left
lightens them. I drag this slider to the
right any time my photo looks washed
out, because it can bring back color and
depth to shadow areas (the original image
is shown on top here, and in the bottom,
I increased the Blacks and the Recovery
amount to bring back detail in the sky).
I'm not nearly as concerned with losing
shadow detail as I am highlight detail,
but if you're a “shadow detail freak”, you
can use the histogram's top-left corner
triangle as your shadow clipping warning,
or press
J
, and any shadow areas that are
clipping will appear in blue on your photo.
Step Eight:
The Brightness slider (circled here) acts as
a midtones slider (if you're familiar with
Photoshop's Levels control, it's like the
center midtones slider). To brighten the
midtones, click-and-drag to the right (to
darken the them, drag to the left). I grab
this slider anytime I have a washed-out
sky—lowering the amount of brightness
can make the sky look rich and blue again
(in the before/after shown here, I lowered
the Brightness amount to -20, but then
it looked a little dark, so I increased the
Exposure amount a little bit to brighten
things back up). We ignore the Contrast
slider here (dragging it to the right makes
the bright areas brighter and the darker
areas darker), because we add contrast
with a more powerful tool (the Tone
Curve), which you'll learn about shortly.
Continued