In This Chapter
Understanding computer printers Finding things on the printer Controlling the printer Feeding the printer ink Choosing the right paper Installing a new printer Setting margins Printing in reverse order Stopping a document from printing
Computers and their printers have a shared lineage. The first computer terminals were often teletype machines, a type of noisy keyboard-printer-phone thing. That history explains why computers on TV and in film make noise when they display characters on the screen, though it could be just another manifestation of Hollywood’s lack of touch with reality.
Eventually the teletype morphed into three unique computer peripherals: the keyboard, the monitor, and the printer. All three gizmos are still considered part of the basic computer system. Although you might not purchase a printer when you buy your PC, it’s still something worth looking into, and definitely something worth having. This chapter covers things associated with PC printers and printing.
The Printer, the Paper, the Document Maker
You need a printer attached to your computer system because dragging the PC around and showing everyone what’s on the screen is just too much of a chore. No, it’s much better to print your stuff on paper, to create a hard copy of your data, documents, and doodles. The printer makes all that possible.
Types of computer printers
Computer printers are categorized by how the ink gets thrown onto the paper as well as by any special printer features or options. You can pick from one of three general types of printers:
Inkjet: The inkjet printer creates its image by spewing tiny balls of ink directly on the paper. It’s that jet-of-ink action that gives this printer category its name. The inkjet printer is the most common type of computer printer.
Laser: Laser printers are found primarily in the office environment, where they can handle the high workloads. The printer uses a laser beam to create the image. The result is crisp and fast output, but at a premium price over the standard inkjet type of printer.
Impact: Impact printers are few and far between these days, although once they were the dominant type of computer printer. These printers are slower and noisier than the other types of printers. They use a ribbon and a device that physically bangs the ribbon on the paper. Because of that, impact printers are primarily used now for printing invoices or multicopy forms. They’re not practical for home use.
Two additional types of printers use the inkjet method of lobbing ink onto paper: photo printers and all-in-one printers.
A photo printer is specifically designed to print photographs. Generally, a photo printer has a wider variety of inks available for better-quality color printing.
An all-in-one printer combines a basic inkjet or photo printer with a fax machine, scanner, and copier. This type of printer is popular in home and small offices. It does everything.
Inkjet printers are by no means messy. The ink is dry on the paper by the time the paper comes flopping out of the printer.
A laser printer that can print in color is known as a color laser printer. The regular (monochrome) laser printer uses only one color of ink — usually, black.
High-priced printers offer a higher-quality output, faster speed, more printing options, the ability to print on larger sheets of paper, and other amazing options.
The basic printer tour
Take a moment to examine the PC’s printer and look for some handy items, as labeled in Figure 12-1:
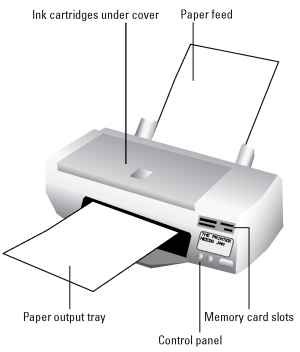
Figure 12-1:
Notable places on the printer.
Paper feed: The paper feed is where you store the paper that the printer eventually prints on. For more information, see the section “The printer eats paper,” later in this chapter.
Manual/envelope feeder: The printer may have a special slot, tray, or foldout-thing used to manually feed special papers or envelopes. It may be hidden on your printer, and it’s not shown in Figure 12-1, so look around a bit to see whether your printer has such a deal.
Ink/toner replacement: Printers don’t go on printing forever. At some point, you need to feed the thing more ink. Be sure that you know how to open the printer to find where the ink goes. Also see the section “The printer drinks ink,” later in this chapter.
Control panel: Refer to the next subsection for the details.
Memory card reader: Many photo printers have a place where you can directly plug in your digital camera’s memory card.
Paper output tray: The printed paper comes out and is stacked up in the output tray. If the paper comes out face up, be sure to see the section “Printing in reverse order,” later in this chapter.
The printer’s control panel
Every printer has a control panel somewhere on its body. The fancy models have LCD screens that display text or preview and select photos for printing. Less fancy printers may have only a couple of buttons or lights. Either way, two important buttons to find or features to access on the printer’s control panel are the On-line or Select button and the Cancel button.
The purpose of On-Line or Select is to tell your printer whether to ignore the computer. When the printer is offline or deselected, the computer can’t print. The printer is still on, which is good because you may need to access features, unjam the printer, or do things that you otherwise cannot do while the thing is printing.
The Cancel button helps you stop printing. It’s useful because today’s printers are so fast that you often don’t have time to cancel printing in Windows. See the section “Stopping a printer run amok,” later in this chapter.
The computer can print only when the printer is online or selected.
If your printer seems to lack a control panel, it’s probably controlled by using a software control panel in Windows. This feature is the printer’s and isn’t a part of Windows, so refer to the printer’s manual for details.
Printers with LCD control panels often use menu buttons to help you choose the online or form-feed options.
All-in-one printers have additional buttons on their control panels — for example, buttons for making copies and scanning. A companion program in Windows probably allows for even greater control over the printer’s abilities. Note that such programs are specific to your printer and aren’t a part of Windows itself.
Keep your printer’s manual handy. For example, I put my printer’s manual right beneath the printer, where I can always find it. You may never read the manual, but if your printer suddenly pops up and displays Error 3 4, you can look up Error 3 4 and read how to fix it. (The voice of experience is talking here.)
The printer drinks ink
The Chinese invented ink over 3,000 years ago, but it’s still basically the same stuff you use to print stuff on paper with your computer printer. The type of ink and how it’s stored depend on which type of printer you’re using.
Inkjet printers, which include photo and all-in-one models, use ink cartridges. Laser printers use toner, a powdery ink substance that also comes in a cartridge.
All printers use black ink or toner. Color printers also use black, plus three other inks or toners: magenta, cyan, and yellow. Photo printers add two more colors: another flavor each of magenta and cyan.
Replacing the ink in your printer works differently for each printer manufacturer. Instructions are usually found on the inside of the lid or compartment where the ink cartridges reside. Overall advice: Be careful! Spill the ink and you’ve got a serious mess.
Yes, they make money by selling you ink. That’s why the printer is cheap. It’s the old “Give away the razor and sell them the blade” concept all over again.
Some manufacturers sell their cartridges with return envelopes so that you can send the old cartridge back to the factory for recycling or proper disposal.
Make sure that you don’t breathe in the dust from a laser toner cartridge or else you’ll die.
Sometimes, the colors in an inkjet printer come three to a cartridge. Yes, it’s true: If only one color of ink goes dry, you must replace the entire cartridge even though the other two colors are still available.
‘ Make a note of which type of inkjet cartridges your printer uses. Keep the catalog number somewhere handy, such as taped to your printer’s case, so that you can always reorder the proper cartridge.
Always follow carefully the instructions for changing cartridges. Old cartridges can leak and spread messy ink all over. Buy rubber gloves (or those cheap plastic gloves that make you look like Batman) and use them when changing an ink or toner cartridge. I also suggest having a paper towel handy.
‘ When the laser printer first warns you that Toner [is] low, you can squeeze a few more pages from it by gently rocking the toner cartridge: Remove the cartridge and rock it back and forth the short way (not from end to end), which helps redistribute the toner dust.
Rather than buy new cartridges, consider getting ink cartridge refills or toner cartridges recharged. Be sure that you deal with a reputable company; not every type of ink or toner cartridge can be reused successfully.
Never let your printer cartridges go dry. You may think that squeezing every last drop of ink saves you money, but it’s not good for the printer.
The printer eats paper
Next to consuming ink, printers eat paper. Fortunately, paper isn’t as expensive as ink, so it doesn’t bankrupt you to churn through a ream or two. The only issue is where to feed in the paper. Like feeding a baby, there’s a right end and a wrong end.
The paper goes into a feeder tray either near the printer’s bottom or sticking out the top.
Some laser printers require you to fill a cartridge with paper, similar to the way a copy machine works. Slide the cartridge all the way into the printer after it’s loaded up.
Confirm that you’re putting the paper in the proper way, either face down or face up. Note which side is the top. Most printers have little pictures on them that tell you how the paper goes into the printer. Here’s how those symbols translate into English:
![]()
The paper goes in face down, top side up. The paper goes in face down, top side down.
![]()
The paper goes in face up, top side up. The paper goes in face up, top side down.
Knowing the proper paper orientation helps when you’re printing on both sides of a sheet of paper or loading items such as checks for use with personal finance software. If the printer doesn’t tell you which way is up, write Top on a sheet of paper and run it through the printer. Then draw your own icon, similar to those just shown, to help orient the pages you manually insert into the printer.
Always make sure that you have enough printer paper. Buying too much isn’t a sin.
Types of paper
There’s really no such thing as a typical sheet of paper. Paper comes in different sizes, weights (degrees of thickness), colors, styles, textures, and, I assume, flavors.
The best general-purpose paper to get is standard photocopier paper. If you want better results from your inkjet printer, getting specific inkjet paper works best, although you pay more for that paper. The higher-quality (and spendy) inkjet paper is good for printing colors; the paper is specially designed to absorb the ink.
At the high end of the spectrum are specialty papers, such as photographic papers that come in smooth or glossy finishes, transparencies, and iron-on T-shirt transfers. Just ensure that the paper you get is made for your type of printer, ink jet or laser.
Some printers are capable of handling larger-size paper, such as legal or tabloid sizes. If so, make sure that you load the paper properly and tell your application that you’re using a sheet of paper that’s a different size. See the later section “Basic Printer Operation” for more information.
Avoid thick papers because they get jammed inside the printer. (Thicker paper stock can’t turn corners well.)
Avoid using erasable bond and other fancy dusted papers in your printer. These papers have a talcum powder coating that gums up the works.
Don’t let the expensive paper ads fool you: Your inkjet printer can print on just about any type of paper. Even so, the pricey paper does produce a better image.
Printer Setup
As with all other computer peripherals, a courting stage occurs between the PC console and the printer. It involves an introduction, some dating, and, finally, a full-on-marriage. You’ll be grateful that the entire operation is much faster and far more successful than human courtship and bonding.
Connecting the printer
After liberating the printer from its box, and from various pieces of tape and evil Styrofoam, locate the printer’s power cable. Then locate the printer cable, the one that connects the printer to the console.
Aha! The printer didn’t come with a printer-to-console cable, did it? It never does. You have to buy the printer cable separately. It’s just a standard USB cable with A and B ends. Refer to Chapter 3 for information on plugging things in.
Before jumping the gun, read the printer’s instruction sheet to see whether you need to install software before turning the printer on. If not, turn the printer on. A USB printer is instantly recognized and configured by Windows. Life is good.
Most printers, like computers, can be left on all the time. The printer automatically slips into a low-power sleep mode when it’s no longer needed. However, if you don’t print often (at least every day), it’s perfectly fine to turn off the printer.
Some printers demand to be directly connected to the computer, not plugged into a USB hub.
You can connect a number of printers to a single computer. In fact, most PCs on a network have access to multiple printers, though you can also connect two printers to a single PC using USB cables.
Finding the printer in Windows
Windows 7 lists printers, as well as all other gizmos connected to your PC, in one handy place. It’s the Devices and Printers window, shown in Figure 12-2. To view the Devices and Printers window, choose Devices and Printers from the Start button menu.
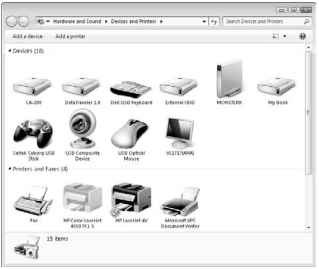
Figure 12-2:
Printers in the Devices and Printers window.
Icons shown in the Devices and Printers window represent various gizmos connected to your PC, including the monitor, keyboard, external storage, Webcams, and gamepads (refer to Figure 12-2).
Printers have a separate category in the Devices and Printers window. It lists the printers attached to or available to your PC on a computer network. Those are all the printers you can use in your programs to print things.
One printer in the list is known as the default printer. That doesn’t mean it’s broken. Instead, the default printer is identified as your computer’s primary printer. It’s the printer you want to use most of the time. That’s a handy thing to have, especially when your PC has multiple printers and you don’t want to spend extra time choosing one every time you print.
To print a document in Windows, you need to use the Print command in your application. For more information, see the section “Basic Printer Operation,” later in this chapter.
The default printer has a green checkmark by its icon.
You can select or change the default printer at any time. See the section “Setting the default printer,” later in this chapter.
Refer to Chapter 5 for more information on the Control Panel in Windows.
Previous versions of Windows showed printers in the Printers window. You get to that window by choosing Printers (or Printers and Faxes) from the Start button menu.
Manually adding a printer
When you can’t find your PC’s printer in the Devices and Printers window (refer to Figure 12-2), you have to manually add the printer, in one of two ways.
First, you follow the directions that came with your PC’s printer. A disc may be included, which you can use to help set things up. Keep in mind that you may need to install the software before you connect the printer.
Second, you click the Add a Printer button on the toolbar in the Devices and Printers window (refer to Figure 12-2). When you click the Add a Printer toolbar button, you run the Add Printer Wizard, which quizzes you about the type of printer you’re adding. Follow the wizard’s directions to locate and set up the printer.
Definitely print a test page to ensure that the printer is working.
When the printer is connected properly and everything is up to snuff, you see that gratifying test page print. You can then start using that printer. Its icon appears in the Devices and Printers window.
Let the network administrator worry about connecting network printers.
If you have an older printer using the old-style printer cable, the name of the printer port is LPT1.
Setting the default printer
To ensure that Windows uses your favorite printer whenever you do a quick-print, choose that favorite by making it the default. Follow these steps:
1. Choose Devices and Printers from the Start button menu. The Devices and Printers window appears.
2. Right-click the printer you plan to use most often.
3. Choose Set As Default Printer from the pop-up menu.
The tiny check mark on the printer’s icon confirms that you’ve specified the default printer.
4. Close the Devices and Printers window.
You can change the default printer at any time by repeating these steps.
Basic Printer Operation
Under Windows, printing is a snap. All applications support the same Print command: Choose File Print from the menu, or press Ctrl+P, to see the Print dialog box, depicted in Figure 12-3.
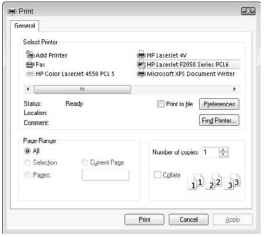
Figure 12-3:
A typical Print dialog box.
The Print dialog box shown in this figure is typical for most programs. To print the entire document, just click the Print button. Otherwise, you can us the settings in the dialog box to change what and how you print.
For example, you can choose another printer from the list of available printers to print on that printer rather than on the default.
Place a value other than 1 by Number of Copies to print several copies of your work.
Set the number of pages to print (Page Range) to print specific pages from the document. For example, type 2 to print only page 2, or type 3-9 to print pages 3 through 9.
Click the Print button after making your choices to print your document. Or, you can click Cancel and not print anything.
Other printer options, such as paper size and orientation, are set in something called the Page Setup dialog box. See the next section.
Use the Print command only once. When the printer seems slow, just wait a while before thinking that you goofed up and choosing the Print command again. Otherwise, you print one copy of the document for every time you use the Print command.
The common keyboard shortcut for the Print command is Ctrl+P.
Rather than waste paper, consider using the FileOPrint Preview command instead. It displays a sneak peek of what’s to be printed so that you can examine the printer’s output before wasting a sheet of paper.
In many newer applications, the printing commands are kept on a button menu because there’s no File menu. Look for the button in the upper left corner of the window. Click that button to display its menu.
Many applications sport a Print toolbar icon. If so, you can click that button to quickly print your document by using the default printer.
Setting the margins
The Print dialog box is concerned only with printing, not with formatting. Setting margins, paper size, and other aspects of what is to be printed is handled elsewhere in a program, usually in a Page Setup dialog box, as shown in Figure 12-4.
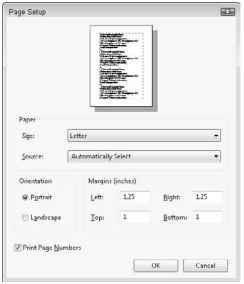
Figure 12-4:
The Page Setup dialog box.
To access the Page Setup dialog box, choose FileOPage Setup from the menu. When the program lacks a menu, click the button in the upper left corner of the window and choose the Page Setup command from that menu. The Page Setup command might also be found on the Print submenu.
Change the settings in the Page Setup dialog box, as you can see in the figure.
Choose a different paper size from the Size button, though keep in mind that your printer must accept the size you select.
Choose portrait (tall) or landscape (wide) orientation for the document. Set margins as necessary.
Click the OK button to save your changes. You need to print the document to see your work, though the preview window in the Page Setup dialog box shows you sort of what your document will look like when printed.
As with the Print dialog box, each application’s Page Setup dialog box is different, with commands not always in the same location.
The Page Setup dialog box is where you set things like margins and paper size — not in the Print dialog box.
Computer printers cannot print on an entire sheet of paper. There’s usually a small margin around the sheet or just on one end of the paper, where no printing can take place. That part of the page is held by the printer’s paper-feeding mechanism, and its size and location vary from printer to printer.
Printing in reverse order
Some printers cough out pages face up. What that means is that everything you print is in reverse order, with the last page printed on top. You can fix that problem by directing the program to print your stuff in reverse order, last page first. That’s a job for the Printer’s Properties dialog box.
To see the Printer’s Properties dialog box, press Ctrl+P to summon the standard Print dialog box (refer to Figure 12-3). In that dialog box, click the Properties, Preferences, or Options button.
After you’re in the Printer’s Properties dialog box (which may not be called Printer’s Properties), you can search for an option to print in reverse order or print from back to front. After choosing that option, click the OK button. Proceed to print your document, which then spews out of the printer properly.
Printing in reverse order isn’t a printer feature; it’s part of the program you use. Some programs have that feature, and others don’t.
Stopping a printer run amok
The most frustrating printer experience you can have is wanting the dumb thing to stop printing. It happens. Often.
The easiest way to stop printing is to look on the printer’s control panel for a Cancel button. Press that button, and all printing stops. Oh, a few more pages may pop out of the printer, but that’s it.
If you have an older printer (or just a cheap one) without a Cancel button, do this:
1. Open the Devices and Printers window.
In older versions of Windows, open the Printers window by choosing Printers from the Start button menu.
2. Open your printer’s icon.
The printer’s window is displayed, similar to the one shown in Figure 12-5.
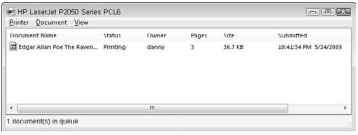
Figure 12-5:
A printer’s window.
3. Click to select the document you want to cancel.
4. Choose Document Cancel from the menu.
Or, if you want to cancel all pending documents, choose Printer Cancel All Documents.
5. Click the Yes button to confirm that you want to cancel the document.
6. Wait.
7. Close the printer’s window when you’re done.
It may take a few moments for the last bit of text to print. But, seriously, if the printer continues to spew pages at this point, just turn off the printer. Wait a few seconds, and then turn it back on again.
