In This Chapter
Understanding folders Visiting the root folder Finding your account folder Creating new folders Understanding libraries Using libraries
Working in the Open dialog box
The most important thing on your PC is your stuff, the information you create or obtain and keep on the computer’s storage system. That stuff dwells in containers called files, so understanding files is an important part of getting the most from your PC. The files themselves dwell inside their own containers, which are folders. If you want to build upon a happy relationship with your computer, it follows that after understanding files, you need to understand folders. Chapter 20 covers files; this chapter is all about folders.
About Folders
A folder is a container for files, and files are containers for data — the stuff you collect or create on the computer. Basically, folders exist to help keep your files organized. The objective: to maintain your sanity. If being sane is important to you, you need to know about folders.
More than just containing files, folders can be used to keep your stuff organized. Without folders, files would exist in one huge clump on the PC’s storage media. That would be a Bad Thing.
Think about it: The typical PC hard drive stores between 10,000 and 50,000 files. Imagine finding just one file! Heck, it would take you a week to scroll through the list. I won’t even go into the madness of duplicate filenames and how sluggish the computer would behave anytime you saved or opened anything on the storage system. Yech!
No, folders are the key to organizing files on your computer’s storage media. Windows uses folders to keep its stuff organized. You can do the same with your stuff.
A folder is a storage place for files.
Refer to Chapter 20 for information on files. It’s very important! Understanding files is the key to getting the most from your computer.
Folders keep like files grouped together — the way barbed wire keeps prisoners, vicious animals, and toddlers from wandering off.
Folders appear in Windows using the folder icon, as shown in the margin. When the folder is empty, it appears as shown in the margin. A folder with contents appears full, sometimes even previewing the contents in the folder icon itself.
To open the folder, double-click it with the mouse. Folders open into a window that displays the folder’s contents. See the section “Using Windows Explorer,” later in this chapter.
In addition to files, folders can hold other folders. Folders within folders! Just like those Russian matryoshka dolls. See the section “Subfolders and parent folders,” elsewhere in this chapter.
Folders may also be referred to as directories. This term is merely a throwback to the early days of computing and the Unix operating system, which was used by Julius Caesar.
Famous Folders
Folders are a necessary part of file organization, and they’re used all over your computer: When Windows was first set up on your PC, it created a slew of folders, some for it and some for you. Software you install on your computer also creates folders. This section explains all that folder stuff.
The root folder
Storage media exist to store files, and files must be stored in folders. Therefore, all the computer’s storage media are organized into folders. It all starts with one, main folder, the root folder. In the same way a tree trunk has many limbs branching out from it, all other folders on your hard drive branch out from that main, root folder.
The root folder doesn’t have a specific icon. Instead, it uses the icon for the media that the root folder is on. So, the root folder on drive C has the same icon as drive C.
You can see the root folder icons in the Computer window: Open the Computer window by choosing the Computer command from the Start button menu. All the icons you see in that window represent the root folder for the various storage media. Opening an icon in the Computer window displays the contents of that storage media’s root folder.
The root folder is simply the main, or only, folder on any storage media.
The root folder resembles the lobby of a grand building: It’s merely a place you pass through to get to somewhere else. Where else? Why, to other folders, of course!
Never add, delete, or change any files or folders in the root folder. It belongs to the operating system, not to you.
While you’re at it, never mess with any files or folders found in the following folders: Windows, WINNT, or Program Files. My general rule is never to mess with any file or folder on your computer that you didn’t create.
The root folder may also be called the root directory.
Subfolders and parent folders
Folders can contain both files and other folders. When one folder exists inside another, it’s a subfolder. This term has nothing to do with underwater naval vessels or hoagie-like sandwiches.
Say you have a folder named Vacation and that folder exists inside a folder named 2010. The Vacation folder is said to be a subfolder of the 2010 folder. Conversely, the 2010 folder is said to be the parent folder of the Vacation folder.
A subfolder can also be called a child folder, but that’s just a tad cheeky, now, isn’t it?
You can create your own folders. See the section “Creating a new folder,” later in this chapter, for the details.
No limit exists on the number of subfolders you can have. A folder can be inside a folder inside a folder, and so on. If you name the folders well, it all makes sense.
As the topmost folder on any storage media, the root folder has no parent folder, though in the Windows hierarchy, the “parent folder” of any storage media is the Computer window, and the Computer window’s parent folder is the desktop.
A place for your stuff
Humans don’t use the root folder; the root folder is for the computer only. The proper place for your stuff is the User Profile folder. Yes, that’s a dreadful name.
The User Profile folder is the main folder for storing your stuff on the computer. It’s named after your account on the computer. So, if your account is named Danny, the User Profile folder is named Danny.
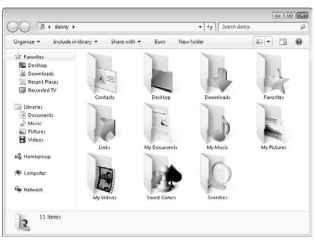
To see the contents of your User Profile folder, choose your account name from the left side of the Start button menu. The contents of your User Account folder are displayed in a window, similar to the one shown in Figure 21-1.

Figure 21-1:
The User Account folder window.
Inside the User Account Folder window, you find about a dozen folders pre-created for you, each of which helps you organize the stuff you collect or create on your computer. Table 21-1 lists the folders commonly found.
Additional subfolders may be found in your User Profile folder — folders you created yourself or folders added by programs you installed. That’s all okay; the User Profile folder is your own, and it’s where you’re supposed to create folders to help organize your stuff.
You can also view the contents of your User Profile folder by opening your account’s icon on the desktop or by choosing your account icon in a folder window or in any of a zillion other, confusing ways that I don’t mention here.
Don’t mess with any folders outside your User Profile folder.
All applications automatically choose the User Account folder or one of its subfolders when you use the Save As dialog box to save a file.
In Windows Vista, the My Documents, My Pictures, My Music, and My Video folders are named without the My prefix.
Behind the scenes, the My Documents, My Pictures, My Music, and My Video folders in Windows 7 are named Documents, Pictures, Music, and Video. You just see the My prefix thanks to special software trickery. Don’t be surprised if you occasionally see the folders minus their My prefix; they’re the same folders. Yeah, it’s weird, but it’s Windows.
Windows 7 adds a level of file organization to the folder concept by creating something called a library. Refer to the section “Working with libraries,” later in this chapter.
| Table 21-1 | Subfolders Found in the User Profile Folder |
| Folder Name | Contains |
| Contacts | A database of people’s names used by e-mail, list-making, or |
| personal-information programs | |
| Desktop | A duplicate of files and shortcuts placed on the desktop |
| Downloads | Files downloaded from the Internet |
| Favorites | Bookmarks set and used by Internet Explorer |
| Links | Shortcuts to popular files and folders, displayed in the Windows |
| Explorer window | |
| My Documents | Text documents and similar files |
| My Music | Audio and music files, used by Windows Media Player and |
| other musical programs | |
| My Pictures | Digital images, photographs, drawings, and artwork |
| My Videos | Films, movies, and animations |
| Saved Games | Information retained by games so that you can remember your |
| spot or high score from a previously played game | |
| Searches | A set of predefined or saved file searches (see Chapter 22) |
Manage Your Folders
Folders are something you’re supposed to use. Windows makes suggestions for you, giving the examples of the My Documents, My Video, My Music, and other folders. You can choose to use those folders, create your own folders, make folders within folders — all for the purpose of organizing the stuff on your computer. It’s up to you to make it happen, and this section explains how.
Using Windows Explorer
One duty of an operating system is to help you organize the stuff you create. In Windows, that duty is assigned to the program Windows Explorer. It’s the program that displays folder windows on the desktop and allows you to manage your folders and files.
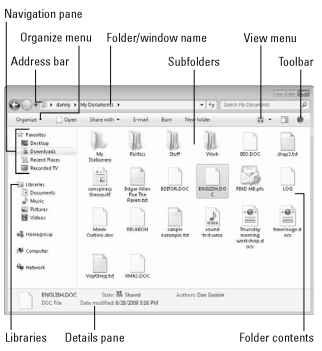
A sample Windows Explorer folder window is shown in Figure 21-2. That window appears whenever you open a folder or storage media icon.

Figure 21-2:
Windows Explorer.
In Figure 21-2, Windows Explorer displays the files and folders found in the My Documents folder. You can see My Documents as the last item (on the right) on the Address bar. Also visible are the Navigation pane and the Details pane, as illustrated in the figure.
Windows Explorer isn’t the same program as Internet Explorer.
My favorite way to start Windows Explorer is to press Win+E on the keyboard.
You control what’s visible in the Windows Explorer window by using the Organize toolbar button’s menu. From the Layout submenu, you can choose a pane to view or summon the traditional menu bar.
The size and appearance of the icons in the Windows Explorer window depend on settings you make from the View toolbar button menu.
Toolbar buttons come and go in Windows Explorer, depending on what you’re doing and which type of icon is selected.
Working with folders
You can manipulate folders using the Windows Explorer window. The things you can do are described in the wee li’l sections here.
Opening a folder
To open a folder, double-click its icon. The contents of that folder are then displayed in the window. You also see that folder appear in the Address bar list, at the top of the Windows Explorer window.
Returning to the parent folder
To move back to a parent folder after visiting a subfolder, you can click the Back button on the Address bar (on the far left, just like when you explore the Web). Or, you can click the parent folder’s name on the Address bar. For example, in Figure 21-2, you can click the danny folder to visit the parent of the My Documents folder.
You can add commonly visited folders to the Favorites list in the Navigation pane. To do so, simply drag the folders icon over to the Favorites list. That way, you can revisit the folder quickly by choosing it from that list.
Creating a new folder
To make a new folder, click the New Folder button on the toolbar. The New Folder icon appears in the window, ready to be given a new name: Type the new folder’s name immediately. Make it short and descriptive. Pressing the Enter key locks in the new folder’s name.
You can use the folder immediately after creating it.
You can also create a new folder when saving a file; a New Folder button appears in the Save As dialog box. See Chapter 20.
Folders are created in the current folder window. The new folder becomes a subfolder of the current folder, so be sure that you’re in the right folder window when you create a new folder.
Folder names are the same as filenames. See Chapter 20.
Folders can also be renamed, just like filenames. See Chapter 22.
Sometimes, the New Folder button gets pushed off the Windows Explorer toolbar. It’s still there; you just need to click the “show more” chevron at the end of the toolbar to display the New Folder button.
In Windows Vista, the New Folder command is found on the Organize button’s menu.
Working with libraries
A library, which is a special feature in Windows 7, contains a selection of files from multiple folders. It’s a handy thing to have, especially when working with large projects or collections of files that may exist in several folders. You can do many things with libraries.
Libraries are unique to Windows 7.
Libraries not only organize files for you, but they also can be shared by other people who also use your computer.
You can share libraries with users on your computer network by using a HomeGroup. See Chapter 16 for more information on Home Groups.
I’ll admit that the concept of the library is something that may take you a while to adjust to. My advice is to understand folders first. After you appreciate how folders work, move on to working with libraries.
Viewing libraries
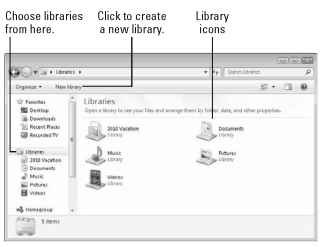
To display the list of libraries available on your computer, or shared between computers on the network HomeGroup, choose the Libraries heading from the Navigation panel in any Windows Explorer window. Libraries appear in their own window, as shown in Figure 21-3.
To view the contents of a library, double-click to open its icon. Libraries contain files and folders. Yet the files and folders you see are culled from various folders located throughout your PC’s storage system, as well as from, possibly, the computer network.
You can work with files in a library the same as you can work with files in a folder.
To see which folders are included in a library, click the link located by the word Includes beneath the library name in the Windows Explorer window.
If you create or save any files (or folders) in a library, they’re created in your own account’s area on your computer.

Figure 21-3:
The Libraries window.
Building a new library
To create a new library, obey these steps:
1. Click the New Library button in the Library window (refer to Figure 21-3).
2. Immediately name the New Library icon, just as you would when creating a new folder.
Be descriptive and brief.
3. Open the new library you just created.
The library is empty.
4. Click the button named Include Folder.
Use the Include Folder dialog box to browse through your folders to find one you want to add.
5. Select the folder you want to add.
6. Click the Include Folder button.
Libraries need to have more than one folder to be useful. To add folders, click the link after the word Includes in the library’s window. (The link is found beneath the library name.) Click the Add button in the Locations dialog box to choose another folder to add to the library.
The Open Dialog Box
As you use your computer, you often find yourself digging through folders with the Open or Browse dialog box, off to fetch a file somewhere. For example, you want to open that document you worked on yesterday, the one that contains your plans for winning the Junior Miss Avocado pageant.
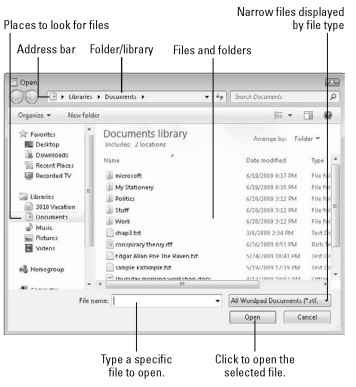
The Open dialog box, depicted in Figure 21-4, is summoned by using the Open command (or Ctrl+O). Similarly, its sister the Browse dialog box appears whenever you issue a Browse command. Either way, the dialog box lets you hunt down a specific file on disk.

Figure 21-4:
The typical Open dialog box.
Yes, the Open dialog box looks and works a lot like a Windows Explorer window. It has the same panes, toolbar, and file list. The bonus information specific to opening files, however, is found near the bottom of the dialog box (refer to Figure 21-4).
The File Name text box allows you to manually enter a filename — which is a typically silly and nerdy thing to do, so I don’t recommend it.
The File Type button is used to help narrow the list of files in the Open dialog box. By showing only files of a certain type, you can more easily scope out the file you want.
Finally, you click the Open button to open the selected file. Note that the Open button often has a menu button next to it. Clicking that button displays options for opening a file.
Not every program can open every type of file. Programs work best on the files they create themselves.
The Open dialog box’s look varies subtly from program to program, but it works the same way in all of them.
When you’re really stuck finding a file, use the Windows Search command. See Chapter 22.
