When you draw geometry, text, or images on the screen, OpenGL performs several calculations to rotate, translate, scale, determine the lighting, project the object(s) into perspective, figure out which pixels in the window are affected, and determine the colors in which those pixels should be drawn.After OpenGL determines that an individual fragment should be generated and what its color should be, several processing stages remain that control how and whether the fragment is drawn as a pixel into the framebuffer. For example, if it’s outside a rectangular region or if it’s farther from the viewpoint than the pixel that’s already in the framebuffer, it isn’t drawn. In another stage, the fragment’s color is blended with the color of the pixel already in the framebuffer.
This section describes both the complete set of tests that a fragment must pass before it goes into the framebuffer and the possible final operations that can be performed on the fragment as it’s written. The tests and operations occur in the following order; if a fragment is eliminated in an early test, none of the later tests or operations takes place:
1. Scissor test
2. Alpha test
3. Stencil test
4. Depth test
5. Blending
6. Dithering
7. Logical operations
All of these tests and operations are described in detail in the following subsections.
Scissor Test
You can define a rectangular portion of your window and restrict drawing to take place within it by using the glScissor() command. If a fragment lies inside the rectangle, it passes the scissor test.
void glScissor(GLint x, GLint y, GLsizei width, GLsizei height);
Sets the location and size of the scissor rectangle (also known as the scissor box). The parameters define the lower left corner (x, y) and the width and height of the rectangle. Pixels that lie inside the rectangle pass the scissor test. Scissoring is enabled and disabled by passing GL_SCISSOR_TEST to glEnable() and glDisable(). By default, the rectangle matches the size of he window and scissoring is disabled.
The scissor test is just a version of a stencil test using a rectangular region of the screen. It’s fairly easy to create a blindingly fast hardware implementation of scissoring, while a given system might be much slower at stenciling—perhaps because the stenciling is performed in software.
Advanced
An advanced use of scissoring is performing nonlinear projection. First divide the window into a regular grid of subregions, specifying viewport and scissor parameters that limit rendering to one region at a time. Then project the entire scene to each region using a different projection matrix.
To determine whether scissoring is enabled and to obtain the values that define the scissor rectangle, you can use GL_SCISSOR_TEST with glIsEnabled() and GL_SCISSOR_BOX with glGetIntegerv().
Alpha Test
In RGBA mode, the alpha test allows you to accept or reject a fragment based on its alpha value. The alpha test is enabled and disabled by passing GL_ALPHA_TEST to glEnable() and glDisable(). To determine whether the alpha test is enabled, use GL_ALPHA_TEST with glIsEnabled().
If enabled, the test compares the incoming alpha value with a reference value. The fragment is accepted or rejected depending on the result of the comparison. Both the reference value and the comparison function are set with glAlphaFuncQ. By default, the reference value is 0, the comparison function is GL_ALWAYS, and the alpha test is disabled. To obtain the alpha comparison function or reference value, use GL_ALPHA_TEST_FUNC or GL_ALPHA_TEST_REF with glGetlntegervQ.
void glAlphaFunc(GLenum fimc, GLclampf ref);
Sets the reference value and comparison function for the alpha test. The reference value ref is clamped to be between 0 and 1. The possible values for func and their meanings are listed in Table 10-2.
|
Parameter |
Meaning |
|
GL_NEVER |
never accept the fragment |
|
GL_ ALWAYS |
always accept the fragment |
|
GL_LESS |
|
|
GL.LEQUAL |
|
|
GL_EQUAL |
|
|
GL_GEQUAL |
|
|
GL_GREATER |
|
|
GL_NOTEQUAL |
Table 10-2 glAlphaFunc() Parameter Values
One application for the alpha test is implementation of a transparency algorithm. Render your entire scene twice, the first time accepting only fragments with alpha values of 1, and the second time accepting fragments with alpha values that aren’t equal to 1. Turn the depth buffer on during both passes, but disable depth buffer writing during the second pass.
Another use might be to make decals with texture maps whereby you can see through certain parts of the decals. Set the alphas in the decals to 0.0 where you want to see through, set them to 1.0 otherwise, set the reference value to 0.5 (or anything between 0.0 and 1.0), and set the comparison function to GL_GREATER. The decal has see-through parts, and the values in the depth buffer aren’t affected.
Stencil Test
The stencil test takes place only if there is a stencil buffer. (If there is no stencil buffer, the stencil test always passes.) Stenciling applies a test that compares a reference value with the value stored at a pixel in the stencil buffer. Depending on the result of the test, the value in the stencil buffer is modified. You can choose the particular comparison function used, the reference value, and the modification performed with the glStencilFunc() and glStencilOpQ commands.
void glStencilFunc(GLenum fiinc, GLint ref, GLuint mask);
void glStencilFuncSeparate(GI enum face,GLenum ftinc, GLint ref, GLuint mask);
Sets the comparison function (fiinc), the reference value {ref), and a mask (mask) for use with the stencil test. The reference value is compared with the value in the stencil buffer using the comparison function, but the comparison applies only to those bits for which the corresponding bits of the mask are 1. The function can be GLJN’EVER, GL_ALWAYS, GLJLESS, GL_LEQUAL, GL_EQUAL, GL^G EQUAL, GL_GREATER, or GL_NOTEQUAL. If it’s GLJLESS, for example, then the fragment passes if ref is less than the value in the stencil buffer. If the stencil buffer contains s bitplanes, the low-order s bits of mask are bitwise ANDed with the value in the stencil buffer and with the reference value before the comparison is performed. The masked values are all interpreted as non-negative values. The stencil test is enabled and disabled by passing GL_STENCIL_TEST to glEnable() and glDisable(). By default, fiinc is GL_ALWAYS, ref is 0, mask is all Is, and stenciling is disabled.
OpenGL 2.0 includes the glStencilFuncSeparate() function that allows separate stencil function parameters to be specified for front- and back-facing polygons.
void glStencilOp(GLenum fail, GLenum zfail, GLenum zpass); void glStencilOpSeparateiGLenum face, GLenum fail, GLenum zfail, GLenum zpass);
Specifies how the data in the stencil buffer is modified when a fragment passes or fails the stencil test. The three functions fail, zfail, and zpass can be GL_KEEP, GL_ZERO, GL_REFLACE, GLJNCR, GLJNCR_WRAP, GL_ DECK, GL_DECR_WRAP, or GLJNVERT. They correspond to keeping the current value, replacing it with zero, replacing it with the reference value,incrementing it with saturation, incrementing it without saturation, decrementing it with saturation, decrementing it without saturation, and bitwise-inverting it. The result of the increment and decrement functions is clamped to lie between zero and the maximum unsigned integer value (2s – 1 if the stencil buffer holds s bits).
The fail function is applied if the fragment fails the stencil test; if it passes, then zfail is applied if the depth test fails and zpass is applied if the depth test passes, or if no depth test is performed.
OpenGL 2.0 includes the glStencilOpSeparate() function that allows separate stencil tests to be specified for front- and back-facing polygons.
"With saturation” means that the stencil value will clamp to extreme values. If you try to decrement zero with saturation, the stencil value remains zero. "Without saturation” means that going outside the indicated range wraps around. If you try to decrement zero without saturation, the stencil value becomes the maximum unsigned integer value (quite large!).
Stencil Queries
You can obtain the values for all six stencil-related parameters by using the query function glGetIntegerv() and one of the values shown in Table 10-3. You can also determine whether the stencil test is enabled by passing GL_ STENCIL_TEST to glIsEnabled().
|
Query Value |
Meaning |
|
GL_STENCIL_FUNC |
stencil function |
|
GL_STENCIL_REF |
stencil reference value |
|
GL_STENCIL_VALUE_MASK |
stencil mask |
|
GL_STENCIL_FAIL |
stencil fail action |
|
GL_STENCIL_PASS_DEPTH_FAIL |
stencil pass and depth buffer fail action |
|
GL_STENCIL_PASS_DEPTH_PASS |
stencil pass and depth buffer pass action |
Table 10-3 Query Values for the Stencil Test
Stencil Examples
Probably the most typical use of the stencil test is to mask out an irregularly shaped region of the screen to prevent drawing from occurring within it (as in the windshield example in "Buffers and Their Uses"). To do this, fill the stencil mask with 0′s, and then draw the desired shape in the stencil buffer with l’s. You can’t draw geometry directly into the stencil buffer, but you can achieve the same result by drawing into the color buffer and choosing a suitable value for the zpass function (such as GL_REPLACE). (You can use glDrawPixels() to draw pixel data directly into the stencil buffer.) Whenever drawing occurs, a value is also written into the stencil buffer (in this case, the reference value). To prevent the stencil-buffer drawing from affecting the contents of the color buffer, set the color mask to zero (or GL_FALSE). You might also want to disable writing into the depth buffer.
After you’ve defined the stencil area, set the reference value to 1, and set the comparison function such that the fragment passes if the reference value is equal to the stencil-plane value. During drawing, don’t modify the contents of the stencil planes.
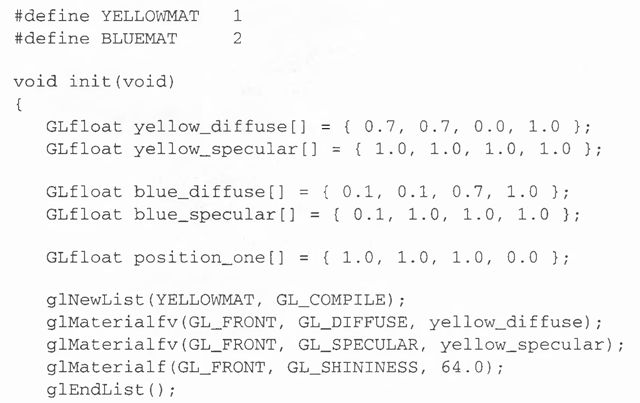
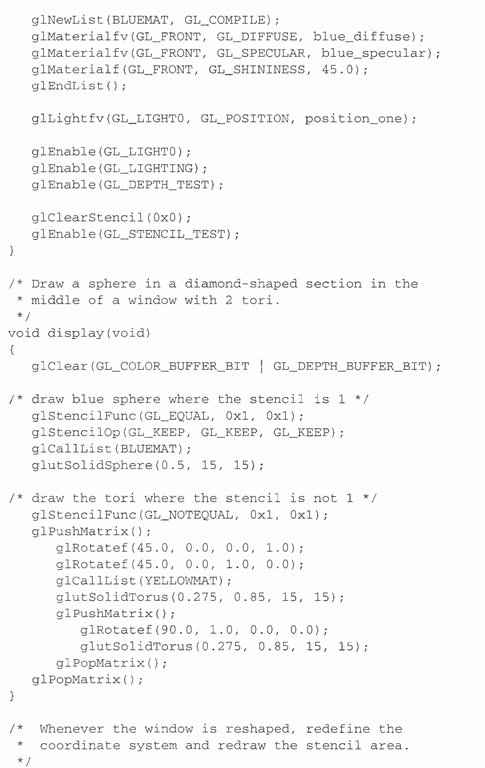
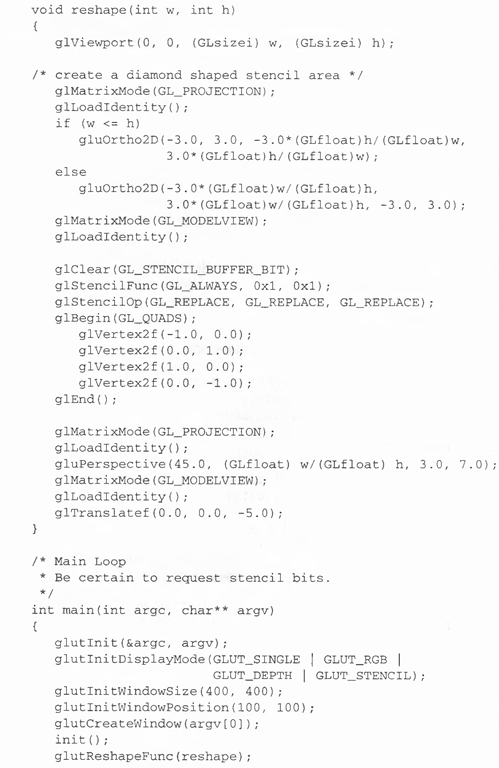
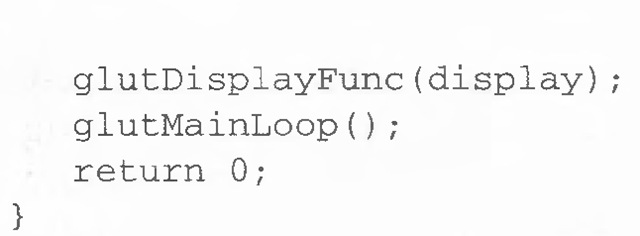
Example 10-1 demonstrates how to use the stencil test in this way. Two toruses are drawn, with a diamond-shaped cutout in the center of the scene. Within the diamond-shaped stencil mask, a sphere is drawn. In this example, drawing into the stencil buffer takes place only when the window is redrawn, so the color buffer is cleared after the stencil mask has been created.
Example 10-1 Using the Stencil Test: stencil.c
The following examples illustrate other uses of the stencil test.
• Capping—Suppose you’re drawing a closed convex object (or several of them, as long as they don’t intersect or enclose each other) made up of several polygons, and you have a clipping plane that may or may not slice off a piece of it. Suppose that if the plane does intersect the object, you want to cap the object with some constant-colored surface, rather than see the inside of it. To do this, clear the stencil buffer to zeros, and begin drawing with stenciling enabled and the stencil comparison function set always to accept fragments. Invert the value in the stencil planes each time a fragment is accepted. After all the objects are drawn, regions of the screen where no capping is required have zeros in the stencil planes, and regions requiring capping are nonzero. Reset the stencil function so that it draws only where the stencil value is nonzero, and draw a large polygon of the capping color across the entire screen.
• Overlapping translucent polygons—Suppose you have a translucent surface that’s made up of polygons that overlap slightly. If you simply use alpha blending, portions of the underlying obiects are covered by more than one transparent surface, which doesn’t look right. Use the stencil planes to make sure that each fragment is covered by at most one portion of the transparent surface. Do this by clearing the stencil planes to zeros, drawing only when the stencil plane is zero, and incrementing the value in the stencil plane when you draw.
• Stippling—Suppose you want to draw an image with a stipple pattern.You can do this by writing the stipple pattern into the stencil buffer and then drawing conditionally on the contents of the stencil buffer. After the original stipple pattern is drawn, the stencil buffer isn’t altered while drawing the image, so the object is stippled by the pattern in the stencil planes.


