2.36.
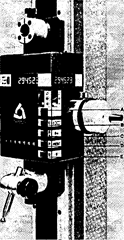
Universal Measuring Instrument enables even an
unskilled operator to quickly measure height, diameters,
centre distances, squareness, grooves, concentricity,
runout, parallelism, straightness, flatness, axial true-
ness, as well as the setting and checking of machine tools,ness, as well as the setting and checking of machine tools,
instruments, toolings and fixtures and an almost un-
limited range of additional applications with ease and
confidence to a high degree of accuracy.
Features.
Apart from direct digital reading and
floating zero, it has automatic computational capabilities
which saves time dramatically and eleminates pos-
sibilities of operator’s error due to separate calculations.
Outstanding features
— Ease of reading digital display.
— Twin digital display in the front and side for
convenience of operator.
— True instantaneous inch/metric conversion at
any point without re-zeroing.
— Stores extra reference datum in memory for
complex incremental measurements.
— Built-in microprocessor establishes centres of
internal and external diameters, grooves, etc.
automatically.
— Computes diameters of bores and shafts by
automatically sensing highest and lowest
points.
— On the same basis directly indicates axial
trueness and face runout.
— High accuracy.
— Squareness testing facilitated.

Fig. 2.109. Universal Measuring Instrument.
— Saves inspection time.
— Built-in microswitches in handwheel automatically calculate and compensate for the
probe diameterfconstant during the measuring process.
— Measuring system made of patented steel scale which has the same co-efficient of
thermal expansion as steel components to be measured.
— Designed such that-the servicing and repairs can be done at the customer’s place, if
required. f”‘
— All the accessories are designed to balance with the counter weight—No adjustment for
the weight of any accessory is required when changed.
— Measuring speed upto 1 meter/second is permissible for error free reading.
— Electronic interface available to feed out-put informations to standard IEEE and IEC
interface devices such as calculators, computers, recorders, plotters and machines.
— Fully tropicalised to withstand temperature upto 50°C and 95% relative humidity.
Operations Simplified Only one push button to control all Measur-ing Programmes.
Only one single push button key is
sufficient for the selection of the correct measuring
programme. All that operator has to see is whether the
surface being measured is plane or cylindrical. Five push
button keys are conveniently located near readout and
their functions are as follows :
Push Button Controls (Refer Fig. 2.110)
A — Push button for selection of measuring
programme (plane or cylindrical surfaces). Correspond-
ing signal light indicates whether it is diameter,
centreline or height measurements, in case of cylindrical
surfaces maximum and minimum values are stored.
Centreline distance appears when measuring pressure is
removed.
B — Push button for input of probe constant while
measuring pressure is applied.
C — Push button for changing one reference
datum (O) to the other (o) or vice versa. Both the daturas
are stored in memory at a time (e.g. for incremental
measurements).
D — Push button for adding or substracting
preselected value. Useful for changeover of probes and
probe holders.
E — Push button for zero setting of digital display
at any position of the measuring head.

Fig. 2.110
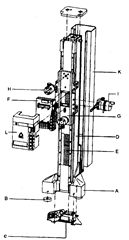
Carefully Designed and Constructed for Easy
Servicing (Refer Fig. 2.111)
A—Robust cast iron base with hammer-tone finish
lacquer coating. Houses valve with air distribution to the
3 supporting pads. Fitted with snap action connector for
compressed air and press button for air cushion.
B — 3 supporting pads with tungsten carbide coat-
ing except the top surface which can be lapped to restore
squareness if necessary. Resists rust and does not wear-
out. Guarantees well balanced air cushion movement.
C — Completely independent compact power
supply unit fitted with four screws to the base and can be
easily replaced. Provides continuous uninterrupted power
to the electronic unit. Takes care of voltage fluctuations
from—18% to + 20%. Sockets for mains cable, fuse and
socket for printer and interface.
D — Measuring column with hardened stainless
steel guide rail and precision lapped guide surfaces.
E — Unbreakable steel scale has same co-efficient
of expansion as most of the steel components being checked
hence temperature variations does not affect measuring
accuracy. It also permits faster measuring speed (1
meter/second). Non-contacting system unaffected by fric-
tion, wear or back-lash. Insensitive to electrical interferen-
ces and oil film.
F — Plug in type electronic display unit is complete-
ly independent and easily interchangeable. Read out is
provided in the front as well as in the side for easy viewing.
Fully tropicalised to withstand temperature upto 50°C and
relative humidity 95%.
G — Measuring slide moves freely on precision ball bearings and its movement is controlled
by steel tape and counter weight. (No rack and pinion movement or backlash).
H — Two probe holders to fix various types of probes with heavy duty locating shaft (dia 20
mm) for extra rigidity.
I — Ultra-smooth multi-functional handwheel controls rapid movement, provides unlimited
fine adjustment movement, embodies preloaded ring for constant measuring pressure, locks
measuring slide in desired position and also triggers built-in micro-switches to compensate auto-
matically for probe constant through electronic unit.
K — Aluminium cover with hammertone finish lacquer coating.
L — Aluminium protection cover for electronic display unit.
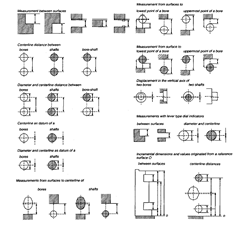
Fig. 2.112 shows some typical applications of universal measuring instrument.

Fig. 2.111

Fig. 2.112. Applications of Universal Measuring Instrument.
