3.8.
The accuracy in a vast industrial complex
can be maintained only if its standards are trace-
able to a single source, usually the National
Standard of the country, which are further
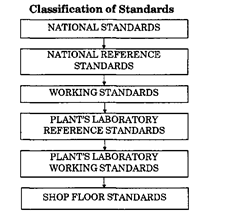
linked up with International Standards. Fig.
3.11 explains how the accuracy of measurement
is transferred from National Standards to the
working shop floor standards.
Since frequent use may impair the ac-
curacy of any standard, direct comparisons with
National Standards are less frequently per-
formed. In such a case, a slightly lower order of
standards, known as National Reference stand-
ards are used. Working standards are ordinarily
used in calibration work. These are compared as
frequently as necessary with National Reference
Standards.

Fig. 3.11. Gauge control structure.
Clearly, there is degradation of accuracy in passing from the defining standards to the
standards in use. The accuracy of a particular standard depends on a combination of the number
of times it has been compared with a standard in a higher echelon, the recentness of such
comparisons, the care with which it was done, and the stability of the particular standard itself.
