Having this nice global map centered on the United States is kind of interesting, but not very useful if you are planning to go to London. Let’s look at what you would have to do to make the map more useful as well as center the map on Heathrow and London.
In topic 16, you created a view controller class (Map Controller) with the right outlets and a nib file that creates a MKMap View View object and sets all the outlets for you when the user selects Map from the main view. You can also have an initialization method set up.
Adding landscape mode and the current location
To start with, it would be very useful to be able to see any map in landscape mode.
Go back to Xcode and add the following method to MapController.m:

That’s all you have to do to view the map in landscape mode — and MapKit will take care of it for you! (This is starting to be real fun.)
What about showing your location on the map. That’s just as easy!
While you added the MapKit framework in topic 16, you still have to tell Map Contoller to use it. Add the following to Map Controller.h:
![]()
In the MapController.m file, uncomment out view Did Load and add the code in bold.

shows User Location is a UKMap View property that tells the map view whether to show the user location. If YES, you get that same blue pulsing dot displayed in the built-in Map application.
If you were to compile and run the application as it stands, you’d get what you see in Figure 17-2 — a map of the USA in landscape mode with a blue dot that represents the phone’s current location (there may be a lag until the iPhone is able to determine that location, but you should see it eventually). Of course, to see it in landscape mode, you’ll have to turn the iPhone, or select Hardware Rotate Right (or Rotate Left) from the simulator menu, or press 96+right (or left) arrow.
If you don’t see the current location, you might want to check and make sure you have connected the mapView outlet to the Map View in the nib file. This was done in topic 16, section “Set up the nib file.”

That is the current location if you are running on the iPhone. If you’re running on the simulator, that location is Apple. Touching on the blue dot also displays what is called an annotation, and you’ll find out how to customize the text to display whatever you cleverly come up with, including as you’ll see, the address of the current location in section “Annotations.”

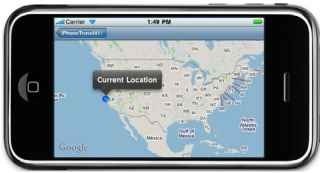
Figure 17-2:
Displaying a map in landscape mode with a user location.
It’s about the region
Cute, but still not that useful for our purposes.
As I said at the beginning of this topic, ideally when you land at Heathrow (or wherever), you should see a map that centers on Heathrow as opposed to the United States. To get there from here, however, is also pretty easy.
Let’s first look at how you center the map.
Add the following code to Map Controller.m:
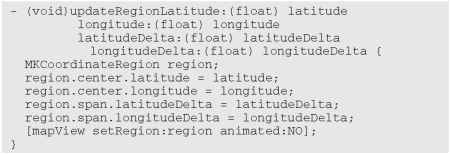
Setting the region is how you center the map and set the zoom level. All of this accomplished by the statement
![]()
A region is a map view property that specifies four things (as illustrated in Figure 17-3).
1. region.center.latitude specifies the latitude of the center of the map.
2. region.center.latitude specifies the longitude of the center of the map.
For example, if I were to set those values as
![]()
the center of the map would be at Heathrow airport.
3. region.span.atitude Delta specifies the north-to-south distance (in degrees) to display on the map. One degree of latitude is always approximately 111 kilometers (69 miles). A region.span.latitud-eDelta of 0.0036 would specify a north-to-south distance on the map of about a quarter of a mile. Latitudes north of the equator have positive values, and latitudes south of the equator have negative values.
4. region.span.longitudeDelta specifies the east-to-west distance (in degrees) to display on the map. Unfortunately, the number of miles in one degree of longitude varies based on the latitude. For example, one degree of longitude is approximately 69 miles at the equator but shrinks to 0 miles at the poles. Longitudes east of the zero meridian (by international convention, the zero or Prime Meridian passes through the Royal Observatory, Greenwich, in east London) have positive values, and longitudes east of the zero meridian have negative values.
While the span values provide an implicit zoom value for the map, the actual region you see displayed may not equal the span you specify because the map will go to the zoom level that best fits the region that is set. This also means that even if you just change the center coordinate in the map, the zoom level may change because distances represented by a span change at different latitudes and longitudes. To account for that, those smart developers at Apple included a property you can set that will change the center coordinate without changing the zoom level.
![]()
When you change this property, the map is centered on the new coordinate and updates span values to maintain the current zoom level.
That CLLocationCoordinate2D type is something you’ll be using a lot, so I’d like to explain that before I take you any further.
CLLocationCoordinate2D type is a structure that contains a geographical coordinate using the WGS 84 reference frame (the reference coordinate system used by the Global Positioning System).

latitude is the latitude in degrees. This is the value you set in the code you just entered (region.center.latitude = latitude;).
longitude is the longitude in degrees. This is the value you set in the code you just entered (region.center.longitude = longitude;).
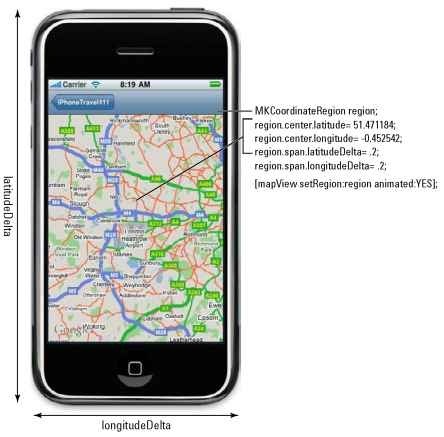
Figure 17-3:
How regions work.
To center the map display on Heathrow, you send the updateRegionLatitude :longitude: latitudeDelta:longitudeDelta message (the code you just entered) when the view is loaded, that is, in the viewDidLoad: method. You already added some code there to display the current location, so add the additional code in bold.
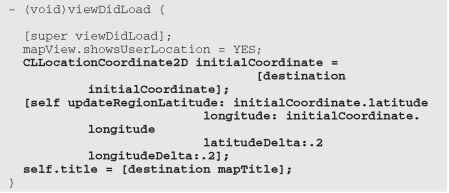
Let’s look at what this does:
1. The initial Coordinate message is sent to the Destination object (remember your model from topic 16) to get the initial coordinates you want displayed. You’re adding some additional functionality to the model, whose responsibly now includes specifying that location. The user may have requested that location when he or she set up the trip (I don’t cover that topic in this topic, leaving it as an exercise for the reader), or it may have been a default location that you decided on when you wrote the code (an airport specified in the destination, for example).
2. Sets the map title by sending the mapTitle message to the Destination object — adding another model responsibility.
For all of this to work of course, you’ll have to add the following code to Destination.m. This will return the latitude and longitude for Heathrow.


Tracking location changes
You can also track changes in user location using key-value observing. This will enable you to move the map as the user changes location. I won’t go into detail on key-value observing other than to show you the code. It’s very similar to when you registered for the UI Keyboard Will Show Notification in the Return MeTo application in topic 8.
First, you add the code in bold to view Did Load: in Map Controller.m to add an observer that’s to be called when a certain value is changed — in this case user Location.
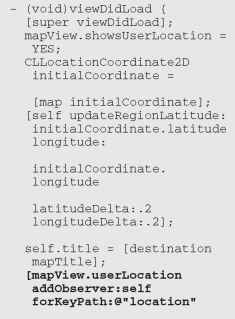

In this method, the keyPath field returns mapView.userLocation.location, which you can use to get the current location. In this example, I am simply displaying a message on the Debugger Console, but as I said, once the user moves a certain amount, you may want to re-center the map.
Technical Stuff: This is not exactly the same loca tion you’d get from CLLocation Manager — it’s optimized for the map, while CL Location Manager provides the raw user location.
Of course, you’ll have to run this on the iPhone for the location to change.
You’ll have to include the MapKit in Destination, so add the following to Destination.h:
![]()
You’ll also have to add the following to Destination.h (after the braces):
![]()
If you compile and build your project, you should see what’s shown in Figure 17-4.
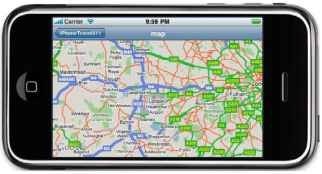
Figure 17-4:
Regions determine what you see on the map.
At this point, when the user touches Map in the main view, iPhoneTravel411 displays a map centered on Heathrow, and if you pan (a tedious task you’ll fix soon) over to Cupertino (or wherever you are), you’ll see the blue dot.
If you tap the dot, as shown in Figure 17-2, you’ll see a callout known as an annotation displaying “Current Location.” You can also add annotations on your own, which is what you’ll do in the next section.
