Animating in corel Painter
Now it is time to set up a clone source from the reference image and a new movie file to animate in:
1. Open the reference image by clicking File > Open.
2. Because this is a sequence of images, turn on Open Numbered Files and follow the directions:
a. Select the first numbered file, click open.
b. Select the last numbered file, click open.
c. Give a name to the movie file that Painter will save: Robby_Roy_Together.FMP.
d. Select the proper level of onion skinning and bit depth (we’ll use the defaults), and click OK.
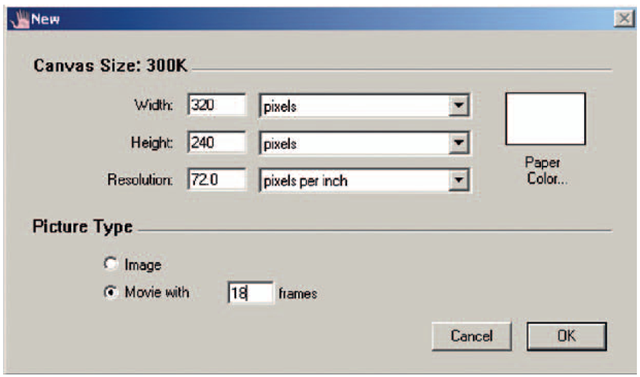
3. Now, create a new file. My file size is very small: 320 x 240. Yours will be the final size that you are working at. Watch out. You could run out of memory here. Set the number of images to be 18.
FIGURE 3.36 Settings to create new movie document in Corel Painter.
4. Make sure that you are on frame 1 for both the reference movie and your new movie.
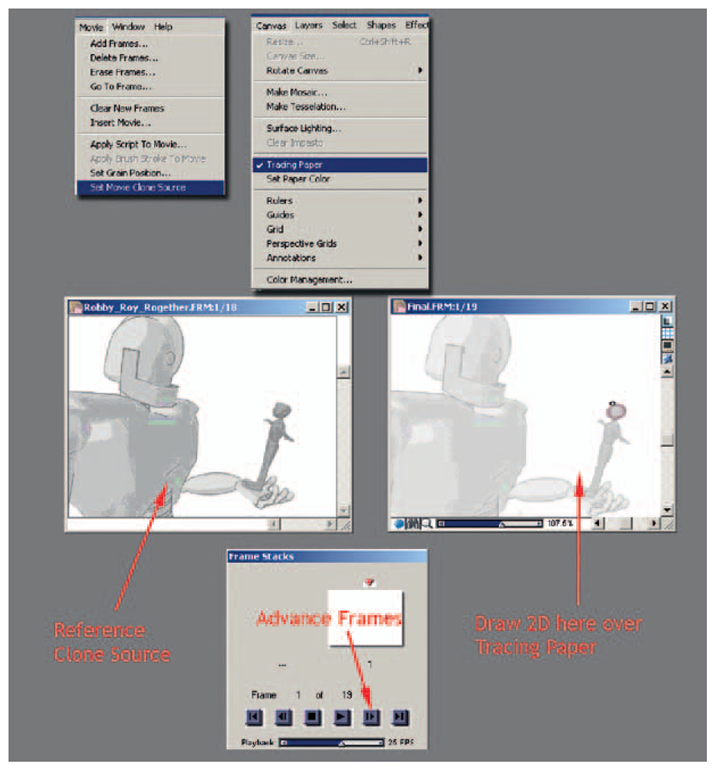
5. Select the reference movie so that it is the active window, and choose Movie > Set Movie Clone Source.
6. Select your new movie (where you will animate), and choose Canvas > Tracing Paper.
7. You can press advance frame to verify that the images have been loaded in. (Maybe play will work for you. I was only able to play back my animation.)
What about onion skinning? That was set in the dialog box when you first started the document. You can close the document and reopen it to set a new number of images to show for onion skinning.
Rendering in corel Painter
When you have completed your animation, it is time to render out the images:
1. Select File > Save As….
2. Choose Save Movie as Movie File.
3. Use the same settings that we used in Photoshop: Animation Compression and Millions of Colors.
FIGURE 3.37 Animating using Movie Clone Source as tracing paper.
FIGURE 3.38 Rendering animation from Corel Painter.
Beware: Step 3 crashes my version of Corel Painter. When you are saving your images as a QuickTime file and you experience crashes, it might be the version of QuickTime you are using that is causing issues and not necessarily the piece of software. Try a different QuickTime version, possibly even an older one. If you are on a school’s computer, where you are unable to install files, you may have to find an alternative method for saving your images.
Maya and Other Software
Of course, there are other software packages that you can use to animate in 2D. Flash might be your first choice, as it was designed as an animation package. The thing to watch is that your line looks like a hand-drawn 2D line and not like a Flash redrawn line. To do this you will have to hand massage every line that you draw by turning the lines to brushstrokes (or drawing with the brush to begin with) and adjusting the vector points to smooth out the line. Figure 3.39 shows a drawing in Flash with the points selected for adjustment. To see an online example of Flash animation, take a look at Home Star Runner at www.homestarrunner .com. All animations are created in Flash, and each drawn line is massaged (or cleaned up) to be exactly what the artists intended.
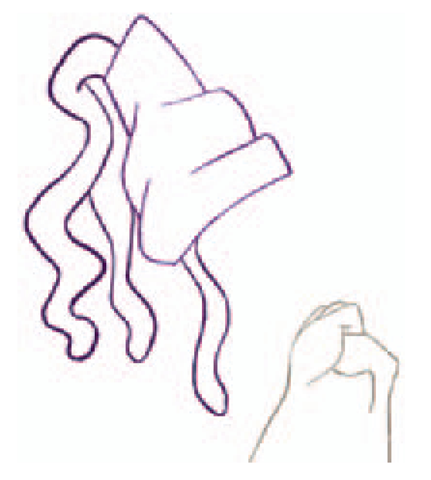
FIGURE 3.39 Drawing in Flash.
A great package that might be on the expensive side but is the industry standard in 2D digital animation is Toon Boom. We’ll take a look at drawing in Toon Boom later on in this topic.
FIGURE 3.40 Drawing in Toon Boom.
Test each software package and decide which one best gives you the style you are looking for.Give yourself time to test other software programs to come up with other looks. Otherwise you risk only knowing one pipeline/technique and coming up with a limited number of visual looks.
Putting it Together
You should have two levels ready to be composited together. If you already know how to do that, you can skip ahead to the project section of this topic. For the rest of you, we’re going to look at timeline-based compositing very quickly, just enough to get you started.
There are two types of compositing software: timeline based and node based. After Effects, Premiere, Combustion, and other products of that price point are generally timeline based. They are good for quick workings and let those with smaller budgets achieve some great results. I’m not an expert in compositing systems and why they all are different from each other; I know which ones I like to use, however. Node-based compositing systems such as Shake, Flame, and Nuke have a different way of approaching compositing. For some, they are more robust at putting together complicated shots. They are considered the high-end compositing packages, can handle larger images, and handle bit depth—oh my, I’m starting to sound like a software demo jock; no, not that. Use what you have or what gets the job done. For animation, you do not need a super-duper compositing system; this isn’t a visual effects movie we’re putting together. However, there are a few things you will want out of your compositing system for putting together animations:
1. The ability to composite one image with alpha channels over another image: A over B. (If your compositing software doesn’t have this, I hope it was free.)
2. The ability to create traveling masks to help register two images together.
3. The ability to use masks to color correct.
4. The ability to reuse artwork easily.
5. The ability to quickly render out the final product at different resolutions, for quick testing of the final results.
For this topic, we will use After Effects. You will want to bring in your two levels, Robby and Roy, and composite them together to create the final output movie.
Take Note
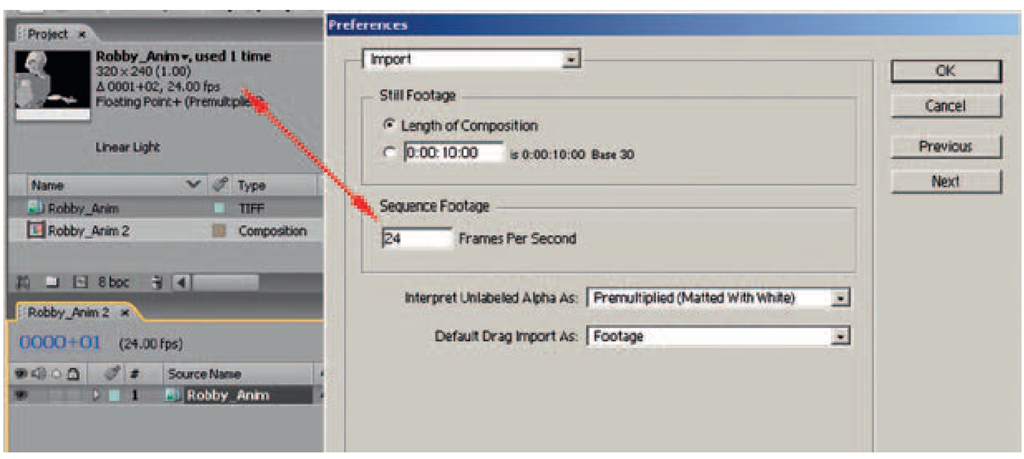
Watch out for frame rate (again). We’re working at 24 frames per second. After Effects (and most compositing software programs) default to 30 frames per second.
Set the Frame rate
Go to the menu Edit > Preferences > Import…, and set the following:
1. Select Sequence Footage > 24 Frames per Second.
2. Interpret Unlabeled Alpha As Premultipled (Matted with White).
FIGURE 3.41 Settings to ensure a proper import of animation into After Effects.
Import Images
1. Select File > Import File, and choose the robot’s images. Make sure to select .tif Sequence and Force Alphabetical Order.
Take Note
What can go wrong here? If you do not have zero padding in your numbers—image-.tif, image-2.tif, image-10.tif—your images will come in out of sequence. Eeek! Don’t do that, Batman! Instead, use zero padding in your image names: image-00001.tif, image-00002.tif, and so on.
2. Repeat step 1 for your 2D Roy images. If the files are a QuickTime movie, which they probably are, you only have to select the file. After Effects will bring it in as you expect it to.
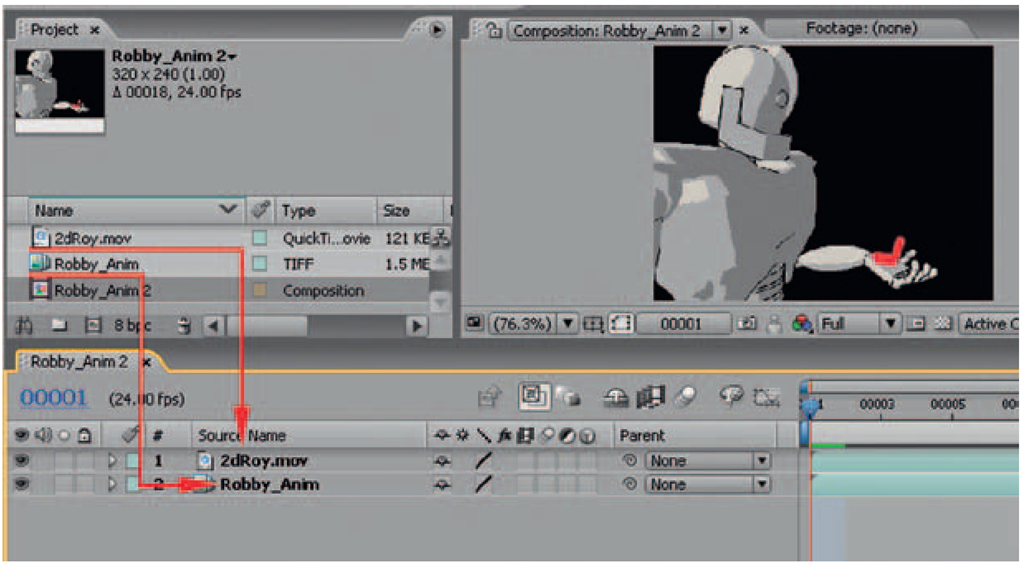
3. Drag the two image sequences into the composition area of After Effects. Drag and drop them with the Robot images on the bottom level.
FIGURE 3.42 Drag levels of animation into the composition area of After Effects.
Because of the way this project is set up, you should not have any overlap between the two characters. This means the fingers should not come in front of Roy. Well, they could. You might have animated Roy hanging on for dear life. I would. If that is the case, you need to do some matting out of Roy. There are a couple of ways to do that. We will cover the matting process in the next topic.
Render Your final movie!
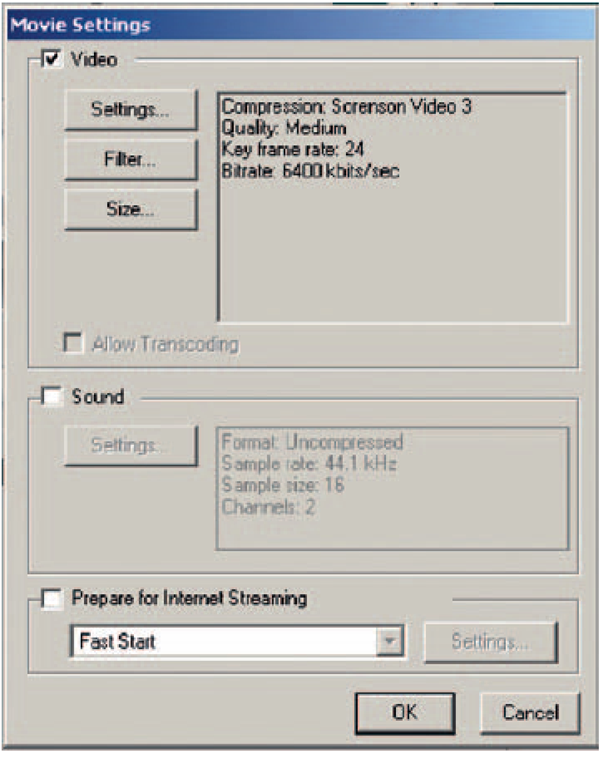
You probably guessed where to go to export out your final 2D/3D movie. Go to File > Export and choose the final file format. We’ll use QuickTime Movie. There actually is a reason for it: I can drag and scrub through the animation to better pinpoint frames to see what needs to be fixed.
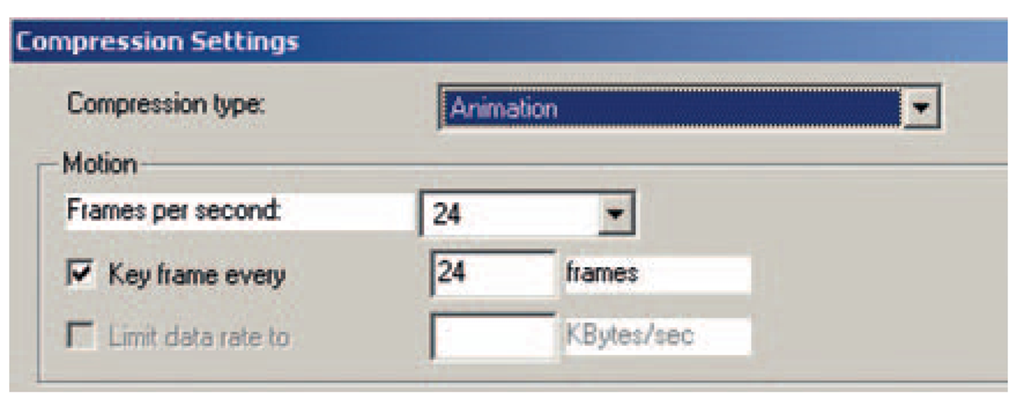
Students in my class are required to use a good compression for playback and quality when submitting homework. Sorenson 3 will give us that.
FIGURE 3.43 Compression settings for final composite.
FIGURE 3.44 Keyframes from final composite.
PROJECT: 3D LEADS 2D
For the project portion of this topic, you will use The Iron Giant as your inspiration. Create a short animation, no more than 48 frames, of the 2D character climbing into the robot’s hand and being lifted. You can assign the emotion. Is he happy? Angry? Curious?
Use the rigs from this topic: Roy and Robby.
Turn in a completed mov file of your animation. Make sure to use proper compression to keep file size at a minimum.
Things to watch for: Keep Roy leveled on top of the robot without the robot overlapping Roy. This will help you have a simple composite of A over B. We’ll get into more complicated rigging further on in other projects.
You are assessed on the following skills:
1. Technical problem solving. Were you able to get an animation pipeline working to produce a finished product?
2. Aesthetic ability. Were you able to create an appealing 2D/3D character combination?
3. Line look. Were you able to make the 3D toon line and 2D line match?
4. Registration. Were you able to eliminate wiggling at contact points of characters?
5. Animation principles. Is it worth watching? Do a test first, a very rough test, to get the technical aspects down, and then do it again. Remember, you are an animator. Have fun with it.
Images of student examples can be found on the companion website at www.hybridanimation.com.
