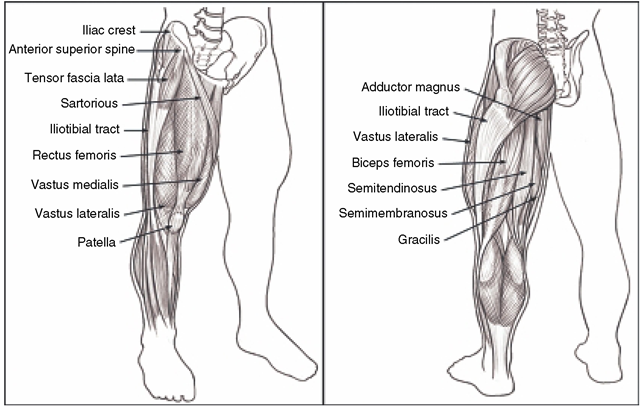
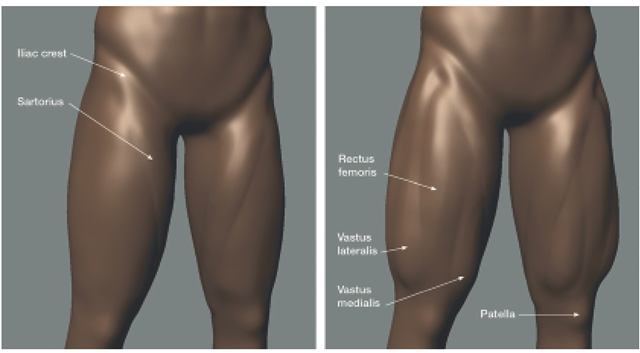
The lower limb is composed of the thigh, the leg, and the foot. In more common terms, the entire lower limb is usually referred to as the leg. Many of the muscles that form the surface anatomy of the thigh begin somewhere on the pelvis and then end at the femur, tibia, or fibula. For example, the origin of the rectus femoris muscle (the large muscle at the front of the thigh) is at the anterior spine of the iliac crest and inserts at the patella and the patellar ligament, which inserts into the tibia (Figure 4.19).
FIG 4.19 The Surface Anatomy of the Anterior Thigh Is Composed of the Sartorious, Vastus Medialis, Rectus Femoris, and the Vastus Lateralis. Most of These Muscles Originate on the Anterior Iliac Crest of the Pelvis.
The lower limb is cylindrical in shape, so many of the muscles that form the surface anatomy wrap around the thigh or leg. For instance, the huge vastus lateralis muscle wraps around from front to back, thus shaping much of the thigh. However, to keep things organized, you will sculpt anterior, lateral, posterior, and medial sections of the thigh, and anterior and posterior sections of the leg. But remember that, when sculpting, you should work on several areas almost simultaneously, constantly balancing the changes made in one area with those made in another.
The main sculpting tools you will use to build up muscle masses are Sculpt, Wax, and Bulge. The Grab tool is also useful for pulling out or repositioning masses. Remember that you may use the Freeze tool to protect certain areas while working on other areas. Always use the Smooth tool to smooth and blend shapes. An inverted Bulge tool is good for sculpting the grooves, depressions, and folds that form the separations among the muscle groups. Use the Contrast tool to further separate muscle groups and use the Pinch tool to delineate the separations between the muscle groups. Press Shift + D to subdivide the model to level 3, and create a new layer. The added geometry will make it possible to sculpt the details of the thigh, leg, and foot. However, remember to focus on sculpting the large masses created by the muscles and other anatomy of the thigh, leg, and foot, and don’t worry about small details yet.
The Anterior Thigh
The surface anatomy of the front thigh is formed by the sartorious, the vastus medialis, the rectus femoris, and the vastus lateralis (Figure 4.19). The rectus and vastus muscles are part of what is commonly referred to as the quadriceps. The fourth muscle of the quadriceps group is the vastus intermedius, but it is a deep muscle and is not part of the surface anatomy.
Start by shaping the long sartorious muscle with the Wax tool as shown in Figure 4.20. The sartorious runs diagonally originating at the anterior superior iliac spine and inserts at the medial tibia. Next, sculpt the vastus medialis with the Bulge and Wax tools on the medial aspect of the lower thigh. Between the vastus muscles is the rectus femoris. This large muscle originates at the anterior inferior iliac spine and runs down to the knee. On the outside of the thigh is the very large vastus lateralis muscle (Figure 4.20). As you sculpt the muscle groups, notice the natural masses and furrows that are formed by the muscles. It is important that these masses are shaped correctly. The best way to check the shapes is to study the figure from life, but because the creature is very muscular, try finding photos of muscular men or even body builders and study how muscles grow in response to exercise. When you are finished with sculpting the muscle groups, use the Bulge tool to rough in the patella (knee cap).
FIG 4.20 Sculpt the Sartorious as It Courses from the Anterior Pelvis to the Medial Tibia, and Then Build Up the Masses of the Rectus Femoris and Vastus Muscles.
The Lateral Thigh
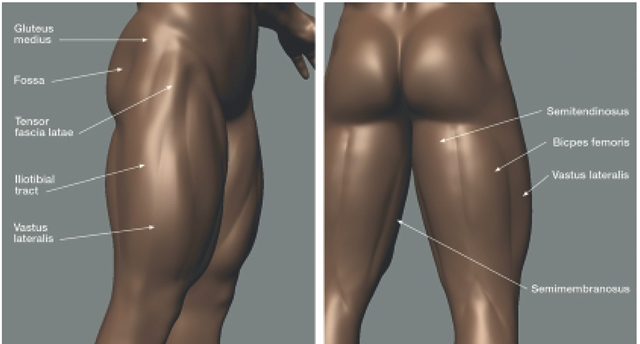
Starting at the iliac crest of the pelvis the lateral thigh is formed by tensor fascia lata muscle, its long iliotibial tract, and the lateral aspects of the gluteus medius and the gluteus maximus muscles. The massive vastus lateralis forms the bulk of the mid-to-lower lateral thigh as it wraps around from the front. Use a combination of the Wax and Bulge tools to shape the surface anatomy as in Figure 4.21. It is important to note that there is a marked fossa (dip) at the upper lateral thigh formed by the gluteus maximus, gluteus medius as they insert at the femur. Use a combination of the Wax and Bulge tools to shape the surface anatomy as in the first panel of Figure 4.21.
The Posterior Thigh
The back of the thigh may be sculpted as four groups of muscles that run along the vertical length of the thigh. The most lateral group is composed of the bulky vastus lateralis as it continues its course to the back of the thigh. The second group is made up of the biceps femoris muscle, and the third group is made up of the semitendinosus muscle. The proximal aspects of the large biceps femoris and semitendinosus muscles originate deep in the pelvis and emerge from underneath the gluteus maximus. The semitendinosus, then, courses along the medial aspect of the femur and inserts at the medial tibia while the biceps femoris runs laterally along the femur and inserts at the head of the fibula. The fourth and most medial group is composed of the semimembranosus, adductor magnus, and the gracilis muscles. Sculpt these muscle groups as shown in Figure 4.21.
FIG 4.21 Because the Thigh Is Cylindrical, Much of Its Lateral Aspects Are Composed of the Anterior Muscles. True Lateral Structures Include the Tensor Fascia Lata, Iliotibial Tract, and the Gluteus Medius. Some of the Posterior Muscles Are Also Visible from the Side.
The Anterior Leg
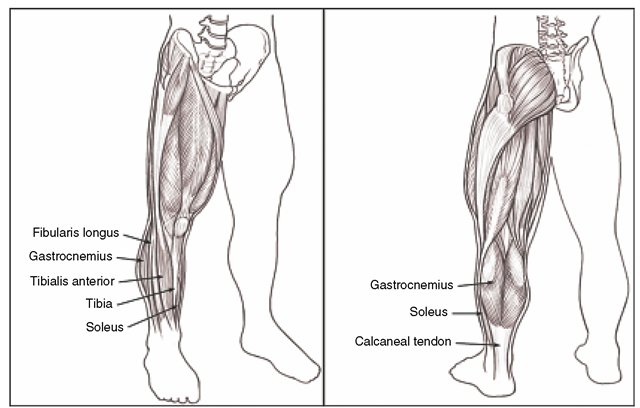
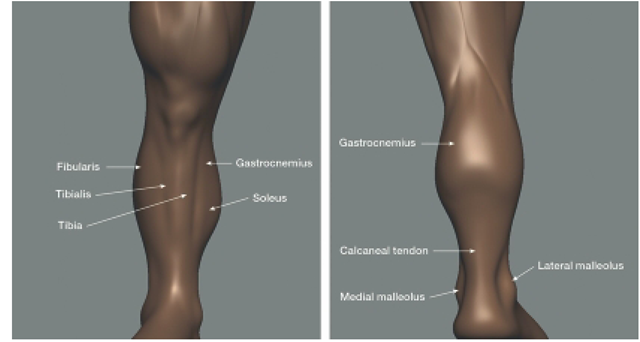
Compared with the muscular thigh, the leg looks hilariously skinny at this point, but that will change once you sculpt some of the leg muscles. The anterior leg may be sculpted as three groups of anatomical structures. The lateral group is composed of two muscles, the largest of which is the fibu-laris longus. The middle group is primarily made up of the tibialis anterior muscle and the tibia. If you touch the front of your leg, you can feel the anterior border of the tibia immediately under the skin. Finally, the gastrocnemius and soleus make up the third and most medial group (Figure 4.22).
Pull out the sides of the leg with the Grab tool to rough in the lateral and medial groups (Figure 4.23). It is important to do this when looking at the leg from the front to get the right shapes. The bulk of the lateral group should be proximal (higher up) and have a shallower curve than the medial group.
To sculpt the middle group, use the Wax tool to build up the mass created by the tibia as shown in Figure 4.23.
FIG 4.22 The Main Structures of the Leg Are the Gastrocnemius, Soleus, Tibia, and the Calcaneal Tendon.
FIG 4.23 Use the Grab, Wax, and Smooth Tools to Sculpt the Surface Anatomy of the Leg. Use the Bulge Tool to Build Up the Ankle Malleoli and Invert the Bulge to Create the Sulcus Anterior to the Calcaneal Tendon.
The Posterior Leg
In this case, the lateral and medial aspects of the leg are combined with the posterior because of its cylindrical shape and the large size of the gastrocnemius and soleus muscles. Although the soleus is a deep muscle, its bulk shapes the back of the leg. The smaller gastrocnemius, composed of medial and lateral heads, drapes over the soleus to give the back of the leg its distinctive shape. The soleus originates at the proximal tibia and fibula, while the gastrocnemius originates at the distal femur. However, both muscles form the large calcaneal tendon (Achilles tendon), which inserts at the calcaneus (heel bone). Use the Grab tool to sculpt the general shape of the posterior leg. Then, switch to the Wax and Smooth tools to build up and blend the masses of the upper leg as shown in Figure 4.23.
The Ankle
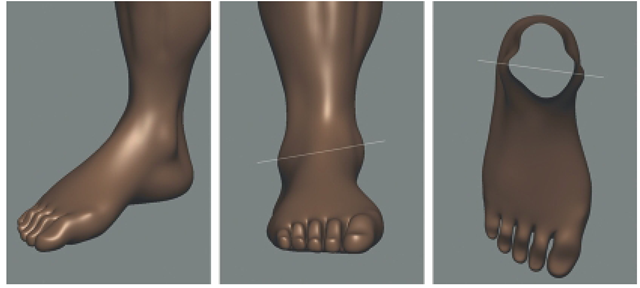
The calcaneal tendon and the distal ends of the tibia and the fibula give the ankle its familiar shape. The distal end of the fibula forms the lateral malleolus and the distal end of the tibia forms the medial malleolus. The malleoli form the bony bumps that you can feel on either side of your ankle. Also note that the medial malleolus is higher than the lateral one. Behind each of the malleoli, but in front of the calcaneal tendon, is a deep sulcus or depression. Use the Wax tool and an inverted Bulge tool to shape the ankle as in Figures 4.23 and 4.24.
The Foot
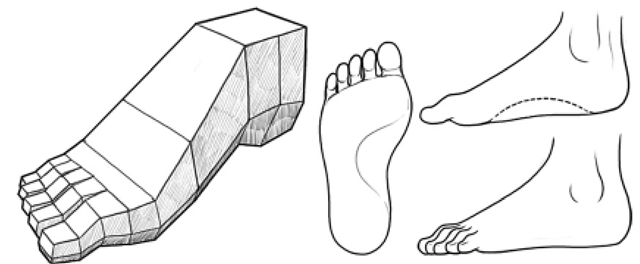
Although, at first glance, sculpting the foot may appear similar to sculpting the hand, there are significant differences. For example, because the primary function of the foot is weight bearing, it is formed around two arches: a longitudinal arch from the ball of the foot to the heel and a transverse arch at the instep (medial to lateral). These arches influence the overall shape of the foot. To get a handle on sculpting the foot and toes, they may be simplified into planes (Figure 4.24).
FIG 4.24 The Foot Is a Weight-Bearing Structure Designed around Two Arches. To Get a General Feel for the Shape of the Foot, It May Be Broken Down into Planes.
Because the model already has basic feet and toes, your task is to refine these shapes into a more detailed foot. Rotate the camera so that you can see the medial side and bottom of the foot, and using the Grab tool, push in the arch. Shape the heel, ball, and the sides of the foot as shown in Figure 4.25. Pay close attention to the appropriate shape of the sole of the foot as it seems from directly below. Notice that the heel is not as wide as the front of the foot. Check the ankle once you have roughed in the foot to make sure everything is in proportion.
Toes come in many shapes and sizes, and depending on what the foot is doing, the shape and position of the toes change. In this case, you will sculpt a generic “toe" shape. Sculpting the toes is one of those situations in which you have to quickly move from one part of the toe to another because changes in one area will influence the overall shape of the toe. Also note that the size of the sculpting tools will be set to very small size and strength values (less than 5) while shaping the toe. Rotate the camera so that you are looking at the foot from the front, and use the Grab tool to pull up on the first knuckle of each toe, then push down on the tip of each toe. Rotate so that you can see the bottom of the toes, and using the Bulge tool, add mass to each tip. Use the Grab tool to shape the bottom of each toe. When the toes are about finished, flatten the dorsal tip of each toe where the toenail will be eventually sculpted.
FIG 4.25 Use the Grab and Smooth Tools to Shape the Foot. The Toes May Be Sculpted with the Grab Tool Set to Very Small Strength Values and Refined with the Wax, Bulge, and Smooth Tools.
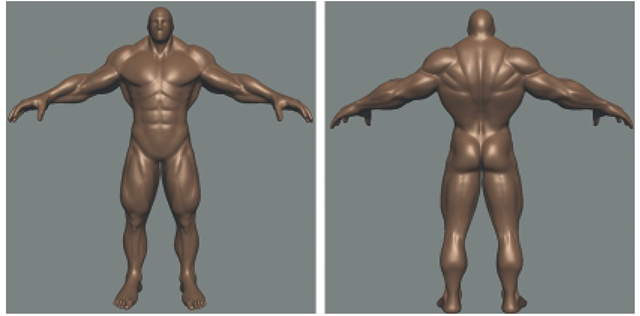
FIG 4.26 The Model Has All of the Major Muscle Groups Roughed In and the Hands and Feet Have Been Refined. Take Time to Inspect Your Work for Problems and Correct Anything You Find Before Moving on to the Next Section.
At this point, you have sculpted the general shapes and masses of the major superficial muscle groups, and you have refined the hands and feet. Your model should have a natural, recognizable physique, and look similar to the model in Figure 4.26. Take time to carefully inspect your model by looking for problem areas where the anatomy may look a bit off. A very useful technique in checking form, proportions, and anatomy is to move the scene light around the figure. Press L, left-click, and drag to move the scene light. As you move the light, the shadows cast on the surface of the figure change to reveal form and shape. This is a good time to save an incremental copy of your work. In the next section of this tutorial, you will work on the head and face and add details to refine the surface anatomy.
